Table of Contents
Advertisement
Quick Links
Operations Manual for Tach-It Mini-Con R Wipe On Labeler with
Conveyor for Bottles and Round Products.
Ben Clements and Sons, Inc. / Clements Industries, Inc.
50 Ruta Court, South Hackensack, New Jersey 07606 USA
Tel: 201-440-5500, Toll Free: 800-222-5540, Fax: 201-440-1455
Email: sales@tach-it.com, Website: www.tach-it.com
Clements Industries Japan, Clements Industries, Inc. Korea
Tach-It and Twisters are registered, copyrighted or trademarks of Clements Industries, Inc.
Copyright Ben Clements and Sons, Inc. and Clements Industries, Inc. December 2014
1
Advertisement
Table of Contents

Related Manuals for Tach-It Mini-Con R


Summary of Contents for Tach-It Mini-Con R
- Page 1 Tel: 201-440-5500, Toll Free: 800-222-5540, Fax: 201-440-1455 Email: sales@tach-it.com, Website: www.tach-it.com Clements Industries Japan, Clements Industries, Inc. Korea Tach-It and Twisters are registered, copyrighted or trademarks of Clements Industries, Inc. Copyright Ben Clements and Sons, Inc. and Clements Industries, Inc. December 2014...
-
Page 2: Table Of Contents
Section #4 Loading of the Labels:———————————————————————Page 5 Section #5 Operation of the Touch Panel Controller:————————————————Page 7 Section #6 Operation of the Tach-It Mini-Con Labeler:———————————————Page 9 Section #7 Adjustment to the Sensitivity of the Stop Sensor:————————————–-Page 10 Section #8 Trouble Shooting:————————————————————————---Page 11... -
Page 3: Section #1 Caution
SECTION #1 CAUTION: Before operating the machine, read the complete operator manual. Never have the power on this machine plugged into the power supply when any of the covers of the machine have been removed. Install and operate this machine only on a flat, level and dry surface. ... -
Page 4: Section #3 Set Up Of The Machine
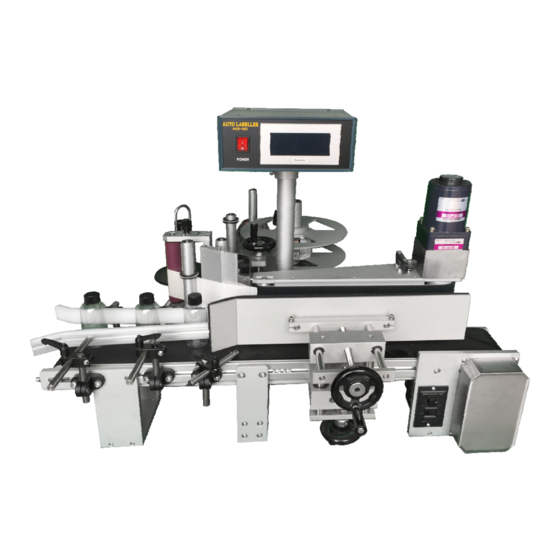
SECTION #3 SET UP OF THE MACHINE: Please Identify, confirm and check each of the below main components of the Mini-Con Labeller. Main Label Head Controller Conveyor Figure #1 Label Head Height Adjustment Knob Vertical Conveyor Motor Control and Power Switch-Not shown Vertical Conveyor Motor Product Rails... -
Page 5: Section #4 Loading Of The Labels
SECTION #4 LOADING OF LABELS: Note: In order to ensure consistent label placement onto the product, during the Label Load- ing process, the labels must be straight and the same distant from the body of the Main Label Head throughout the entire Label Feeding Path. Many of the Rollers that are along the Label Feed Path have Spring Collars which should be used to assist in keeping the labels straight. - Page 6 SECTION #4 LOADING OF LABELS CONTINUED: 3) Verifying that the labels are feeding off the bottom of the roll, take the leading edge of the labels and bring it over A-10 Tension Roller and then in between Roller #3 and the Urethane Wiper. There is a thumb screw that will allow the Urethane Wiper to swivel.
-
Page 7: Section #5 Operation Of The Touch Panel Controller
SECTION #5 OPERATION OF THE TOUCH PANEL CONTROLLER: The Touch Panel Controller (B) for the Tach-It Mini-Con R allows for full control of all functions of the labeler. Please note that if at any time the screen of the Touch Panel Controller turns Red, there has been an error with the labeler and it must be resolved prior to resuming work. - Page 8 SECTION #5 OPERATION OF THE TOUCH PANEL CONTROLLER CONTINUED: Figure #9 Using the Labeler Sub Menu: 1) From the Home Screen touch where is says Labeller and Figure #9 will appear. 2) To change the value of either the Start Delay or 2 Label Delay, touch the box which will be showing the present set value.
-
Page 9: Section #6 Operation Of The Tach-It Mini-Con Labeler
1) Place the Mini-Con R Labeler on a flat dry work surface near the proper voltage electric outlet. 2) Set up the Mini-Con R Labeler and load the labels into the Labeler per the instructions in Sections 3 & 4 of this manual. -
Page 10: Section #7 Adjustment To The Sensitivity Of The Stop Sensor
SECTION #6 OPERATION OF THE TACH-IT MINI-CON LABELER CONTINUED: 7) If any adjustments need to made to the labeller, make the necessary adjustments. 8) The labeller is now ready for use. SECTION #7 ADJUSTMENT TO THE SENSITIVITY OF THE STOP SENSOR (A-3): The Stop Sensor (A-3) used on this machine is designed to read the gap (die cut) between the labels. -
Page 11: Section #8 Trouble Shooting
SECTION #8 TROUBLE SHOOTING:... -
Page 12: Section #9 Parts Identification
SECTION #9 PARTS LIST:...
Need help?
Do you have a question about the Mini-Con R and is the answer not in the manual?
Questions and answers