Table of Contents
Advertisement
Quick Links
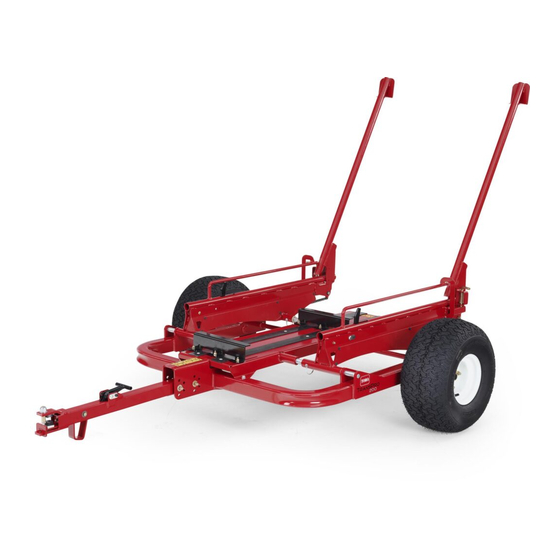
TransPro™ 200 Tow-Behind Trailer
Model No. 04219—Serial No. 400000000 and Up
Model No. 04229—Serial No. 400000000 and Up
Model No. 04239—Serial No. 400000000 and Up
Safety
•
The TransPro 200 trailer is intended for use with
walk-behind Greensmaster machines only. Towing
incompatible products can result in damage to
the trailer and/or injury to the operator. Refer to
Compatible Machines (page 9)
of compatible machines.
•
Use only a vehicle with the proper tow rating. The
TransPro 200 trailer and 2 greens mowers weigh
approximately 1,150 lb (522 kg). Ensure that the
tow vehicle has adequate braking and handling
capacity by checking the recommendations of the
vehicle manufacturer
•
Ensure that the trailer is properly connected to the
tow vehicle before loading or unloading the greens
mowers to prevent sudden unintended tongue
movement or flip-up. The trailer tongue should be
parallel to the ground when you align it with the
tow vehicle hitch.
•
The trailer adds extra towing weight to the vehicle.
Drive the vehicle safely.
– Do not drive the machine on highways or public
roads.
– Always slow the tow vehicle when approaching
and while making a turn.
– Always slow the tow vehicle when driving in
unfamiliar areas or over rough terrain.
– Always slow the tow vehicle when changing
the direction of travel or preparing to stop.
– Always slow the tow vehicle when turning or
driving on slopes.
– Do not make sudden or sharp turns. Do not
suddenly change direction of travel on an
incline, ramp, grade, slope, or similar surface.
– The maximum towing speed is 15 mph (24
km/h). Always adjust the tow-vehicle speed to
allow for existing ground conditions, such as
wet slick surfaces, loose sand or gravel and/or
low visibility conditions, such as dim or bright
lighting, fog, mist, or rain.
– Be especially careful when driving a heavily
loaded vehicle down an incline or slope. Drive
© 2021— The Toro® Company
8111 Lyndale Avenue South
Bloomington, MN 55420
•
for a complete list
•
•
•
•
•
•
Register at www.Toro.com.
Installation Instructions
the vehicle up and down the face of the slopes,
inclines, or grades whenever possible. Do not
drive across the face of a slope if at all possible.
There is a risk of upsetting the vehicle, which
can result in serious injury or death.
Before backing up, look behind you and ensure
that it is clear of people and objects. Back up
slowly and watch the trailer movement closely.
Use extreme caution and slow speed when
backing up the trailer and tow vehicle.
Watch out for traffic when near or crossing roads.
Always yield the right of way to pedestrians and
other vehicles.
If the trailer begins to vibrate abnormally, stop the
tow vehicle immediately. Shut off the tow-vehicle
engine. Repair all damage before towing.
Before servicing or making any adjustments to the
trailer, do the following:
– Stop the tow vehicle and engage the parking
brake.
– Shut off the tow-vehicle engine and remove
the key.
While the trailer is disconnected from tow vehicle:
– Store the trailer on level ground.
– Chock the wheels to prevent the trailer from
moving.
Keep all fasteners tightened securely. Replace
any parts removed when servicing or making
adjustments.
Original Instructions (EN)
Printed in the USA
All Rights Reserved
Form No. 3446-733 Rev A
*3446-733*
Advertisement
Table of Contents

Related Manuals for Toro TransPro 200


Summary of Contents for Toro TransPro 200
- Page 1 Do not • The TransPro 200 trailer is intended for use with drive across the face of a slope if at all possible. walk-behind Greensmaster machines only. Towing...
-
Page 2: Safety And Instructional Decals
Safety and Instructional Decals Safety decals and instructions are easily visible to the operator and are located near any area of potential danger. Replace any decal that is damaged or missing. Installation decal133-8061 133-8061 Assembling the Appropriate Configuration You can install one of the following kits per your desired configuration: •... - Page 3 g341266 Figure 4 1. Chain-link turnbuckle 3. Wheel stop g340445 2. Chain link Figure 2 1. Hex-head screw 3. Wheel stop Connect the spring to the wheel stop and bolt 2. Pin inside of the rail assembly (Figure Use a chain link to install the chain to the chain turnbuckle (Figure g341267...
- Page 4 g340144 g348131 Figure 6 Figure 7 1. Flange nut (5/16 inch) 3. Shoulder bolt 1. Ramp assembly 3. Chain 2. Washers 4. Rail assembly 2. Chain link Use 10 hex-head screws to secure the chain Use a chain link to connect the chain to the ramp covers to the ramp assemblies (Figure assembly...
- Page 5 Assembling the Wheel-Loading Kit Note: Perform the following steps to assemble the left- and right-sided wheel ramps. The following illustrations show the right side of the wheel-loading kit. Use 4 torx-head screws and 4 nuts (5/16 inch) to secure the latch-pin bracket to the guide plate on the ramp assembly (Figure g345954...
- Page 6 g341296 Figure 14 1. Chain-link turnbuckle 3. Wheel stop 2. Chain link Connect the spring to the wheel stop and the ramp bottom (Figure 15). g340442 Figure 12 1. Wheel stop 3. Flag pin 2. Hex-head screw Use a chain link to install the chain to the chain turnbuckle (Figure 13).
- Page 7 Assembling the Trailer Installing the Support Rods to the Main Frame Position the center support on the main frame as shown in Figure g338068 Figure 18 1. Center support 2. Main frame Have an assistant hold the wheel kit or rail kit and center support in-place while installing the g348127 support rods through the holes in the kit, center...
-
Page 8: Installing The Wheels
Securing the Center Support to Installing the Roller Mounts to the the Main Frame Center Support Use 2 screws (3/8 inch) to secure the center support Use 6 carriage bolts and 6 flange nuts (5/16 inch) to to the main frame (Figure 20). -
Page 9: Operation
Figure 23 • Greensmaster Flex 1800/2100 series (including 1. Locknut 3. Trailer tongue eFlex) 2. Washer 4. Bolt (7/16 inch) • Greensmaster 800/1000 series Contact your authorized Toro distributor for more Torque the hardware to 95 N∙m (70 ft-lb). information. - Page 10 Configuring the Trailer Width Note: Greens mowers with a width larger than 21 inches (e.g., Greensmaster 1026) cannot be loaded on the trailer. • Configuring the trailer for 18-inch greens mowers: Use the pins to secure the rail pivots to the inside holes (Figure 24).
- Page 11 • Configuring the trailer for 21-inch greens mowers: Use the pins to secure the rail pivots to the outside holes (Figure 25). g341333 Figure 25...
-
Page 12: Loading The Trailer
Securing the Trailer to the Loading the Trailer Tow Vehicle Preparing the Load the Trailer Lift up the tongue handle (Figure 26). Chock the trailer wheels. Note: Lifting the handle retracts the slide Pull the latch pins on both sides of the trailer to assembly. - Page 13 g261683 Figure 29 1. Hex shaft 3. Rail wheel 2. Clip • Wheel Kit: Install the transport wheels onto g338779 Figure 30 the hex shafts; refer to your traction unit Operator’s Manual. Wheel Kit equipped 1. Front roller 3. Wheel stop Loading a Machine on the Trailer 2.
- Page 14 mount in place; refer to Checking the Torque of the Roller-Mount Fasteners (page 15). Move the front machine back until the transport wheels or rail wheels contact the raised wheel stops. Slide back the front roller mount (Figure 31) until it contacts the front-machine front roller.
-
Page 15: Maintenance
Use a jack to raise the trailer and place jack stands under the trailer. Check each wheel for excessive freeplay (i.e., free movement of the tire and hub assembly). If you detect excessive freeplay, contact to your authorized Toro distributor. -
Page 16: Checking The Torque Of The Wheel Lug Nuts
Checking the Torque of the Checking the Stop Gap Wheel Lug Nuts Rail-Loading Kit Only Service Interval: After the first 10 hours Service Interval: Yearly Torque specification: 108 N⋅m (80 ft-lb) With the ramps secured in the raised position, check the gap measurement between the stop and bottom Check the torque of the wheel lug nuts each time of the rail. - Page 17 Notes:...
- Page 18 The Toro Company (“Toro”) respects your privacy. When you purchase our products, we may collect certain personal information about you, either directly from you or through your local Toro company or dealer. Toro uses this information to fulfil contractual obligations - such as to register your warranty, process your warranty claim or to contact you in the event of a product recall - and for legitimate business purposes - such as to gauge customer satisfaction, improve our products or provide you with product information which may be of interest.
- Page 19 Countries Other than the United States or Canada Customers who have purchased Toro products exported from the United States or Canada should contact their Toro Distributor (Dealer) to obtain guarantee policies for your country, province, or state. If for any reason you are dissatisfied with your Distributor's service or have difficulty obtaining guarantee information, contact your Authorized Toro Service Center.
- Page 20 While the exposure from Toro products may be negligible or well within the “no significant risk” range, out of an abundance of caution, Toro has elected to provide the Prop 65 warnings. Moreover, if Toro does not provide these warnings, it could be sued by the State of California or by private parties seeking to enforce Prop 65 and subject to substantial penalties.
Need help?
Do you have a question about the TransPro 200 and is the answer not in the manual?
Questions and answers