
Related Manuals for Timeguard IRRDALI


Summary of Contents for Timeguard IRRDALI
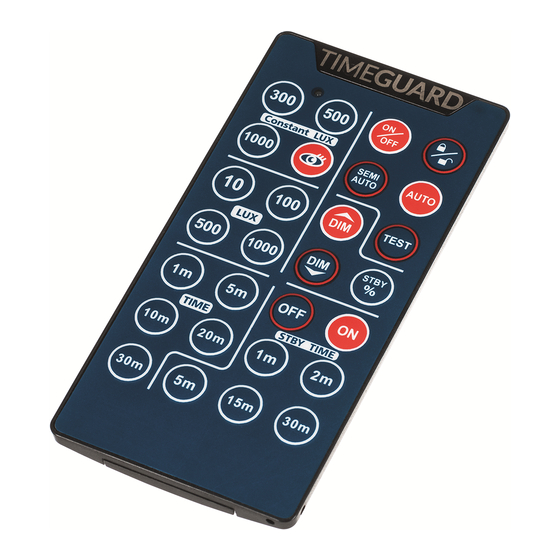
- Page 1 All manuals and user guides at all-guides.com Infra-Red DALI Remote Control Model: IRRDALI...
-
Page 2: General Information
These instructions should be read carefully and retained for further reference and maintenance. The IRRDALI infra-red DALI remote control is designed to be used with the Timeguard IR DALI Presence detector models PDSMDALI, PDSMCDALI, PDFMDALI and PDFMCDALI. 2. Safety • Do not drop, knock or shake the product as rough handling may damage the electronics and void the warranty. -
Page 3: Technical Specifications
All manuals and user guides at all-guides.com 3. Technical Specifications • Rated voltage : 3V DC • Replaceable battery: CR2032 Battery • Protection class: Class III • Transmission range: >5m • Transmission angle: 30° • Time ON adjustment: 1m to 30m •... - Page 4 All manuals and user guides at all-guides.com 4. Setting with Remote Control 4.1 Lock/Unlock • Press this button to LOCK or UNLOCK the sensor IR receiver. • The sensor LED indicator will remain ON for 2 seconds for LOCK status, and flash for 2 seconds for UNLOCK status.
- Page 5 All manuals and user guides at all-guides.com • The sensor LED indicator will flash twice in response to each signal of the remote control; The load will respond according to the setting. Within 30 seconds of the last button press, the sensor will remain on for 2 seconds, and the sensor IR receiver will automatically LOCK.
- Page 6 All manuals and user guides at all-guides.com 4.4 Constant Lux Setting • Press this button to adjust the constant Lux light level setting of; 300 Lux 500 Lux 1000 Lux Teach-in 4.5 Standby % • Press the Standby button, and then use the DIM UP/DIM DOWN buttons to change the standby light level setting from minimum 0% to a maximum of 60%.
- Page 7 All manuals and user guides at all-guides.com • OFF = Standby function deactivated. • ON = Standby permanently set to ON, yet subject to the LUX setting. 4.7 Auto Mode • Press this button to return to Auto Mode. 4.8 Test Mode •...
- Page 8 All manuals and user guides at all-guides.com 4.10 ON/OFF Mode • Press this button to enter 10hr-ON mode or 10hr-OFF mode (the load will remain ON or OFF for 10 hours). • The Auto Mode will resume after the 10 hour delay time is over. •...
-
Page 9: Battery Replacement
All manuals and user guides at all-guides.com 4.12 Semi-auto Mode • Press this button to enter Semi-Auto Mode. • An initial manual-on input is required to turn ON the connected load. After that the sensor will operate as under Auto Mode, and will return to Semi-Auto Mode after the delay time ends and the load turns OFF. -
Page 10: Year Guarantee
020 8450 0515. Note: A proof of purchase is required in all cases. For all eligible replacements (where agreed by Timeguard) the customer is responsible for all shipping/postage charges outside of the UK. All shipping costs are to be paid in advance before... - Page 11 All manuals and user guides at all-guides.com...
- Page 12 All manuals and user guides at all-guides.com If you experience problems, do not immediately return the unit to the store. Telephone the Timeguard Customer Helpline: HELPLINE 020 8450 0515 or email helpline @ timeguard.com Qualified Customer Support Coordinators will be online to assist in resolving your query.
Need help?
Do you have a question about the IRRDALI and is the answer not in the manual?
Questions and answers