
Subscribe to Our Youtube Channel
Related Manuals for Crow FW2-SIREN2EXT-8/9F


Summary of Contents for Crow FW2-SIREN2EXT-8/9F
- Page 1 FW2 Siren System Installation Guide For RUNNER 2 and SERENITY FW2-SIREN2EXT -8/9F FW2-SIREN2CP -8/9F P/N 7102866_A May 2013...
- Page 2 Crow Engineering Ltd. or other Trade Mark owners. The name of Crow Engineering Ltd. or the Crow Engineering Ltd. logo may not be used in any way, including in advertising or publicity pertaining to distribution of materials in this document, without prior written permission.
-
Page 3: Table Of Contents
Contents INTRODUCTION ........................2 ENERAL ESCRIPTION ......................FW2 S RUNNER 2 ............2 IREN NTRODUCTION TO IREN ESCRIPTION ......................FW2 S RUNNER 2 ETTING THE IREN FOR CONFIGURATION ..........STEP 1: FW2-TRANSCEIVER – L & O EARNING PERATING ODE FOR RUNNER 2 ONLY ........................ -
Page 4: Introduction
FW2 Siren Introduction to RUNNER2 RUNNER 2 contains The FW2-TRANS which is an advanced product that adds support 2way wireless devices for the "CROW-RUNNER 2" alarm systems. FW2-TRANS include integrated RF transceiver and an interface with the runner BUS system. -
Page 5: Siren Unit Description
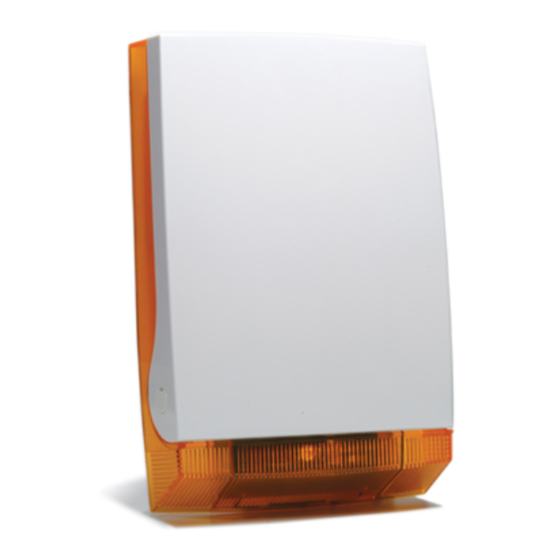
- User Guide Siren Unit Description Powered by non rechargeable battery Lithium 3.6V/14Ah or 12V DC or both ,in this case the Battery use as backup. Alarm signal will activate the Piezo Siren and the Power LED. The Alarm can be reset by the user by using the Control Panel keypads in case that itʹs not reset the time out 2min/15min according Jumper D selection –see Table 1. Arm/Disarm Indication by Beeps/ Flash (Jumper selection)‐See Table 1 Battery test generate every 4 hours. Low Battery Indication by Beeps/Flash (Depends on Jumper Selection of B&C)‐ See Table 1. Tamper protected (Cover and Back tamper). Signal transmitted to Transceiver: Synchronization, Acknowledge, Tamper and Low battery. The Siren can be assigned to Area A or Area B by jumper selection –See Table 1 Setting the FW2 Siren for RUNNER 2 configuration STEP 1: FW2-TRANSCEIVER – Learning & Operating Mode for RUNNER 2 only It is most recommended to perform factory default before first operation;... -
Page 6: Physical Description
- User Guide Physical Description STEP 2: Setting the Siren Configuration Mode Figure 2: Siren Description Diagram The Siren unit can be powered by Lithium Battery 3.6V/14Ah or by external power supply 12V/0.8A or both, in case of both the battery use as backup. NOTE: refer to table 1 for Jumpers set-up on the next page ... - Page 7 - User Guide Table 1: Jumpers set-up. Siren's Jumper's MODE SET-UP Jumper No. Function if = O (Open) Function if =1 (Close) Not in used for RUNNER 2 and SERENITY control panels Flashes appear with ARM/Disarm Arm: 2 Flashes (@LOW BAT 3+3 NO Flashes with ARM/Disarm Flashes) Disarm: 1 Flash (@LOW BAT 2...
-
Page 8: Step 3 : Learning The Sirens
- User Guide STEP 3 : Learning the Sirens Up to 8 Siren units can be activated by single Transceiver. In BUS Mode, these Sirens can be divided to two groups (A&B) for activating their Sirens (by receiving two separate activation controls). Instruction Description Place the Siren Units on a flat To verify back tamper is closed. surface Connect Piezo Siren cable Connect battery cable The Siren will beep once and then the LED power will ... -
Page 9: Setting The Fw2 Siren For Serenity Configuration
- User Guide Setting the FW2 Siren for SERENITY configuration Siren (output) Learning process in Serenity ‐ Up to 8 Sirens can be enrolling into Serenity. The next pages will describe how to configure and learn the FW2 Siren with Serenity C.P. Recommendation: Before you begin the learning process, perform factory defaults on the Siren you wish to learn by pressing on learning button while connecting the battery and hold the button until, the Siren will create a fast blinking for 5 seconds followed 30 second of slow blinking (Battery Passivation). Setting the FW2 Siren configuration Figure 3: Siren Description Diagram NOTE: refer to table 2 for Jumpers set-up on the next page Table 2 : Jumpers set-up. -
Page 10: Learn The Fw2 Siren With Serenity C.p
- User Guide Siren's Jumper's MODE SET-UP Jumper No. Function if = O (Open) Function if =1 (Close) Not in used for RUNNER 2 and SERENITY control panels Flashes appear with ARM/Disarm Arm: 2 Flashes (@LOW BAT 3+3 NO Flashes with ARM/Disarm Flashes) Disarm: 1 Flash (@LOW BAT 2 Flashes) - Page 11 - User Guide Option 2: Using FW2 Serial Number ID via installer mode : Step 1: Verify the FW2 Siren ID serial number which appears on the barcode sticker on FW2 Siren board Step 2: Enter to Installer mode P000000E‐> Enter P64‐> ʹLearn radio output’. Step 3: Use the +, ‐ keys to Select the required output number Step 4: Use the keypad to enter the serial number of the FW2‐ Siren ‐> Press the Enter key and Exit from installer mode. Step 5: Press on the learning button (Siren) ‐> the Siren led will blink, for 3 sec to indicate that the FW2‐Siren was learned. Step 6: To test functionality of the serenity after learning refer to ʺfunction testing after FW2 Siren learningʺ page 10 Option 3: Using FW2 Serial Number ID via Easy Serenity PC application : Step 1: Run and login to Easy Serenity application ‐> go to ʺchange configurationʺ‐> ...
-
Page 12: Function Testing After Fw2 Siren Learning
- User Guide Function Testing after FW2 Siren learning. After the learning is completed and before the installation, verify that the Siren Units are functioning as defined. Step 1: From SERENITY LCD display press on the output control button Step 2: Select the learned output number and press the Enter Key alternately ON/OFF to activate and deactivate the output and verify Sirenʹs led is start flashing and stopped. Step 3: Create an open tamper state alarm from the serenity, verify that the Serenity generates tamper alarm massage on the LCD display, and move to next screens to verify the output number, see examples below and at the end of the test press the user code to reset the tamper alarm ... -
Page 13: Installation Instructions
Installation Instructions Installing the Transceiver 1. Choose a central location for the installation of the Transceiver to insure radio coverage to all the Siren Units. Open the Screw (See Figure‐6) and open the cover. 3. Place the unit on the installation surface and mark out the four screw holes. 4. Use a 6 mm bit to drill the holes. Figure 5: Transceiver Unit Figure 6: Transceiver Installation 5. -
Page 14: Installing The Siren Units
- User Guide Installing the Siren Units A Transceiver can control up to 8 Sirens. It is recommended that the units be installed on a flat surface in a prominent location. To install the Siren in each location: 1. Choose a location for each one for the installation of each Siren units. Make sure that there is Radio coverage to this location from the Transceiver. Place the Siren Units high enough off the ground in order to make them inaccessible to passers‐by and well within the wireless range of the cluster Transceiver 2. Remove the two pivot screws that secure the Siren cover. Figure 7: Siren Unit 3. Remove the Siren cover. 4. Place the unit on the installation surface and mark out the four screw holes. ... - Page 15 - User Guide 5. Use a 8 mm bit to drill the holes Battery Address Jumpers 12 Volt Connector PIEZO Siren Connector Battery Connector Figure 4: Open Siren Unit 6. Fix the unit onto the installation surface. 7. Ensure that the Piezo Siren is connected to the Piezo connector (as shown below). ...
-
Page 16: Maintenance14
Maintenance Low Battery Indication The battery is tested every 4 hours and after power‐up. When the Siren battery is low more beeps are added to the ARM/Disarm beeps in order to indicate the LOW BAT condition of the Siren unit. When Arming the Siren there are 3 beeps, short pause and another 3 beeps instead of two beeps and when Disarming the Siren there will be 3 beeps instead of one. This Low Battery indicationʹs beeps and flashes will be ʺonʺ no matter what the status of Mode Jumpers B and C. In Bus Mode the Low Battery status will be reported to the Control Panel via the BUS and will be indicated as Deviceʹs Low Bat Alarm. Changing the Siren Battery To change the Siren battery: Remove the two pivot screws as shown in Figure on page 4. Disconnect the Power Supply and replace the battery by fresh one. Verify Low Bat restored and then connect the Power supply. Note: The battery shall be Installed/replaced by service man The Siren will beep once and then the LED power will blink for a period of 30 seconds, please wait to the end of the blinking before activating or learning. - Page 17 - User Guide Note: Output must be erased in the serenity too. Command syntax : P000000EP64Ego to Delete radio output level ...
-
Page 18: Specification: Siren Unit
- User Guide Specification: Siren Unit FW2-Siren Specification (External Unit) Value Sound Pressure Level More than 102dB Siren Tone Yelp Frequency Range 2700 ±500 Hz Power LED (90 Lumens) Flash Light Power Supply Voltage 9V÷15V DC or Battery 3.6V /14Ah Lithium or both. Current consumption Standby: 110uA ±10uA@ Battery operation 20mA±2mA@12V DC operation.. -
Page 19: Specification: Transceiver Unit
- User Guide Specification: Transceiver Unit Transceiver Specification (Remote) Value Power Supply 9V-14V DC Current Consumption Receive:30mA±5mA Transmit:40mA±5mA < 14dBm Transmit power Operating temperature range C to +55 Ambient temperature, storage C to +70 Inputs IN-1: Trigger Alarm. IN-2: Trigger Key Arm/Disarm BUS Connection via Fast Connection or Terminals Outputs Tamper Out Terminals ,...
Need help?
Do you have a question about the FW2-SIREN2EXT-8/9F and is the answer not in the manual?
Questions and answers