Advertisement
Quick Links
KIT CONTENTS
2.
1.
6.
8.
7.
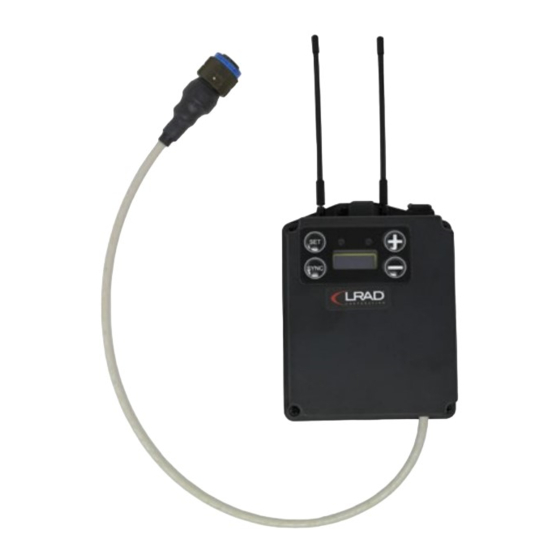
1. Wireless Receiver
6. AUX Cable (3.5 mm Audio Cable)
2. Wireless Transmitter
7. USB Cable
3. Headworn Microphone
8. Wireless Microphone Package Manual
4. MP3 Player
9. MP3 Player Instruction Manual
5. Belt Pouch
10. LRAD Wireless Kit User Manual
GETTING STARTED – BASIC USE
A
1.
Ensure that the Volume is Set to Minimum: Turn the Transmitter's Volume Control Knob counter-clockwise prior to turning anything on (A).
2.
Turn on Receiver and LRAD: Depending on the wireless kit and LRAD model being used, this will require turning on a Power Switch located on either
the LRAD or the Receiver (B).
3.
Turn on the Transmitter: Press and hold the Transmitter's Power Button (C).
4.
Connect the Transmitter and the Receiver: Ensure that the transmitter's channel matches that of the receiver.
5.
Broadcast Audio through the Wireless Kit and LRAD: Adjust the Transmitter's Volume Control Knob to reach the desired level (D).
Broadcast Spoken Audio: Press and hold the Push to Talk (PTT) Button and speak directly into the headworn microphone (E).
For continuous, hands-free transmission of spoken audio, pull the Locking Latch down onto the PTT button (F).
Broadcast a Pre-recorded Alert Tone: Press the Alert Tone Button (G).
Broadcast Audio from an External Audio Device: Initiate playback of audio on external audio device.
6.
Power Down: First turn off the Transmitter by holding the Power Button, and then turn off the Receiver and the LRAD using the Power Switch.
1 (858) 676-1112
|
LRAD WIRELESS KIT
QUICK INSTALL GUIDE
4.
3.
5.
9.
10.
B
www.genasys.com
|
info@genasys.com
SETUP & CONNECTIONS
A.
Connect receiver to LRAD. Connect audio cable from receiver to audio input connector on LRAD.
B.
Attach receiver to LRAD using head unit mounting clip, located on top of the LRAD.
C.
Connect headworn microphone to transmitter. Insert microphone cable into MIC audio input
connector.
AND/OR
D.
Connect transmitter to external audio source (ex. MP3 player) using AUX cable. Insert one end of
the AUX cable into external audio device and the other end into AUX input connector.
C
D
|
P/N 119513-00 Rev. 03 |
F
E
Adjust volume carefully. Feedback can occur if
microphone is near the LRAD while operating at
high volume.
PTT Button does not need to be pressed to play
alert tone or audio from external audio device.
Audio from MIC and AUX inputs are mixed and
will broadcast simultaneously if audio is coming
from both inputs.
Never carry devices by the antenna or cable.
For more information consult the LRAD
Wireless Kit User Manual.
Copyright © 2021 Genasys Inc.
G
Advertisement

Related Manuals for GENASYS LRAD


Summary of Contents for GENASYS LRAD
- Page 1 Adjust volume carefully. Feedback can occur if Turn on Receiver and LRAD: Depending on the wireless kit and LRAD model being used, this will require turning on a Power Switch located on either microphone is near the LRAD while operating at the LRAD or the Receiver (B).
- Page 2 Power Level – H • Lithium batteries **Charging is not possible with alkaline or lithium batteries, or if Above settings required to effectively use LRAD speaker at the rechargeable batteries have deteriorated. See LRAD Wireless Kit User Manual or Wireless maximum volume.
Need help?
Do you have a question about the LRAD and is the answer not in the manual?
Questions and answers