
Related Manuals for GENASYS LRAD


Summary of Contents for GENASYS LRAD
- Page 1 LRAD WIRELESS KIT GENASYS INC. LRAD WIRELESS KIT USER MANUAL 16262 West Bernardo Drive San Diego, CA 92127 www.genasys.com Manual Part No.: 119514-00 Rev. 03 Revised April 2021 CAGE: 1K3W7 Copyright, 2021, Genasys Inc.
-
Page 3: Table Of Contents
Figure 4: Radio Completely Removed from Housing ..............8 Figure 5: Wireless Receiver ......................9 Figure 6: Setup on LRAD-100X ...................... 10 Figure 7: Transmitter Partially in Belt Pouch ................11 Figure 8: Transmitter Completely in Belt Pouch ................11 Figure 9: Channel Group ....................... -
Page 4: Safety Information
• Do not bend, twist, or pinch cables, especially at connection points. • Make sure all cable connection ports are kept clean and clear of debris. • Only use Wireless Kit with Genasys products. • Only use attachments/accessories specified by Genasys. -
Page 5: Introduction
GENASYS INC. 2.0 Introduction The LRAD Wireless Kit is a Genasys product that allows users to remotely operate their Long Range Acoustic Device (LRAD). Users of the Wireless Kit can position themselves up to 200 meters from their LRAD, dramatically increasing both range and safety. This adds a heightened level of flexibility, allowing users to broadcast communications from locations that would otherwise be inaccessible or dangerous. -
Page 6: Parts Lists
LRAD WIRELESS KIT GENASYS INC. 3.0 Parts Lists The following table shows the items that are included in the standard Wireless Kit: Table 2: Wireless Kit Parts List Part Number Item Description Image 119512-00 RECEIVER ASSY, WIRELESS, FOR (CU) URXP40_14, WATERPROOF, DOME... - Page 7 MP3 player packing) N/A (part of AUX CABLE (3.5 MM AUDIO CABLE) MP3 player packing) 119514-00 MANUAL, PRINTED, LAMINATED, LRAD WIRELESS KIT, SONY UWP SERIES 119513-00 QUICK INSTALL GUIDE, WIRELESS KIT, SONY UWP SERIES, PRINTED, LAMINATED N/A (part of MANUAL, SONY WIRELESS...
-
Page 8: System Details
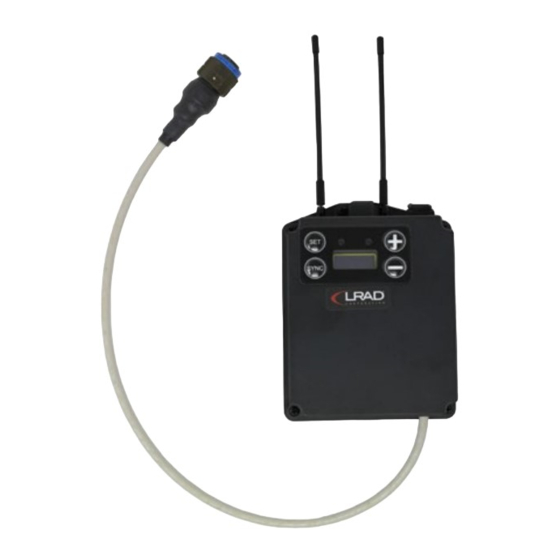
4.1 Wireless Transmitter: UTX-B40 The wireless transmitter sends a signal to the receiver and controls the audio being broadcast through the LRAD. The transmitter is held by the user. The following figure highlights the different interfaces located on the transmitter. -
Page 9: Audio Input
LRAD WIRELESS KIT GENASYS INC. The transmitter is equipped with LED indicator lights that communicate information on the status of the Wireless Kit. These indicator lights relay messages regarding battery power and audio input. 4.1.1 Audio Input Table 3: Audio Input Information... -
Page 10: Battery Access
LRAD WIRELESS KIT GENASYS INC. 4.1.3 Battery Access The transmitter is made up of two components: the radio and the housing. The radio sits inside of the housing. The radio contains the battery compartment and USB connector. Users will need to remove the radio from the housing in order to replace and/or charge the batteries. -
Page 11: Figure 4: Radio Completely Removed From Housing
LRAD WIRELESS KIT GENASYS INC. 3. Remove the radio completely from the housing. This will allow access to the battery compartment, located on the front of the radio, and the USB connector, located on the left side. Figure 4: Radio Completely Removed from Housing IMPORTANT NOTES: •... -
Page 12: Wireless Receiver: Urx-P40
*There are two types of receivers: one that has a POWER switch, and one that does not. Your receiver will depend on your LRAD. Note how power is controlled on your LRAD. • If your LRAD does not have a POWER switch, then you will need a receiver with a POWER switch. -
Page 13: Setup
1. Connect receiver to LRAD. Connect audio cable from receiver to audio input connector on LRAD. • Refer to (A) in Figure 6. 2. Attach receiver to LRAD using head unit mounting clip, located on the top of the LRAD. • Refer to (B) in Figure 6. 3. Connect transmitter to audio source. -
Page 14: Belt Pouch Use
LRAD WIRELESS KIT GENASYS INC. 5.1 Belt Pouch Use The belt pouch allows the user to secure the transmitter to their waist, freeing up their hands for more flexibility while operating the Wireless Kit. The belt pouch is designed to fit tightly around the transmitter. -
Page 15: Operation
CONTROL knob counterclockwise. 2. Turn on the receiver and LRAD. • Depending on the Wireless Kit and LRAD model being used, this will require turning on a POWER switch located on either the receiver or the LRAD. 3. Turn on the transmitter. Press and hold the POWER button. -
Page 16: Important Operational Notes
LRAD WIRELESS KIT GENASYS INC. 6.1 Important Operational Notes • Adjust volume carefully. Feedback can occur if microphone is near the LRAD while operating at high volume. • Press MUTE button to mute and unmute audio. • PTT button does not need to be pressed to play alert tone or audio from external audio device. -
Page 17: Connection
NOTE: Receivers and transmitters can only operate on channels in their given frequency range. This range depends on the location of the user. For more information on frequency ranges consult the Sony Wireless Microphone Package Manual, which is included as part of the LRAD Wireless Kit. -
Page 18: Figure 10: Channel Number
LRAD WIRELESS KIT GENASYS INC. 4. Once the channel group is set, the channel number will start flashing (Figure 10). Figure 10: Channel Number 5. Use the SELECT buttons to scroll through channel numbers. Then press the SET button to choose the desired channel number. -
Page 19: Clear Channel Scan
LRAD WIRELESS KIT GENASYS INC. • Make sure that the channel group and channel number, and therefore the frequency (displayed at the bottom of the GP/CH menu), match exactly on both the transmitter and the receiver. • If the channel group and channel number match, the transmitter and receiver should successfully connect. -
Page 20: Figure 11: Gp All + Section
LRAD WIRELESS KIT GENASYS INC. Clear Channel Scan on Receiver: 1. Use the SELECT buttons to scroll through menus until the CLR CH SCAN menu is displayed. 2. Press and hold the SET button until the GP ALL + section starts flashing (Figure 11). -
Page 21: Daisy Chain: Connect One Transmitter To Multiple Receivers
In a daisy chain configuration, one transmitter is capable of broadcasting to multiple receivers, with each receiver attached to a corresponding LRAD. This configuration allows the user to remotely broadcast a single message through multiple LRADs, creating even greater operational flexibility and broadcasting range. -
Page 22: Maintenance And Storage
LRAD WIRELESS KIT GENASYS INC. 8.0 Maintenance and Storage Cleaning Clean the surfaces and the connectors of the devices included in the Wireless Kit with a dry, soft cloth. Never use thinners, benzene, alcohol, or any other chemicals. Usage Avoid using the Wireless Kit near electrical or lighting equipment, which may subject the Kit to electromagnetic interference. -
Page 23: Troubleshooting
LRAD WIRELESS KIT GENASYS INC. 9.0 Troubleshooting If you experience any of the issues listed below while operating your Wireless Kit, follow the provided troubleshooting procedures. If these procedures do not remedy your issue, contact Genasys Technical Support. Table 5: Troubleshooting Information... - Page 24 LRAD WIRELESS KIT GENASYS INC. The sound is weak. The volume on the audio source is too Adjust the volume on the low. external audio source. Alternatively, if using the headworn microphone, speak louder and/or move mouth closer to the microphone.
-
Page 25: Specifications
LRAD WIRELESS KIT GENASYS INC. 10.0 Specifications Transmitter: UTX-B40 Dimensions (excluding antenna) 4.7” H x 5.0” W x 1.5” D (11.9 cm x 12.7 cm x 3.8 cm) Weight (excluding batteries) 11.3 oz (320.3 g) Oscillator Type Crystal-controlled PLL synthesizer Antenna Type 1/4 λ... -
Page 26: Technical Support
LRAD WIRELESS KIT GENASYS INC. 11.0 Technical Support Contact information for Genasys Technical Support is listed below. Genasys Inc. 16262 West Bernardo Drive San Diego, CA 92127 Tel: 858-676-0574 Fax: 858-676-1120 Technical@genasys.com Manual Part No.: 119514-00 Rev. 03...
Need help?
Do you have a question about the LRAD and is the answer not in the manual?
Questions and answers