Table of Contents
Advertisement
Quick Links
Advertisement
Table of Contents

Related Manuals for HighPoint rDrive 6628TW


Summary of Contents for HighPoint rDrive 6628TW
- Page 1 6628TW User Manual 1/10/18 Revision 1.0.1 HighPoint Technologies, Inc.
- Page 2 Backup your important data before using HighPoint's products and use at your own risk. In no event shall HighPoint be liable for any loss of profits, or for direct, indirect, special, incidental or consequential damages arising from any defect or error in HighPoint's products or manuals.
-
Page 3: Table Of Contents
How to Login to the rDrive Manager ..................12 Remote Login ........................... 12 Formatting the RAID Volumes ....................12 Section 3: Using the HighPoint rDrive Manager ................... 16 How to Login to the rDrive Manager ..................16 Navigating the rDrive Manager ....................16 Overview Tab ........................... - Page 4 Maintenance ..................24 Array Information ................24 Expanding an Existing Array ............. 28 Physical Device Information ................29 Rescan ........................30 Beeper Mute....................... 30 Settings Tab ..........................31 Enclosure ........................31 Email Notification ....................... 31 SMTP Setting ....................31 Add Recipient ....................32 Security ........................
-
Page 5: Product Overview
Customers can now take advantage of professional class Thunderbolt™ 3 storage with a premium feature set for the price of entry level backup solution. The rDrive 6628TW delivers superior data security and outstanding transfer performance in a compact, turnkey, out of the box ready solution that can be easily connected to any PC running Windows 8.0 or later platform with Thunderbolt™... -
Page 6: Section 1: Hardware Installation
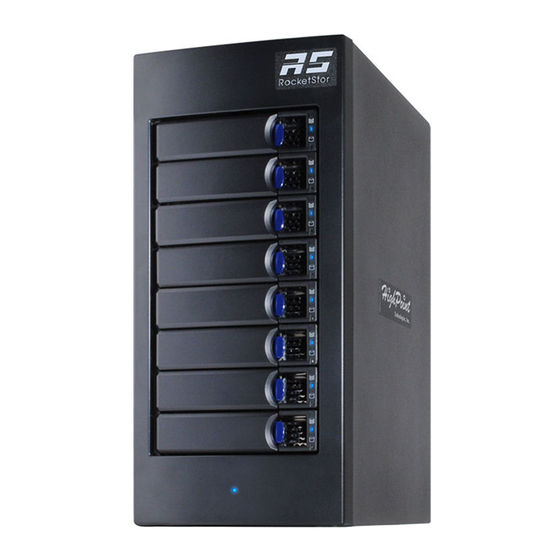
Section 1: Hardware Installation Hardware Overview Panel Layout-Front View LED Indicators Disk Present: Solid blue Disk Active LED: Flashing blue Disk Failure LED: Solid red Disk rebuilding/identifying LED: Flashing red Power LED: Solid blue Panel Layout-Rear View... -
Page 7: System Requirements
3 (USB type-C) port or AIC card Windows 8 or later Enclosure Setup 1. Connect the rDrive 6628TW to the host system with the Thunderbolt 3 cable 2. Connect the rDrive 6628TW to power and turn on the power switch... -
Page 8: Section 2: Setting Up Software For Windows Platforms
Drivers provide a way for your operating system to communicate with your new hardware. Updating to the latest available driver ensures your product benefits from the most recent performance, stability, and compatibility improvements. 1. Obtain the latest driver software for the rDrive 6628TW from our website: http://www.highpoint-tech.com/USA_new/series-rd6628tw-download.htm#nav_bottom 2. Locate the downloaded folder and run setup.exe 3. -
Page 9: Updating The Drivers
4. Right click on the RocketRAID 840A SATA Controller and select Properties 5. Click the Properties tab and look at the Driver Version section to check Updating the Drivers 1. Obtain the latest driver files for the rDrive 6628TW from http://www.highpoint- tech.com/USA_new/series-rd6628tw-download.htm#nav_bottom... -
Page 10: Uninstalling The Driver
3. Select Device Manager 4. Click on the Storage controllers tab 5. Right click on the RocketRAID 840A SATA Controller and select Update Driver Software 6. Click Browse my computer for driver software 7. Select the driver files you downloaded 8. -
Page 11: Installing The Highpoint Rdrive Manager
5. Restart the system Installing the HighPoint rDrive Manager The HighPoint rDrive Manager is the primary link between you and your RAID array. Using the management utilities and menus offered by the rDrive Manager, you would be able to access, create, and maintain your RAID arrays. -
Page 12: How To Login To The Rdrive Manager
How to Login to the rDrive Manager You can reach the rDrive Manager log in page either by: Double clicking on the rDrive Manager icon created on your desktop Opening your preferred web browser and typing http://localhost:7406 in the address bar Note: You can set the password under the Setting tab Remote Login A user connected to a local network can remotely access the rDrive Manager using the IP address of the... - Page 13 For Windows users 1. Right click the Windows logo on the bottom left of the screen 2. Select Disk Management 3. If you just created the array, a prompt will appear after clicking disk management asking you to initialize the disk a.
- Page 14 4. Once initialized, right click the unallocated disk space for your disk and select New Simple Volume 5. Follow the instructions on screen to receive a drive letter...
- Page 15 6. Follow the instructions on screen to create a disk name 7. Once finished, the drive will appear in your OS with the name and letter you assigned Please note your disk may initially appear offline to the operating system and you may have to bring it online 1.
-
Page 16: Section 3: Using The Highpoint Rdrive Manager
Section 3: Using the HighPoint rDrive Manager How to Login to the rDrive Manager You can reach the rDrive Manager log in page either by: Double clicking on the rDrive Manager icon created on your desktop Opening your preferred web browser and typing http://localhost:7406 in the address bar. -
Page 17: Overview Tab
Overview Tab The Overview provides information regarding each HighPoint Enclosure connected to your computer detects. It is also the first page you see when logging in. It also provides the following information Enclosure Properties Storage Properties On the top left of the page is a drop down menu that allows you to select which controller you want to manage (if you have multiple HighPoint controllers connected). -
Page 18: Array Config
Array Config. When setting up a new array configuration make sure back up all the data on the disks. Afterwards click maintenance than delete to set up the disk for the new array. Delete The delete function is used to delete the already exist arrays so that the user has free disks to create another array. -
Page 19: Quick Config
Quick Config. 1. Choose the Raid level you would like (Refer to Table 2; RAID Reference Level)(P.38) 2. Select the disk type a. New disk is used for disk with no data on them b. Used disk is used for disks already having data... -
Page 20: Advanced Config
3. Click create on the bottom 4. Next, you will need to format the RAID Volume. Please check page 11 for more information. Advanced Config. -
Page 21: Creating Array
The Advanced Config. tab has the following functions: Create Array Spare Pool Logical Device Rescan Beeper Mute Creating Array... - Page 22 Array Type JBOD: Just a Bunch of Disks RAID 0: Striping RAID 1: Mirroring RAID 5: Rotating Parity bit (Single parity) RAID 6: Rotating Parity bit (Dual parity) RAID 10: Striping Mirrored array RAID 50: Stripping RAID 5 array Each RAID level has its pros and cons based on the application you use it for (Note: Refer to RAID level Quick Reference.)
-
Page 23: Spare Pool
when processing large I/O requests. Multiple physical drives working in parallel increases the throughput, meaning better performance. For smaller I/O requests (512 bytes to 4 kilobytes), it is better to have each individual disks handle their own I/O request, improving the IOPS (I/O per second), rather than having one tiny I/O request being handled by multiple disks. -
Page 24: Logical Device
4. Click Add Spare, and confirm by selecting OK from the pop-up window: 5. The disk has now been assigned as a spare. Click OK to confirm: 6. Disks added to the spare pool will be displayed under Spare Pool and can be removed by checking the box before the target drive, then clicking the Remove Spare button. - Page 25 Normal Arrays with the Normal status are healthy and functioning properly. Arrays with the Normal status will have the following options: Delete: deletes the selected RAID array Unplug: powers off the selected RAID array – once powered off, the physical disks can be safely removed from the RAID controller o To detect the disk again you can wait for the system to detect the disk or you can turn the power off and on for a quicker solution...
- Page 26 Critical Arrays in the Critical status can be accessed and utilized, but are no longer fault tolerant. A Critical array should be rebuilt as soon as possible to restore redundancy. A critical status array has all the normal status options except the following: ...
- Page 27 Disabled An array with the Disabled status means that the RAID level does not have enough disks to function. Your data will be inaccessible Rebuilding will not trigger, since the RAID array does not have enough parity data to rebuild. Your options in Maintenance are: ...
-
Page 28: Expanding An Existing Array
Expanding an Existing Array Important: It is recommended that the array be Verified/Rebuilt before Expanding or Migrating. Once you start an OCE/ORLM procedure, you can stop the process, but it must be resumed until completion. To add more capacity to your current configuration follows these steps: 1. -
Page 29: Physical Device Information
The Logical Device Information will change the status to migrating. Physical Device Information Location: which controller and port the drive is located in Model: model number of the drive connected Capacity: total capacity of the drive Max Free: total capacity that is not configured... -
Page 30: Rescan
The following properties are part of the Physical Devices Information Model: model number of the physical drive Capacity: total capacity of the physical drive Revision: HDD device firmware revision number Read Ahead* (Enable/Disable): enabling disk read ahead will speed up read operations by pre- fetching data and loading it into RAM ... -
Page 31: Settings Tab
Settings Tab Enclosure Review the rDrive unit information or update the BIOS/Firmware Email Notification Setting up the event notification via SMTP Email server You can instruct the controller to send an email out to the recipients of your choosing when certain events trigger (for more information, see Event Tab). -
Page 32: Add Recipient
To set up email alerts: 1. Check the Enable Event Notification box. 2. Enter the ISP server address name or SMTP name 3. Type in the email address of the sender (email account that is going to send the alert) 4. -
Page 33: Security
Security This section allows you to change the log-in password, Port Number and enable or disable localhost access. Password Setting To change your password type your new password, confirm it, and then click Submit Note: if you are locked out of the rDrive Manager and do not remember your password, do the following ... -
Page 34: System
When the rebuild is finished, the data may be accessible but may also be inconsistent, due to any bad sectors that were ignored during the procedure. If this option is enabled, HighPoint recommends checking the event log periodically for bad sectors warnings. Rebuild Priority (default: Medium) ... -
Page 35: Event
Event The event view is a basic error logging tool built into the rDrive Manager Icon Name Definition Information Includes general administrative tasks: Create/delete arrays Configuring spares Rebuilding arrays Configuring event notifications Configuring maintenance Warning Alerts issued by the Host Adapter: ... -
Page 36: Scheduler
Scheduler To enter the Scheduler, select Schedule a Task on the SHI page The Scheduler enables you to schedule disk/array checkups to ensure disks/array are functioning optimally. How to Create a New Verify Task All arrays will appear under New Verify Task 1. -
Page 37: Help
Online Help redirects you to additional documentation concerning the rDrive Manager. Register Product takes you to the HighPoint Online Web Support Portal. On this page you can create a new customer profile where you can register your product, or post an online support ticket The Configuration Record feature simplifies the process of gathering system and configuration information when submitting a technical support inquiry. -
Page 38: Section 4: Troubleshooting
Section 4: Troubleshooting Handling Critical Arrays When your disk status turns critical, your array as a whole is still accessible, but one or more disks are faulty (depending on your RAID level), and the array is in danger of failing. Common scenarios for critical status ... -
Page 39: Rebuilding Stops Due To Bad Sectors
Online RAID Roaming One of the features of all HighPoint RAID controllers is online array roaming. Information about the RAID configuration is stored on the physical drives. So if a card fails or you wish to switch cards, the RAID... -
Page 40: Appendix
Appendix Table 1: rDrive Manager Icon Guide Critical: Missing Disk A disk is missing from the array bringing it to ‘critical’ status. The array is still accessible but another disk failure could result in data loss. Verifying The array is currently running a disk integrity check. Rebuilding The array is currently rebuilding meaning you replaced a failed disk or added a new disk to a ‘critical’... - Page 41 Spare The device is a spare drive, it will automatically replace any failed drive part of an array. Normal The array status is normal Initializing The array is initializing, either foreground or background initialization Initialization Stopped The initialization has been stopped. Current status is uninitialized. Critical: Inconsistency Data in the array is inconsistent and needs to be rebuilt.
-
Page 42: Contacting Technical Support
RAID 6 parity 50-75% two drives failure sessions. data protection Contacting Technical Support For any help and support, please submit the following Support ticket online at http://www.highpoint-tech.com/websupport/ Configuration record...
Need help?
Do you have a question about the rDrive 6628TW and is the answer not in the manual?
Questions and answers