Table of Contents
Advertisement
Quick Links
BRIGHTLINK HD Video Wall Controller
MODEL: BL-VW22
Operating Instructions
BRIGHTLINKAV.COM
Dear Customer
Thank you for purchasing this product. For optimum performance and safety, please read
these instructions carefully before connecting, operating or adjusting this product. Please
keep this manual for future reference.
1
Advertisement
Table of Contents

Related Manuals for Brightlink BL-VW22


Summary of Contents for Brightlink BL-VW22
- Page 1 BRIGHTLINK HD Video Wall Controller MODEL: BL-VW22 Operating Instructions BRIGHTLINKAV.COM Dear Customer Thank you for purchasing this product. For optimum performance and safety, please read these instructions carefully before connecting, operating or adjusting this product. Please keep this manual for future reference.
- Page 2 1. FEATURES Support USB/VGA/Composite/HDMI input. Select 1 of 4 source and distribute to 4 displays. Create a 2x2 Video Wall Controller from any source to four displays. Support multi-level cascading to create 3x3, 4x4...Video Wall (Max 10x10). ...
-
Page 3: Specifications
4. SPECIFICATIONS Operating Temperature Range 0 to +35°C (32 to +95°F) Operating Humidity Range 5 to 90 % RH (no condensation) Input Video Signal 0.5-1.0 volts p-p Input DDC Signal 5 volts p-p (TTL) DTV/HDTV: 1080P/1080i/720P/ Video Format Supported 576P/480P/576i/480i Audio Format Supported LPCM Input ports... -
Page 4: Connecting And Operating
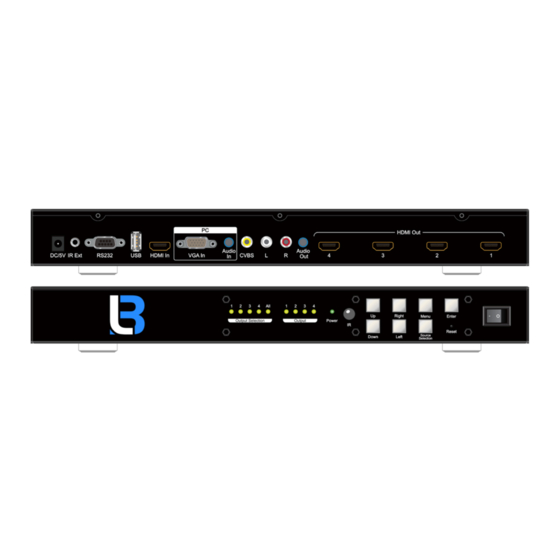
Rear Panel 1. Power input port 2. IR Ext port 3. RS232 port 4. USB input port 5. HDMI input port 6. VGA input port 7. Audio input port 8. CVBS input 9. L /R Audio input 10. Audio output 11. - Page 5 8. Typical Application Application 1: Split a single source to 4 displays Application 2: 2x2 Video Wall Displaying Application 3: Multi-Level Cascading (Max 10x10 Video Wall)
- Page 6 9. Remote Control Instruction 1. Power on/off 2. Mute 3. Next one 4. Stop 5. Previous one 6. Play/Stop 7. USB Disk input 8. HDMI input 9. AV input 10. VGA input 11. Menu 12. Multi-function Button 13. Up 14. Left 15.
- Page 7 2. Move the left or right arrow, enter into the below interface, choose “OSD Language English”, then press “Ok”. 3. Choose the required language, then press “OK”, press “ ” back to the main menu.
- Page 8 9.1.2 Language setting for each output 1. Press the Output No on the remote and press “ ”, press “OSD Language” and choose the required language 9.2 Mirror Function ( 180°Rotation ) 1. Press the Output No on the remote, the press “ ”...
-
Page 9: Splicing Setup
9.3 Splicing Setup: 1. Press the Output No on the remote or use DIP Switch to choose the output, the relative indicator will turn green, then press “ ”. For example, if you need make splicing setup for output 1 to output4, press “1”,”2”,”3”,”4” on the remote, the indicator “1”... -
Page 10: Menu Reset
2. Choose “Splicing SETUP”, When the Horizontal Count and Vertical Count is the same, there will be no deformation on the image. 3. When cascade for NXN video wall , the output which cascade for next layer should be set as “1x1”, other outputs should be set as your required”NXN”. For example, if you need cascade for “3x3”, the output 1 need to connect with next Video Wall Controller , then the output 1 should be set as “1x1”, output2 to output4 should be set as “3x3”. - Page 11 9.5. Edge Adjust.
- Page 12 9.6 Scroll Text (Support CVBS/VAG/HDMI input modes) 1. Create a text document named “ARICH.TXT” under the USB DISK, enter the required content in the document. 2. Insert the USB Disk into the USB port of product. 3. Press”All” on the remote or set the DIP Switch to “010000” , then press “ ”.
- Page 13 4. Move the left or right arrow to choose “Scroll Text”. 5. Enter “Scroll Text”, you can set the Font size, Background Color, Font color, Flow Speed.
- Page 14 6. Turn on the Function, then re-power the Video Wall controller, there will be scroll text on the display. 9.7 USB Disk Input Mode 1.Choose USB input , press “ALL” button on the remote controller, then you can select the required file to play.
- Page 15 2.Press “OK” button when playing the video or displaying pictures.
- Page 16 3. Support JPG、PNG, BMP format pictures 4. Support MP3, FLAC format audio files. 5. Support AVI.WMV,MPG,MP4,RMVB video files 6. Support TXT format file...
- Page 17 9.8 CVBS/HDMI input mode: You can set as 16:9 or 4:3 in this mode. 9.9 VGA input mode...
- Page 18 10. RS232 Control 1). Open CommUart Assistant. 2). Comport setting: Baud 115200 bps Rate: Parity: None Data Bits: 8 bit Stop Bits: 1 bit 3). Enter Port Command in Send options.
- Page 19 Command Features 99 06 FF FF Show Panel no for all HDMI outputs 99 07 FF FF Hide panel no for all HDMI outputs 79 92 FF AV input 79 93 FF VGA input 79 94 FF HDMI input 79 95 FF USB input All bellowing command is only effective for the selected output, please choose the output before sending command.
- Page 20 MAINTENANCE Clean this unit with a soft, dry cloth. Never use alcohol, paint thinner of benzine to clean this unit. PRODUCT SERVICE 1) Damage requiring service: The unit should be serviced by qualified service personnel if: (a) The DC power supply cord or AC adaptor has been damaged; (b) Objects or liquids have gotten into the unit;...
Need help?
Do you have a question about the BL-VW22 and is the answer not in the manual?
Questions and answers