Advertisement
Quick Links
Appendix B
The Garmin GPS Map 76 Receiver: Features, Functions,
Setup, and Quality of Position
Garmin GPS Map76 Features
Specifications
Weight: 7.5 ounces
No. channels: 12 parallel
Antenna type: Quad Helix
Display size: 180 x 240 pixels
Included map base: North America major highways, cities, exits – accepts optional
Map Source ™ enhanced maps
No. Waypoints: 500 with name and graphical symbol
No. Tracks: 10 saved, about 10,000 total track points, auto logging
No. Routes: 50 comprised of 50 waypoints each
Rugged standard: IPX 7 waterproof – floats on surface!
Other features: Trip computer, tidal info, sun/moon info, hunting/fishing info
Manual, pg. 4 and: http://www.garmin.com/products/gpsmap76/spec.html.
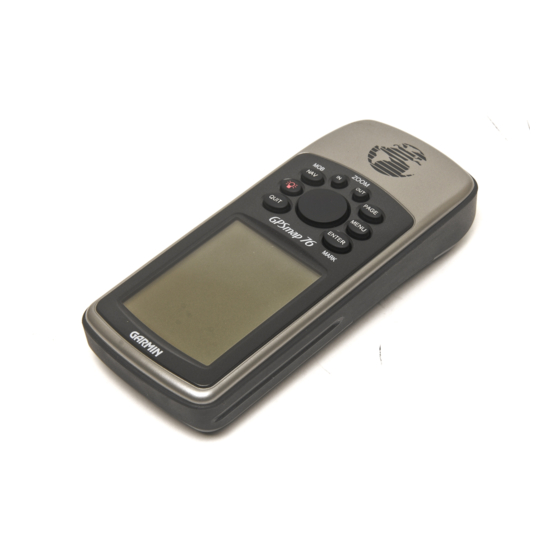
GPS Map 76 – Front View
Visible on the front side of the Map76 is the:
Antenna – always hold the receiver upright with the display facing you and the
antenna at about an 80 degree angle from horizontal. Face towards the southwest to
obtain the best GPS reception.
Screen protector – Provides international patent information and a reminder of how to
orient the receiver for best GPS satellite reception.
Keypad – A ROCKER key surrounded by 8 functional keys.
Display – Display capable of depicting GPS data and 4 grey color maps.
NRI Grazing Land On-Site Data Collection
(03/23/20011) B-1
Advertisement

Subscribe to Our Youtube Channel
Related Manuals for Garmin GPS Map 76


Summary of Contents for Garmin GPS Map 76
- Page 1 Appendix B The Garmin GPS Map 76 Receiver: Features, Functions, Setup, and Quality of Position Garmin GPS Map76 Features Specifications Weight: 7.5 ounces No. channels: 12 parallel Antenna type: Quad Helix Display size: 180 x 240 pixels Included map base: North America major highways, cities, exits – accepts optional Map Source ™...
- Page 2 GPS Map 76 – Back View On the back side of the Map 76 you will find: 1. The antenna port, 2. The battery compartment, and 3. The power-data port. You can connect an external antenna with an MCX connector to the antenna port.
- Page 3 Use two fresh AA batteries from the same pack each time you change batteries. The power/data port is located near the bottom of the back side – insert Garmin power adapter or PC data 4-pin plugs by aligning the slot on the plug with the raised key on the inner wall of the port.
- Page 4 Map 76 Interface Keys POWER/backlight key (light bulb) – Press and hold to power up the Map76. Press again to activate the backlight. QUIT – Press this key to exit a function or go back a page. NAV (MOB) – Press this key to begin navigation function. When the NAV key is pressed and held it records a Man Overboard (MOB) point that stores the current location and commences navigation back to that point.
- Page 5 Press the ENTER key to move through the startup pages to the GPS Information page. Startup Pages 1 and 2 contain proprietary and copyright information. Startup Page 3 is a warning and legal disclaimer. See Manual, pg. 10. POWER Key, Second Press Press the POWER key a second time to adjust backlight and display contrast.
- Page 6 MENU Key, First Press Press the MENU key to see a list of the options. Use the ROCKER key to scroll to and highlight an option then press the ENTER key to select an option: Start Simulator – Select this option to place the Map76 in simulator mode. North Up (Track Up) –...
- Page 7 Use the ROCKER key to choose an option. Press the ENTER key to select an option: Go To Point – Set the Map76 to navigate to a specific waypoint. Navigate Route – Set the Map76 to navigate using a specific route (collection of related waypoints).
- Page 8 Map Page Point Page Highway Page Route (or GoTo) page The GPS Information page Displays speed, elevation, accuracy, receiver status, satellite status, date, time, and location. When the receiver receives 3 satellite signals it will report accuracy (estimated) and speed. When it‟s receiving 4 satellites it will report elevation. The Map76 displays several types of receiver status messages: 2D location –...
- Page 9 Configuration 1 & 2 systems. Map Source Topo data are approximately 1:100,000 scale. Other Map Source software can be obtained from Garmin or Garmin dealers: http://www.garmin.com/cartography/mapsource/ Change the zoom scale by using the zoom keys on the Map76 keypad...
- Page 10 Use the ROCKER key to scroll to Setup Page Layout. When the option is highlighted press the ENTER key. Another choice list pops up. Use the ROCKER key to move up/down the list. When the option desired is highlighted (in this case Small (1 Row)) then press the ENTER key.
- Page 11 You will see the top left most data field highlighted. Press the ENTER key to change the type of data displayed in the field. Use the ROCKER key to scroll up/down the choice list that pops up. When the desired data type is highlighted press the ENTER key. Use the ROCKER key to scroll to a different data field.
- Page 12 Pointer Page (use with NAV key) The pointer page is used for navigation when a straight line course can not be followed. The pointer page has: User selectable data fields ° Status bar (indicates which point being navigated) ° Compass ring (graphic display of current track) °...
- Page 13 Like the map page, the zoom level can be changed by using the ZOOM IN/OUT keys. Navigate down the highway by keeping the point of the triangle aligned with the white line in the highway and the highway pointed towards the top of the display. Press the MENU key to access the highway page options.
- Page 14 Fuel (must be moving) ° See Manual Pg. 36 GPS Map 76 Setup Turning on the Map 76 and Placing in Simulator Mode Press and hold the POWER key until the first screen appears. Press the ENTER key until the GPS Info Page appears.
- Page 15 The memory indicator gauge at the bottom center of the page tells you how much memory is available for waypoints and tracks. A battery in the lower right corner tells you the unit is operating on battery power only. The battery symbol works like a gauge – you can see how much power is left by seeing how “full”...
- Page 16 Mode field Normal Mode is the default setting and tracks satellites, computes Position, Velocity, and Time (PVT). Battery Saver mode optimizes receiver to save battery power (slower screen updates) Simulator mode turns off the GPS tracking and uses a small time slice of prior acquired data.
- Page 17 Warning – excessive backlight will rapidly drain batteries! Beeper field Provides audible (and annoying) beeping sound when keys are pressed and messages pop up. Use the ROCKER key to select choice, then Press ENTER key to lock in the choice. Although annoying beginners will find it‟s easier to know and see what‟s going on with the receiver if the beeper is left fully on.
- Page 18 Time Zone field Use the ROCKER key to scroll through a choice list of time zones. Select “Other” then choose a UTC (Universal Time Coordinated, or Greenwich Mean Time (GMT)) offset. You will have to reset the time zone when you operate the Map 76 in a different time zone.
- Page 19 The Units tab contains settings for Elevation, Depth, Distance/Speed, Temperature, Direction Display, and Speed Filter. These settings are used in related data fields throughout the unit. Elevation – Choose from Feet or Meters in height above Mean Sea Level. Depth – Choose from Feet, Fathoms (one fathom equals six feet), or Meters for depth below sea level.
- Page 20 Recommended – Set this field to “Numeric Degrees”. Speed Filter – Choose from Auto or User. The User setting will average the speed and heading at the rate specified in the time (seconds) setting. The receiver provides faster updates of PVT when the speed filter is set lower. See Manual Pg.
- Page 21 Set to NAD 83 for navigation to points generated from NRCS geospatial data bases. Coordinates are stored in the Map76 using the WGS 84 datum. The data download software, MN DNR Garmin extension for Arcview 3.X GIS, converts the data to NAD 83 during data download.
- Page 22 There is a difference between magnetic and true north that varies with latitude and longitude. The difference is commonly known as declination but Garmin refers to it as variation. Variation is automatically computed by the Map76 based on current position.
- Page 23 Alarms Tab Options The Alarms tab contains settings for Anchor Drag, Approach and Arrival, Off Course, Shallow Water, and Deep Water. The settings determine if and when a warning beep is sounded and/or a message is displayed. We will not discuss Anchor drag, Shallow Water, and Deep Water settings in this class.
- Page 24 The Interface tab contains settings for one field initially – Serial Data Format. The field contains eight settings that let the Map76 communicate with computers and other compliant devices. Garmin – The Map76 can communicate with Garmin Mapsource ™ and other software installed on PCs. NRI Grazing Land On-Site Data Collection...
- Page 25 Quality of Position How to hold the receiver When trying to receive satellite signals, orient the GPS Map 76 so the top of the unit points towards the sky. If the unit is held with the top pointed towards the horizon, or upside down, satellite reception will be severely degraded.
- Page 26 What takes place during initialization? The Map76 comes from the factory in Taiwan with the GPS almanac (satellite orbital information) set for Olathe, Kansas. The almanac information is out of date and therefore incorrect. When should you initialize? When the receiver is first used. When the receiver is moved more than several hundred miles before next use.
- Page 27 Shows location of satellites in sky relative to location (in center) of receiver. Satellites that are displayed in the plot are being tracked. Satellites used for navigation (positioning) will be highlighted in black. The center dot is directly overhead of the receiver. The inner ring depicts the sky from 45 to 90 degrees off the horizon.
- Page 28 The estimate tends to be lower than reality. NCGC user experience indicates that the estimate is anywhere from 25 to 50 percent too low. For example if the estimate reads “15 feet” then the actual positional error is most likely between 19 and 23 feet.
Need help?
Do you have a question about the GPS Map 76 and is the answer not in the manual?
Questions and answers