
Subscribe to Our Youtube Channel
Related Manuals for SHE 7KL2005F


Summary of Contents for SHE 7KL2005F
- Page 1 BEDIENUNGSANLEITUNG Mobiles Klimagerät SHE7KL2005F HERZLICHEN GLÜCKWUNSCH! VIELEN DANK, DASS SIE SICH FÜR EIN PRODUKT VON SHE ENTSCHIEDEN HABEN.
-
Page 2: Table Of Contents
Selbstdiagnose Behebung von Problemen Technische Informationen Garantie NUR FÜR DAS SHE-SERVICECENTER 40 – 45 Reparaturanweisungen für Geräte die R290 enthalten LESEN SIE BITTE DIE BEDIENUNGSANLEITUNG SORGFÄLTIG DURCH BEVOR SIE MIT MONTAGE, INSTALLATION, BEDIENUNG ODER WARTUNG BEGINNEN. SCHÜTZEN SIE SICH SELBST UND ANDERE, INDEM SIE DIE SICHERHEITSHINWEISE BEFOLGEN. - Page 3 Wenden Sie sich für eventuelle Reparaturen des Geräts, des Netzsteckers oder Kabels stets und ausschließlich an vom Hersteller autorisierte Kundendienststellen. Die Kundendienststellen können Sie online unter www.she.at abrufen. ● Entfernen Sie die Verpackung und stellen sicher, dass das Klimagerät nicht beschädigt ist. Im Zweifelsfall verwenden Sie das Klimagerät nicht und kontaktieren Sie die Servicestelle oder Ihren Händler.
- Page 4 Sie sich an den Händler, bei dem das Produkt gekauft wurde. KONFORMITÄTSERKLÄRUNG Hiermit bestätigen wir, dass dieser Artikel den grundlegenden Anforderungen, Vorschriften und Richtlinien der EU entspricht. Die ausführliche Konformitätserklärung können Sie jederzeit unter folgendem Link einsehen: www.she.at.at/downloads/doc/she7kl2005f.pdf Irrtümer und technische Änderungen vorbehalten. www.she.at Seite 4 von 45...
-
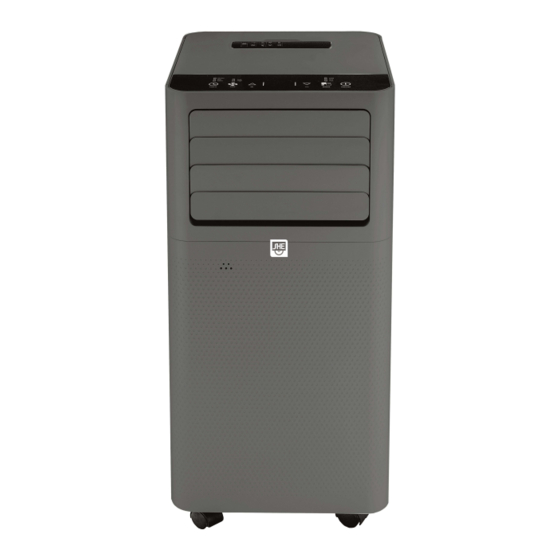
Page 5: Beschreibung Des Geräts Und Lieferumfang
BESCHREIBUNG DES GERÄTES und LIEFERUMFANG BEZEICHNUNG DER EINZELNEN TEILE 1. Fernbedienungsfach 2. Griff 3. Laufrollen 4. Bedienungsfeld 5. Sensor 6. USB-Ladeanschluss 7. Lufteinlassgitter 8. Luftauslassgitter 9. Luftauslassgitter 10. Kabelanschluss 11. Mittlerer Kondenswasserauslass 12. Kondenswasserauslass 13. Netzkabel Abluftschlauch mit Adapter Fensterhalterung (B) Verlängerungsschiene (A) Fensterhalterung für Rollladen –... -
Page 6: Inbetriebnahme
INBETRIEBNAHME VORBEREITUNG ZUR VERWENDUNG WICHTIG! Lassen Sie das Gerät mindestens 2 Stunden aufrecht stehen, bevor Sie es das erste Mal in Betrieb nehmen und vergewissern Sie sich, dass der Kondenswasserauslass gut verschlossen ist. Stellen Sie das Gerät bei einer richtig geerdeten Steckdose auf einen ebenen Untergrund in der Nähe des Fensters auf. - Page 7 3. Installation bei einem Fenster/Balkon ohne Fensterhalterung Stellen Sie nun das Klimagerät in der Nähe von einem Fenster oder einer Balkontür auf. Passen Sie die Länge des Schlauchs so an, dass er bis zum Fenster/ zur Balkontür reicht. Überprüfen Sie, ob die Luft im Schlauch ungehindert strömen kann.
- Page 8 Der Abluftschlauch ist genau auf dieses Gerät abgestimmt. Verlängern Sie ihn nicht und ersetzen Sie ihn auch nicht durch einen anderen Schlauch, andernfalls könnten Sie das Gerät beschädigen. Empfehlung von SHE Wir empfehlen Ihnen einen SHE Hot-Air Stop bei der Installation Fenstern, Balkontüren oder Schiebetüren.
-
Page 9: Bedienfeld Und Fernbedienung
BEDIENFELD UND FERNBEDIENUNG BEDIENFELD Beschreibung des Bedienfelds und der Fernbedienung BEDIENFELD KONTROLLEUCHTEN TASTEN A. Anzeige KÜHLEN-Modus 1. TIMER B. Anzeige ENTFEUCHTER-Modus 2. VENTILATORSTUFE C. Anzeige LÜFTER-Modus 3. ERHÖHEN D. Anzeige HOHE VENTILATORSTUFE 4. DISPLAY E. Anzeige NIEDRIGE VENTILATORSTUFE 5. SENKEN F. -
Page 10: Funktionen Einstellen
*BITTE BEACHTEN SIE: Bei dieser Fernbedienung handelt es sich um eine Universalfernbedienung für mehrere Modelle des Klimagerätes. **Dieses Klimagerät verfügt über keine automatische Oszillation. FERNBEDIENUNG Fernbedienung vorbereiten – Batterien einlegen oder tauschen Bitte beachten Sie die folgenden Anweisungen: 1. Entfernen Sie die Abdeckung auf der Rückseite der Fernbedienung. - Page 11 MODI EINSTELLEN Kühl-Modus Optimal für warmes und schwüles Wetter um den Raum abzukühlen. GERÄT FERNBEDIENUNG Drücken Sie sooft die -Taste bis… Drücken Sie sooft die die -Taste bis….. ….auf dem Bedienfeld die „COOL“-Kontrollleuchte aufleuchtet. Mit den Tasten stellen Sie die gewünschte Temperatur ein – achten Sie dabei auf das Display: Mit der „FAN SPEED“- Taste wählen Sie die Mit der...
- Page 12 Entfeuchtungs-Modus Optimal zur Reduzierung der Feuchtigkeit im Raum (z.B.: im Frühling und Herbst, für feuchte Räume, während Regenperioden usw.). GERÄT FERNBEDIENUNG Drücken Sie mehrmals die -Taste bis…. Drücken Sie mehrmals die -Taste bis… ….auf dem Bedienfeld die „DRY“-Kontrollleuchte aufleuchtet und auf dem Display In diesem Modus wird die Stärke des Gebläses automatisch vom Gerät ausgewählt und zieht die Feuchtigkeit aus der Luft.
- Page 13 ÄNDERN DER TEMPERATUREINHEIT Sie haben die Möglichkeit zwischen GRAD und FAHRENHEIT auszuwählen: GERÄT FERNBEDIENUNG Halten Sie die △ oder ▽-Tasten ca. 3 Drücken Sie die -Taste um die Sekunden lang gleichzeitig gedrückt um die Temperatureinheit zu ändern: Temperatureinheit zu ändern: GRAD: FAHRENHEIT: Folgende Funktion kann nur mithilfe der Fernbedienung eingestellt...
-
Page 14: Tipps Zur Richtigen Anwendung
TIPPS ZUR RICHTIGEN ANWENDUNG Finden Sie hier einige Hinweise, um die optimale Leistung des Klimagerätes zu erzielen: Fenster und Türen in dem zu klimatisierenden Raum schließen. Den Raum mit Vorhängen, Jalousien oder Rollläden vor direktem Sonnenlicht schützen. So sparen Sie Energie. Keine Gegenstände auf das Gerät legen und Lufteinlass und Luftauslass nicht verdecken. - Page 15 REINIGEN DES GEHÄUSES Schalten Sie das Gerät vor der Reinigung aus, warten Sie einige Minuten und ziehen Sie dann stets den Stecker, um das Gerät vom elektrischen Netz zu trennen. Reinigen Sie das Gerät mit einem mäßig feuchten Tuch und wischen Sie es anschließend mit einem trockenen Tuch ab.
- Page 16 PERMANENTER WASSERABLAUF Sie haben die Möglichkeit permanente Wasserabläufe zu installieren, um nicht jedes Mal den Wassertank manuell entleeren zu müssen, wenn Sie vorhaben das Gerät für einen längeren Zeitraum in Gebrauch zu nehmen (oder die Wasserpumpe ausfällt.) Das Gerät verfügt über zwei separate Kondenswasserauslässe: Modus ENTFEUCHTEN ...
-
Page 17: Tätigkeiten Zu Saisonbeginn/-Ende
TÄTIGKEITEN ZU SAISONBEGINN/- ENDE TÄTIGKEITEN ZU SAISONENDE Entleeren Sie sorgfältig den Kondenswasserbehälter zur Gänze in ein geeignetes Gefäß wie im Abschnitt „Wassertank entleeren“ beschrieben. Lassen Sie das Klimagerät 2 Stunden lang im Gebläse/Lüfter-Modus laufen, bis das Gerät innen komplett trocken ist. ... -
Page 18: Behebung Von Problemen
BEHEBUNG DER PROBLEME Bevor Sie sich mit unserer Kundenhotline/ Servicestelle in Verbindung setzen, prüfen Sie bitte, ob sich der Fehler anhand der untenstehenden Hinweise beheben lässt. PROBLEM MÖGLICHE URSACHE LÖSUNG Stromausfall Wiederherstellung Stromversorgung abwarten. Gerät nicht Gerät an die Stromversorgung Stromversorgung angeschlossen. -
Page 19: Technische Informationen
320x320x670 Schuss Home Electronic GmbH Kontaktadressen für weitere Informationen Scheringgasse 3, A-1140 Wien Tel: +43 (1) 97 0 21 – 0 Serviceline: +43 (1) 97 0 21 – 502 www.she.at FB-Nr: 236974 t / FB-Gericht: Wien Seite 19 von 45... -
Page 20: Garantie
Mit diesem Qualitätsprodukt von SHE haben Sie eine Entscheidung für Innovation, Langlebigkeit und Zuverlässigkeit getroffen. Für dieses SHE Gerät gewähren wir eine Garantiezeit von 2 Jahren ab Kaufdatum gültig in Österreich! Sollten in diesem Zeitraum wider Erwarten dennoch Servicearbeiten an Ihrem Gerät notwendig sein, garantieren wir Ihnen hiermit eine kostenlose Reparatur (Ersatzteile und Arbeitszeit) oder (nach Ermessen der Firma Schuss) das Produkt auszutauschen. -
Page 21: English
(failure to do so will void the warranty). For any repairs to the device, power plug or cable, always and exclusively contact authorized service centers. The customer service centers can be accessed online at www.she.at. ●... - Page 22 If the power cord is damaged, it must be replaced by the manufacturer or an authorized service center to avoid all possible risks. 10. The device must be installed in accordance with local electrical system installation and operating instructions. 11. The electrical socket in which you connect the device must not be defective or loose and must be suitable for the required current load and above all be reliably earthed.
-
Page 23: Recycling, Disposal And Declaration Of Confirmity
We hereby confirm that this article complies with the essential requirements, regulations and directives of the EU. The detailed declaration of conformity can be viewed at any time under the following link: www.she.at.at/downloads/doc/she7kl2005f.pdf Errors and technical changes reserved. www.she.at Seite 23 von 45... -
Page 24: Technical Description And Delivery Content
BESCHREIBUNG DES GERÄTES und LIEFERUMFANG BEZEICHNUNG DER EINZELNEN TEILE 1. Remote Control 2. Handle 3. Castors 4. Control Panel 5. Sensor 6. USB-Charging Slot 7. Intake grill 8. Air outlet grill 9. Intake grill 10. Plug fixer 11. Middle condenser drain 12. -
Page 25: Start Up
START UP PREPARING FOR USE IMPORTANT! Leave the device in an upright position for at least 2 hours before starting it up for the first time and make sure the condensation water outlet is well sealed. Place the device on a level surface close to a window and a grounded outlet. ... - Page 26 3. Installation of the hose to a window/balcony without the window mount Place the air conditioner near a window or a balcony door. Adjust the length of the hose to reach the window/balcony door. Open the window/balcony door and put the hose out. Check that the air in the hose can flow freely.
- Page 27 The exhaust hose is precisely matched to this device. Do not extend it or replace it with another hose, otherwise you could damage the device. Recommendation from SHE We recommand a SHE Hot-Air Stop for installation on windows, balcony doors or sliding doors. They offer the following advantages: ...
-
Page 28: Operating Panel And Remote Control
REMOTE CONTROL AND OPERATING PANEL OPERATING PANEL Description of the control panel Indicators Buttons A. Indicator COOL 1. TIMER B. Indicator DRY 2. FAN SPEED C. Indicator FAN 3. INCREASE D. Indicator HIGH SPEED 4. DISPLAY E. Indicator LOW SPEED 5. -
Page 29: Setting Functions
*Please note: This remote control is a universal remote control for different models of this air conditioner. This air conditioner has NO AUTO SWING. Preparing the remote control – inserting or replacing batteries Please follow these instructions: 1. Remove the cover on the back of the remote control. ... - Page 30 SETTING MODES Cooling mode Ideal for cooling the room in hot and humid weather. OPERATING PANEL REMOTE CONTROL Push the -button until… Push the -button until… ….the „COOL“ indicator on the panel lights up. With the buttons you can set the desired temperature – please pay attention to the display: With the „FAN SPEED“- button, you can With the...
- Page 31 Dehumidification mode Perfectly suited to reducing the humidity in the room (e.g. in the spring and autumn, in humid rooms, during rainy periods etc.). OPERATING PANEL REMOTE CONTROL Push the -button until… Push the -button until… ….the „DRY“ indicator on the panel lights up and the display shows In this mode, fan speed is selected automatically by the appliance and default low speed fan.
-
Page 32: Tips For Correct Use
SWITCH THE UNIT OF THE TEMPERATUR You can choose between CELCIUS and FAHRENHEIT: OPERATING PANEL REMOTE CONTROL Push the △ or ▽-button for about 3 Push the -button to change the unit of seconds, to change the unit of temperature: the temperature: CELCIUS: FAHRENHEIT:... -
Page 33: Maintence And Cleaning
TIPS FOR CORRECT USE Here you will find information on the optimal use of your air conditioning unit: Close the windows and doors of the room you want to use the air conditioning unit in. Close windows & doors. Protect the room from direct sunlight using curtains, Venetian blinds or roller blinds to save energy. - Page 34 CLEANING THE HOUSING Switch the device off prior to cleaning, wait a few minutes and then always the plug to disconnect the device from mains. Clean the device using a slightly damp cloth, follow up with a dry cloth. For safety reasons never use water to clean the device.
-
Page 35: Tasks At Beginning And End Of The Season
PERMANENT WATER DRAIN You have the option to install a permanent water drain, so you DRY MODE do not have to drain the water tank manually each time you intend the use the unit for a longer period (or if the water pump fails). -
Page 36: Selfdiagnose
CHECKS AT BEGINNING OF SEASON Make sure the power supply cable and the outlet are fault free and that it is properly grounded. Make sure the plug is properly fitted to the condensation outlet and that the filters have been inserted. -
Page 37: Troubleshooting
TROUBLE SHOOTING Before you contact our customer hotline / service point, please check whether the error can be corrected using the information below: PROBLEM POSSIBLE CAUSE LÖSUNG Power outage. Wait for power to come back on. The device is not connected to a Connect the device to a power power supply. -
Page 38: Technical Informations
Schuss Home Electronic GmbH Contact addresses for further information Scheringgasse 3, A-1140 Wien Tel: +43 (1) 97 0 21 – 0 Serviceline: +43 (1) 97 0 21 – 502 www.she.at FB-Nr: 236974 t / FB-Gericht: Wien Seite 38 von 45... -
Page 39: Warranty
By purchasing a SHE quality product you have acquired an innovative, long lasting and reliable item. For this SHE device we grant a warranty of 2 years from the date of purchase, valid in Austria only. In the unlikely event that service work is required on your device in this period we warrant free repair (spare parts and labour) or (subject to Schuss’s decision) to replace the product. -
Page 40: Nur Für Das She-Servicecenter Reparaturanweisungen Für Geräte Die R290 Enthalten
öffnen dies führt zum sofortigen Verlust des Garantieanspruchs. IMPORTANT! These instructions are only for the SHE-Service center! A Service or repairing of the device must only be performed by a qualified technician who is allowed to handle the R290 refrigerant. - Page 41 1.6 No ignition sources No person carrying out work in relation to a refrigeration system which involves exposing any pipe work that contains or has contained flammable refrigerant shall use any sources of ignition in such a manner that it may lead to the risk of fire or explosion. All possible ignition sources, including e- cigarette smoking, should be kept sufficiently far away from the site of installation, repairing, removing and disposal, during which flammable refrigerant can possibly be released to the surrounding space.
- Page 42 Intrinsically safe components are the only types that can be worked on while live in the presence of a flammable atmosphere. The test apparatus shall be at the correct rating. Replace components only with parts specified by the manufacturer. Other parts may result in the ignition of refrigerant in the atmosphere from a leak.
- Page 43 9 DECOMMISSIONING Before carrying out this procedure, it is essential that the technician is completely familiar with the equipment and all its detail. It is recommended good practice that all refrigerants are recovered safely. Prior to the task being carried out, an oil and refrigerant sample shall be taken in case analysis is required prior to re-use of reclaimed refrigerant.
- Page 44 Competence of service personnel General Special training additional to usual refrigerating equipment repair procedures is required when equipment with flammable refrigerants is affected. In many countries, this training is carried out by national training organizations that are accredited to teach the relevant national competency standards that may be set in legislation. The achieved competence should be documented by a certificate.
-
Page 45: Seite 2 Von
Evacuate again. Remove parts to be replaced by cutting, not by flame. Purge the braze point with nitrogen during the brazing procedure. Carry out a leak test before charging with refrigerant. Reassemble sealed enclosures accurately. If seals are worn, replace them. ...
Need help?
Do you have a question about the 7KL2005F and is the answer not in the manual?
Questions and answers