SOLIS GRIND & INFUSE PERFETTA User Manual
Hide thumbs
Also See for GRIND & INFUSE PERFETTA:
- User manual (40 pages) ,
- Quick start manual (127 pages)
Table of Contents
Advertisement
Advertisement
Table of Contents

Related Manuals for SOLIS GRIND & INFUSE PERFETTA


Summary of Contents for SOLIS GRIND & INFUSE PERFETTA
- Page 1 GRIND & INFUSE PERFETTA Type 1019 User manual...
-
Page 2: Table Of Contents
CHANGING THE AMOUNT OF COFFEE STORAGE DAILY MAINTENANCE WEEKLY MAINTENANCE MONTHLY MAINTENANCE REPLACING THE WATER FILTER CARTRIDGE USING THE BREWING HEAD CLEANING CYCLE DESCALING CLEANING A BLOCKED GRINDER RESET TING FUNCTIONS TECHNICAL SPECIFICATIONS TROUBLESHOOTING ALARMS DISPOSAL 2 YEAR GUARANTEE SOLIS CUSTOMER SERVICE... -
Page 3: Important Safety Precautions
I N T E N D E D U S E • This appliance is intended to prepare various types of coffee with freshly ground beans. • Only use the appliance as described in this manual. • This appliance is intended to be used in household and similar applications such as: –... - Page 4 – Always wear dry rubber gloves to unplug the appliance before taking it out of the water. – Do not start using the appliance again before having it checked for functionality and safety by Solis or a service center authorized by Solis. •...
- Page 5 Do not operate the appliance with wet hands. • Only use the appliance with the provided accessories or accessories recommended by Solis. Incorrect accessories or misuse can lead to damage to the appliance. • Do not move the appliance when in use.
- Page 6 • Never remove the portafilter during the brewing process. • During or directly after the steaming process, only touch the steam and hot water wand by the thermo-insulated loop. The steaming wand gets hot. • Never point the steam and hot water wand towards people, animals, or moisture sensitive items.
-
Page 7: Vco N T E N T S
• Do not use any oils or lubricants on this appliance. • Do not store the appliance in temperatures below 0 °C or above 55 °C. CO N T E N T S Please check the contents of the package: 1x GRIND &... -
Page 8: Appliance Description
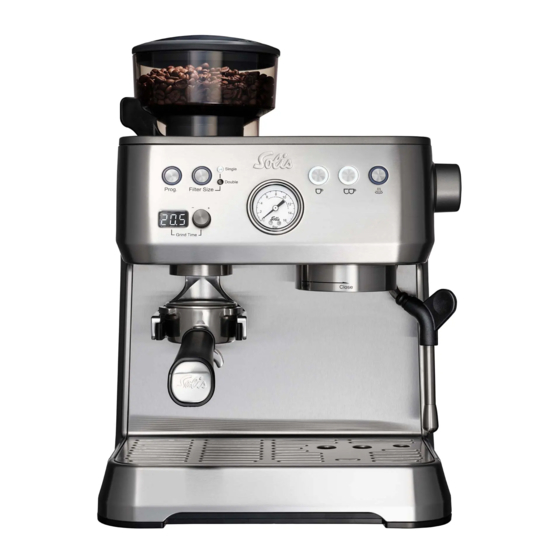
A P P L I A N C E D E S C R I P T I O N The GRIND & INFUSE PERFETTA is an espresso machine that can make an espresso with freshly ground beans. The appliance is equipped with a steaming wand to make steamed milk or heat beverages. -
Page 9: Control But Tons
Bean container Power cable Cup tray Milk jug Portafilter holder Test strip Brewing head Cleaning brush Steaming wand Cleaning tool Drip tray Rubber insert for cleaning Grinder unlock button Tamper Water tank Double cup filter Water filter cartridge Single cup filter Accessories storage Portafilter Power button... -
Page 10: Installation
I N S TA L L AT I O N To install the appliance: Place the appliance on a stable, flat, and heat and moisture resistant surface. Place the bean container on the appliance. Rotate until the bean container locks in place. Plug the power cable into a power outlet. -
Page 11: Making An Espresso
M A K I N G A N E S P R E S S O To make an espresso with freshly ground coffee: Choose if you want to make one or two espressos. Place empty cups on the cup tray to preheat the cups. - Page 12 6 Do not overfill the portafilter. The coffee ground should not make contact with the brewing head when placed to ensure a proper seal. 17. Remove any coffee ground from the edge of the portafilter s. 18. Pull the steaming wand to the side.
-
Page 13: Tips For A Perfect Espresso
6 Do not leave the appliance unattended when in use. To program the amount of coffee, go to chapter Changing the amount of coffee. 21. Press the corresponding cup extraction button to start the process. During the coffee extraction, the display shows the brewing time. 22. -
Page 14: Steaming Milk
Consult the table below for how to use different settings for a different taste. Espresso properties Stronger, bitter, and Weak, less bitter, and smaller espresso bigger espresso Grind size Finer grind size Coarser grind size Amount More coffee ground Less coffee ground Tamping pressure More firm More gently... - Page 15 To steam milk: Press the steaming function button to activate the steaming function. The appliance heats up the steaming function. The steaming function button blinks. When the steaming function is ready, the steaming function button constantly light up white. Fill the milk jug with milk (max.
-
Page 16: Using The Hot Water Function
U S I N G T H E H OT WAT E R F U N C T I O N 6 During or directly after use, only touch the rubber handle of the steam and hot water wand. The steaming wand gets hot. -
Page 17: Changing The Brewing Temperature
20 minutes after the energy saving mode time, the machine will shut down (image When the cup extraction buttons light up white, the appliance is ready for use . C H A N G I N G T H E B R E W I N G T E M P E R AT U R E To set the brewing temperature: Press the programming button to enter the settings menu. -
Page 18: Changing The Amount Of Coffee
Press the programming button to confirm the setting and to enter the water hardness menu. Rotate the grind time knob to change the water hardness setting (see chapter Alarms). Press the programming button to confirm and save the new value. When the appliance beeps twice and the cup extraction buttons light up white, the appliance is ready for use. -
Page 19: Weekly Maintenance
W E E K LY M A I N T E N A N C E We recommend doing the following maintenance weekly: Empty the drip tray 6. Clean the drip tray with water and a mild detergent. Set the grind size selector to COARSE. - Page 20 Switch off the appliance and remove the bean container (see image E). Empty the bean container 1.
- Page 21 GRINDZ You can buy GRINDZ at your supplier or Solis (art. No. 993.08). 11. Open the hopper gate at the back of the bean container 1. 12. Place a container under the portafilter holder 3.
- Page 22 21. Dry the bean container thoroughly. 22. Reassemble the grinder and the bean container 1. Make sure all parts lock in place. 23. Fill the bean container with coffee beans. 24. Open the hopper gate at the back of the bean container 1. 25.
-
Page 23: Replacing The Water Filter Cartridge
R E P L AC I N G T H E WAT E R F I LT E R C A R T R I D G E Replace the water filter cartridge when the corresponding alarm is visible (see chapter Alarms). -
Page 24: Using The Brewing Head Cleaning Cycle
Insert the water filter cartridge into the bracket in the water tank with the selector facing downwards. Fill the water tank with water up to the MAX marking. 10. Insert the water tank into the appliance. 11. Place a container (min. 500 ml) underneath the brewing head 4. 12. - Page 25 Insert and rotate the portafilter into the brewing head (see image I). Make sure the handle is aligned with the CLOSE marking. Place a container underneath the portafilter s. Press the programming button d. Press the double cup extraction button to start the rinsing procedure.
-
Page 26: Descaling
D E S C A L I N G Descale the appliance when the corresponding alarm is visible (see chapter Alarms). For descaling of the machine, please use a descaling agent which is suitable for espresso machines. 6 When the descaling alarm shows up, descale the appliance immediately to avoid permanent damage to the appliance. - Page 27 Remove the water tank from the appliance (see image J). Empty the water tank above a sink. Remove the water filter cartridge from the water tank 8. Fill the water tank with descaling agent and water. The minimum level required for descaling is 1 litre.
- Page 28 The descaling process takes 20 minutes. During the process: Rotate the steaming knob • anticlockwise when the display shows OP. Rotate the steaming knob • clockwise when the display shows CL. 6 If the descaling procedure is interrupted (e.g. during a power loss) we recommend to complete the procedure when the interruption is solved.
-
Page 29: Cleaning A Blocked Grinder
11. Place back the bean container. Make sure all parts lock in place. If the grinder is still not working, contact your supplier or Solis. R E S E T T I N G F U N C T I O N S... -
Page 30: Technical Specifications
T E C H N I C A L S P E C I F I C AT I O N S Model-No. 1019 Voltage / frequency 220–240 V~ / 50 – 60 Hz Output 1420 - 1700 W Dimensions (W x D x H) 30.9 x 41.2 x 37.3 cm Weight 9.0 kg... - Page 31 The steaming wand nozzle is Clean the steaming wand clogged. nozzle (Chapter Monthly maintenance). The appliance is damaged Contact Solis or a Solis authorized service center. The water filter cartridge is Replace the water filter logged. cartridge (see chapter Replacing the water filter...
- Page 32 The steaming wand nozzle is Clean the steaming wand clogged. nozzle (Chapter Monthly maintenance). The appliance is damaged Contact Solis or a Solis authorized service center. The water filter cartridge is Replace the water filter logged. cartridge (see chapter Replacing the water filter cartridge).
- Page 33 The appliance is not switched Make sure the appliance is switched on. The appliance is damaged. Press any button. If the appliance doesn’t switch on, the appliance is damaged. Contact Solis or a Solis authorized service center.
-
Page 34: Alarms
A L A R M S 6 It is possible that multiple alarm signals are visible at the same time. When this occurs, fix all the alarms individually according to the description in this manual. When both cup extraction buttons light up white, the appliance is ready for use. -
Page 35: Disposal
Please visit us at www. solis.com for countryspecific contact details. Naturally, we would also be pleased to provide you with information over the phone. Please contact us via the following... - Page 37 Schweiz / Suisse / Svizzera Nederland �� Solis Produzione SA �� Solis Benelux BV Centro Solis Stadskade 318 Via Penate 4 NL – 7311 XX Apeldoorn CH – 6850 Mendrisio Afwijkend adres voor productretouren – zie: www.solis.com Adresse für Warenretouren abweichend – siehe: �� 085 –...
- Page 38 Solis of Switzerland Ltd Solis-House • CH-8152 Glattbrugg-Zurich • Switzerland www.solis.ch • www.solis.com Please visit us at www.solis.com...
Need help?
Do you have a question about the GRIND & INFUSE PERFETTA and is the answer not in the manual?
Questions and answers