Advertisement
Quick Links
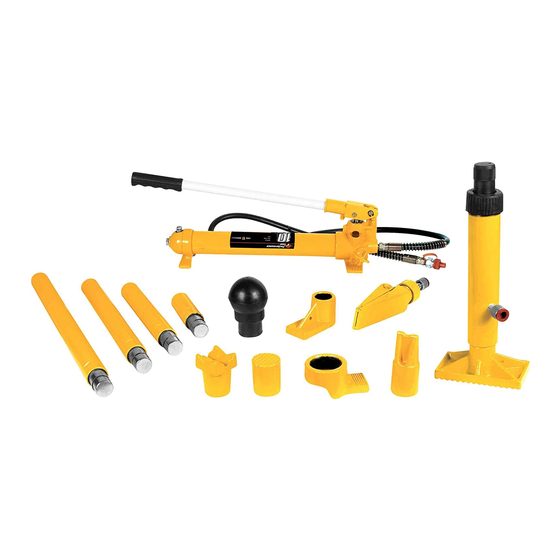
10 TON HYDRAULIC RAM SYSTEM
Item Number W1651
OWNER'S MANUAL
WARNING
It is the owner and/or operators' responsibility to study all WARNINGS, operating, and maintenance
instructions contained on the product label and instruction manual prior to operation of this product.
The owner/operator shall retain product instructions for future reference.
The owner and/or operator are responsible for maintenance, maintaining all decals or warning labels
and while in use, maintaining the unit in good working order. If the owner and/or operator are not
fluent in English, the product warnings and instructions shall be read and discussed with the
operators' native language by the purchaser/owner or his designee. Make sure that the operator
comprehends its contents. Safety information shall be emphasized and understood prior to usage.
The product shall be inspected per the operating instructions.
Users of this product must fully understand these instructions. Each person operating this product
must also be of sound mind and body and must not be under the influence of any substance that
might impair their vision, dexterity, or judgment.
Protect yourself and others by observing all safety information.
Failure to comply with instructions could result in personal injury and/or property damage!
If you encounter any problems or difficulties, please contact our customer service department at:
1-800-426-1262 between 6:30 a.m. and 4:30 p.m. Pacific time.
Advertisement

Summary of Contents for Performance Tool W1651
- Page 1 10 TON HYDRAULIC RAM SYSTEM Item Number W1651 OWNER’S MANUAL WARNING It is the owner and/or operators’ responsibility to study all WARNINGS, operating, and maintenance instructions contained on the product label and instruction manual prior to operation of this product.
- Page 2 SAFETY GUIDELINES / DEFINITIONS This instruction manual is intended for your benefit. Please read and follow the safety, installation, maintenance and troubleshooting steps described within to ensure your safety and satisfaction. The contents of this instruction manual are based upon the latest product information available at the time of publication. The manufacturer reserves the right to make product changes at any time without notice.
- Page 3 IMPORTANT SAFETY INFORMATION 1. Study, understand, and follow all instructions 11. Store tools/equipment out of reach of before operating this device. children and other untrained persons. Tools and equipment are dangerous in the hands 2. DO NOT exceed rated capacity. Overloading of untrained users.
- Page 4 PACKAGING CONTENTS Description Quantity Description Quantity Pump Flat Base Spreader Wedge Ram Toe Plunger toe Case Wedge head 4 1/4 in. Extension V-base 10 in. Extension Male Connector 14 1/2 in. Extension Cap Head 20 1/2 in. Extension Rubber head SETUP INSTRUCTIONS Ram Attachments: 1.
- Page 5 SETUP INSTRUCTIONS Note: The Flange Base and Flange Head must only be used together to prevent an off center load. Note: When positioning the Ram (3) use a smaller attachment on the side that is to be bent instead of the stationary side. If the stationary side is in danger of being bent or damaged, place a block of wood or other material behind the Flat Base (9) to distribute pressure over a greater area.
- Page 6 BEFORE USE NOTICE During shipment or handling, air in the pump can become trapped in the hydraulic system causing the pump to malfunction. Bleeding The Pump: 1. Set Pump (1) flat on a level surface. 2. Remove the Fill Screw (A). The O-ring (B) should come off with it. 3. The fluid level should be near the bottom of the opening. If required, add high grade hydraulic fluid.
- Page 7 5. Keep the surface of this equipment and 2. Replace worn or damaged parts with its accessories free of hydraulic fluid Performance Tool® replacement parts. and grease. Use only a mild detergent Be sure that only qualified person- and damp cloth when cleaning. Do not nel perform repairs. DO NOT attempt...
- Page 8 CARE & MAINTENANCE 6. For best results, use only hydraulic Fig. 5 fluid with a rating of SAE 20 for refills. Check fluid level with pump in fully down position. 7. Change the hydraulic oil at least once every three years: a. Set Pump (1) flat on a level surface. b. Remove the Fill Screw (A). The O- ring (B) should come off with it. c.
- Page 9 TROUBLESHOOTING This Performance Tool® product was constructed with quality materials and workmanship and will give you many years of trouble free use when cared for as described in the "Care & Maintenance" section on page 7-8. However, as with any mechanical device, periodic adjustments are necessary to maintain a peak level of performance.
- Page 10 REPLACEMENT PARTS LIST PUMP Description Description Valve Block Screw Oil Filter Plastic Cup O-ring Screw Reservoir Nylon Ring Tie Rod Sealing Ring Nylon Ring O-Ring Fill Plug Nylon Ring Sealing Ring Screw Air Valve O-Ring Screw Nylon Ring O-ring Piston Pump Leg Ball Circlip...
- Page 11 REPLACEMENT PARTS LIST SPREADER WEDGE Description Description O-ring Circlip End Cap Moveable Jaw Coupling Ring Spring Coupling Bolt Fixed Jaw O-Ring Piston Dust Cap Cup Seal Description Cover Circlip Piston Rod Circlip Bushing Nylon Ring Sealing Ring Circlip Spring Screw Protection Cup Ring Cylinder...
- Page 12 90 days from the date of purchase, provided that product is returned to place of purchase immediately after discovery of defect. After 90 days and up to one year from date of purchase, PERFORMANCE TOOL®...


Need help?
Do you have a question about the W1651 and is the answer not in the manual?
Questions and answers