Advertisement
Quick Links
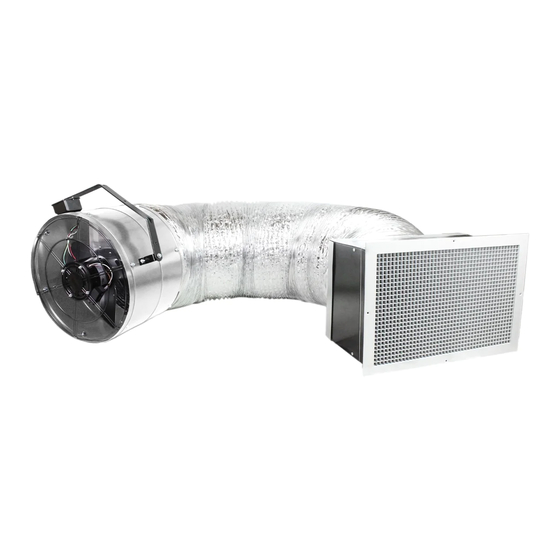
INSTALLATION INSTRUCTIONS
DUCTED WHOLE HOUSE FANS
Read all warnings and instructions before beginning to install this fan.
WARNING – TO REDUCE THE RISK OF FIRE, ELECTRIC SHOCK, OR INJURY TO
a) Installation work and electrical wiring must be done by qualified person(s) in accordance with all
applicable codes and standards, including fire-rated construction.
b) Sufficient air is needed for proper combustion and exhausting of gases through the flue
(chimney) of fuel burning equipment to prevent back drafting. Follow the heating equipment
manufacturer's guideline and safety standards such as those published by the National Fire
Protection Association (NFPA), and the American Society for Heating, Refrigeration and Air
Conditioning Engineers (ASHRAE), and the local code authorities.
c) When cutting or drilling into wall or ceiling, do not damage electrical wiring and other hidden
utilities.
WARNING –
d)
FAN WITH ANY SOLID-STATE SPEED CONTROL DEVICE.
e) Use this unit only in the manner intended by the manufacturer. If you have questions, contact the
manufacturer.
f) Before servicing or cleaning unit, switch power off at service panel and lock the service disconnecting
means to prevent power from being switched on accidentally. When the service disconnecting means
cannot be locked, securely fasten a prominent warning device, such as a tag, to the service panel.
DOUBLE CHECK FAN BLADES ARE SECURE TO HUB PRIOR TO INSTALLATION.
BLADES CAN BE DAMAGED DURING SHIPMENT AND CAN BECOME A HAZARD
1. This unit has an unguarded propeller. Do not use in locations readily accessible to people or animals.
2. For general ventilating use only. Do not use to exhaust hazardous or explosive materials and vapors.
3. Carbon monoxide is an odorless, colorless gas that can kill. It may be drawn into the house by operating
this fan if your fuel-burning equipment is not properly maintained, or if you lack adequate attic space.
FOR
Fan Models: CX1401, CX1801
PERSONS, OBSERVE THE FOLLOWING:
TO REDUCE THE RISK OF FIRE OR ELECTRIC SHOCK, DO NOT USE THIS
CAUTION
UPON ACTIVATION OF MOTOR!
Advertisement

Related Manuals for Maxx air CX1401


Summary of Contents for Maxx air CX1401
- Page 1 INSTALLATION INSTRUCTIONS DUCTED WHOLE HOUSE FANS Fan Models: CX1401, CX1801 Read all warnings and instructions before beginning to install this fan. WARNING – TO REDUCE THE RISK OF FIRE, ELECTRIC SHOCK, OR INJURY TO PERSONS, OBSERVE THE FOLLOWING: a) Installation work and electrical wiring must be done by qualified person(s) in accordance with all applicable codes and standards, including fire-rated construction.
-
Page 2: Installation Instructions
The damper assembly box requires a rough opening to be cut that is 14-½” x 22-½”. CX1401- Adequate for 533 sq. ft. house. Requires a minimum of 310 sq. in. of Net Free Exhaust Area CX1801- Adequate for 930 sq. ft. house. Requires a minimum of 535 sq. in. of Net Free Exhaust Area *When measuring vents for NFA, remember that louvers and screens cut down considerably on the available free air —... - Page 3 Parts Included • Fan, hanging bracket, duct and transition • 5/16" x 2-1/2" bolt • 5/16" x 3/4" bolt assembly • • Damper assembly box 2 - 5/16" locknuts • • Intake grille and mounting screws 4 - 5/16" flat washers •...
- Page 4 IMPORTANT: Ensure that the distance between the ceiling joists members is at least 14-½ inches. Also ensure there is an acceptable fan mounting location 10 feet or less from the location where the wire is being used to mark the location of the damper assembly box installation.
- Page 5 Step 4 (Living space): • Slide the damper box assembly up into the hole and secure it to the ceiling structure using a minimum of a two inch (2”) long wood or sheetrock screws. Be sure to avoid installing these screws toward the middle of the damper assembly flanges as the intake grille will screw in at the middle of the damper box flanges as shown in Figure C.
- Page 6 Step 6 (Attic): • Extend the duct and duct transition down to the damper assembly box. • Fit the duct transition over the top of the damper assembly box. Ensure that it sits flush against the top of the damper assembly box as shown in Figure E. •...
- Page 7 Step 7 (Living space): NOTE: All electrical wiring supplied and installations must meet or exceed the requirements of local electrical and fire codes. Wire to 120 Volt, 60 Hz circuit only, using a minimum of 14/2, two-conductor wiring with ground for the primary wiring run.
- Page 8 Step 9 (Living space): NOTE: Ensure that power supply is disconnected or turned OFF before connecting the primary wiring run. Install the provided switches in a UL listed double gang wiring junction box. • Connect the incoming power supply wire (usually Black) to the top right terminal of the On/Off switch (1). •...
- Page 9 Operating Instructions Whole House Fans cool your home by pulling in fresh, cooler air from outside through open windows and doors. For best results in a multi-story home, windows should be opened on alternate levels for most efficient cooling. NEVER operate fan without open windows or doors. CAUTION: If your home has a fireplace, be sure that the flue damper is closed to prevent chimney soot from being DO NOT operate the fan when a fire is burning in the fireplace.
-
Page 10: Limited Warranty
No other parts or components are warranted. There is no warranty for defects caused by abuse, faulty installation, or the like. CX1401, CX1801 Limited 10-Year Repairs or replacement parts supplied under this warranty are warranted only for the period of this warranty; that is, for the time period stated by model number above, from the date of the original retail purchase of the unit.
Need help?
Do you have a question about the CX1401 and is the answer not in the manual?
Questions and answers