Fisher-Price 73528 Instructions Manual
Hide thumbs
Also See for 73528:
- Manual (32 pages) ,
- Instructions manual (13 pages) ,
- Instruction sheet (12 pages)
Advertisement
Quick Links
e • Please keep this instruction sheet for future reference,
as it contains important information.
• Adult assembly is required.
½
• Age: 1
years - 5 years.
• Weight Limit: 23 kg (50 lbs).
• Tools needed for assembly: Phillips Screwdriver,
Hammer and Scrap Block of Wood (all not included).
f • Conserver ce livret d'instructions car il contient
des renseignements importants.
• Ce produit doit être assemblé par un adulte.
½
• Âge-: 1
- 5 ans
• Poids maximal-: 23 kg
• Outils requis pour l'assemblage : tournevis cruciforme,
marteau et bloc de bois (non fournis).
S • Guardar estas instrucciones para futura referencia, ya que
contienen información de importancia.
• Requiere montaje por un adulto.
½
• Edades: 1
a 5 años
• Peso máximo: 23 kg
• Herramientas necesarias para el montaje: Destornillador
de cruz, martillo y pedazo de madera (no incluidas).
P • Por favor, guarde este folheto de instruções
para referência futura, pois ele contém
informações importantes.
• É necessário que a montagem seja feita por um adulto.
• Para crianças de 1 ano e meio a 5 anos.
• Limite de peso: 23 kg.
• Ferramentas necessárias para a montagem: chave
Phillips, Martelo e Pedaço de Bloco de Madeira
para Apoio (não inclusos).
www.fisher-price.com
73528
Advertisement

Related Manuals for Fisher-Price 73528


Summary of Contents for Fisher-Price 73528
- Page 1 73528 e • Please keep this instruction sheet for future reference, S • Guardar estas instrucciones para futura referencia, ya que as it contains important information. contienen información de importancia. • Adult assembly is required. • Requiere montaje por un adulto.
-
Page 2: Consumer Information
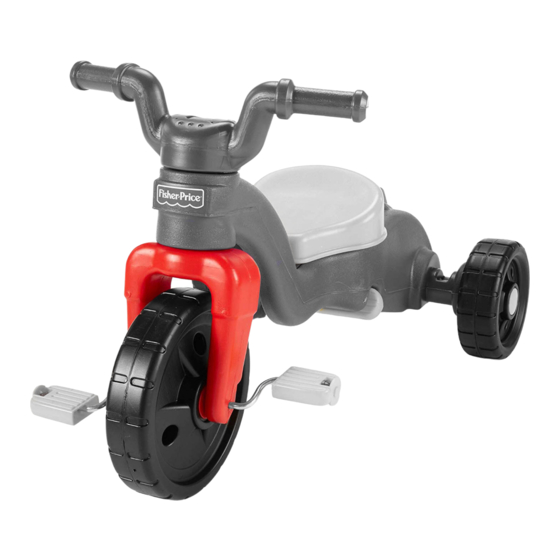
e CONSUMER INFORMATION f SERVICE Á LA CLIENTÈLE S INFORMACIÓN PARA EL CONSUMIDOR P INFORMAÇÃO AO CONSUMIDOR e WARNING f AVERTISSEMENT S ADVERTENCIA P ATENÇAO e To avoid serious injury: • Adult supervision is required. • Never use near cars and other motor vehicles, near streets, steps, sloped driveways, hills, roadways, alleys, swimming pool areas or other bodies of water. - Page 3 e PARTS f PIÈCES S PIEZAS P PEÇAS e Seat e Seat Pin e NOTE: The base/handle f Selle f Tige de selle assembly can be attached S Asiento S Clavija del asiento to the trike in either the P Assento P Pino do Assento Ride-on Rocker (page 10) or Learn to Pedal (page...
- Page 4 e ASSEMBLY f ASSEMBLAGE S MONTAJE P MONTAGEM e IMPORTANT! • Please save all packaging material until assembly is complete to e Straight Axle ensure that no parts are discarded. f Essieu droit • Please wipe each part with a clean, dry, cloth before assembling S Eje recto this product.
- Page 5 e Rear Wheel Spoke Side Up e Cap Nut e Wheel Cap f Roue arrière, le côté avec f Écrou borgne f Chapeau de roue S Tuerca ciega rayons vers le haut S Tapón de la rueda S Rueda trasera con el rayo para arriba P Capa da Porca P Capa da Roda P Roda Traseira Lado Externo...
- Page 6 • Ajustar el tornillo con un destornillador de cruz, sin apretarlo en exceso. Fisher-Price, Inc., a subsidiary of Mattel, Inc., East Aurora, New York 14052, U.S.A. ©2008 Mattel, Inc. All Rights Reserved. ® and ™ designate U.S. trademarks of Mattel, Inc.
- Page 7 P • Coloque a estrutura de pé. • Encaixe a cabeça do garfo no espaço reservado da estrutura. Cuide para que o garfo esteja posicionado de maneira que as capas do garfo apontem para as rodas traseiras. • Coloque o guidom sobre a cabeça do garfo e empurre-o para encaixar na estrutura.
- Page 8 e Seat Pin f Tige de la selle S Clavija del asiento P Pino do Assento e • Insert 13 - #8 x 1.9 cm ( ¾ ") screws through the handle top, base and e • While pushing down on the seat, insert the seat pin through the hole in into the handle bottom.
- Page 9 e LABEL APPLICATION e Flared End e Handle Cover e Trike f Extrémité élargie f Couvre-poignée f Tricycle S Extremo ancho f POSE DES ÉTIQUETTES S Tapa del manubrio S Triciclo P Ponta Curva P Capa da Alça P Triciclo S PEGAR LAS ETIQUETAS P APLICAÇÃO DO ADESIVO e Handle...
- Page 10 e RIDE-ON ROCKER e LEARN TO PEDAL TRIKE f TRICYCLE À BASCULE f APPRENDRE À PÉDALER S MECEDORA S TRICICLO DE APRENDIZAJE P BALANÇO P TRICICLO PARA APRENDER A PEDALAR e IMPORTANT! Be sure to adjust the seat in the most forward position for Ride-on Rocker mode.
- Page 11 S • Para convertir de la modalidad de aprendizaje a la modalidad independiente, quitar la clavija del manubrio de la base/manubrio yel dorso del armazón. e Handle Pin P • Se você estiver convertendo a partir do modo Aprenda a Pedalar, f Tige de poignée S Clavija del manubrio remova o pino da alça da base/alça e da parte traseira da estrutura.
- Page 12 f Conseil : Pour l’entreposage, placer les couvre-poignées, les extrémi- tés élargies vers le haut, et les fixer à la poignée avec quatre vis. Puis, insérer la tige de poignée dans un des trous de la base/poignée ou dans les trous des dispositifs de retenue de roue. Ranger la base/ poignée dans un lieu sûr pour utilisation ultérieure en mode pour se bercer ou en mode pour apprendre à...
Need help?
Do you have a question about the 73528 and is the answer not in the manual?
Questions and answers