Fisher-Price 73528 Instructions Manual
Rock, roll ‘n ride trike
Hide thumbs
Also See for 73528:
- Manual (32 pages) ,
- Instruction sheet (12 pages) ,
- Instructions manual (12 pages)
Advertisement
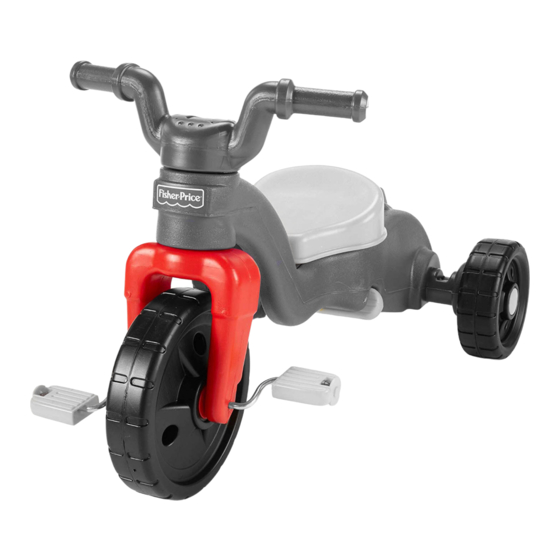
Rock, Roll 'n Ride Trike
Rock, Roll 'n Ride Trike
TM
Instructions
Model Number: 73528
Please keep this instruction sheet for future reference, as it contains important information.
Adult assembly is required.
Age: 1
1
/
years - 5 years.
2
Weight Limit: 50 lbs. (23 kg).
Tools needed for assembly: Phillips Screwdriver, Hammer and Scrap Block of Wood (all not included).
If you have any questions about this product, or are missing a part, please call
us toll-free at 1-800-432-KIDS, rather than return this product to the store.
Advertisement
Table of Contents

Related Manuals for Fisher-Price 73528


Summary of Contents for Fisher-Price 73528
- Page 1 Rock, Roll ‘n Ride Trike Rock, Roll ‘n Ride Trike Instructions Model Number: 73528 Please keep this instruction sheet for future reference, as it contains important information. Adult assembly is required. Age: 1 years - 5 years. Weight Limit: 50 lbs. (23 kg).
- Page 2 #8 x " Screw - 13 Please read these instructions carefully and identify all parts before assembly. Refer to the parts page for identifica- tion.Call Fisher-Price ® Consumer Relations, toll-free at 1-800-432-KIDS, 8 AM - 6 PM EST Monday through Friday.
- Page 3 Parts Parts Note: The base/handle assembly can be attached to the trike in Seat Pin either the Ride-on Rocker (page 9) or Learn to Pedal (page 10) mode. Seat Handlebar Frame Cover 2 Base/Handle Covers Frame Straight Axle 2 Rear Wheels 2 Cap Nuts Footrest Fork...
- Page 4 Assembly Assembly • Please save all packaging material until assembly is complete to ensure that no parts are discarded. • Please wipe each part with a clean, dry, cloth before assembling this product. CAUTION This product contains small parts in its unassembled state.
- Page 5 Assembly Assembly Pedal Axle Cover Metal Tab Pedal Axle Rear Wheel Spoke Side Up Cap Nut Pedal Axle Cover Slot Straight Axle • Fit two pedal axle covers onto the pedal axle metal tabs. Make sure the metal tabs fit into the slot in each pedal axle cover.
- Page 6 • Place a fork cover over the pedal axle on one fork arm. Fisher-Price, Inc., a subsidiary of Mattel, Inc., East Aurora, NY 14052, U.S.A. • Insert two #10 x " screws into the fork cover and tighten ©2002 Mattel, Inc.
- Page 7 Assembly Assembly Frame Cover Handlebar Frame Neck Fork Post FIRST, insert the screw " so that is visible. THEN, tighten the screw with a Phillips screwdriver. " Fork Covers • Place the frame cover over the frame opening. Make sure the holes in the frame cover align with the holes •...
- Page 8 Assembly Assembly Seat Pin • Insert 13 - #8 x " screws through the handle top, base • While pushing down on the seat, insert the seat pin and into the handle bottom. Tighten the screws with a through the hole in the seat and into a seat mount Phillips screwdriver.
- Page 9 Assembly Ride-on Rocker Assembly Ride-on Rocker IMPORTANT! Be sure to adjust the seat in the most forward Flared End position for Ride-on Rocker mode. Trike Handle Cover Base/Handle • Position the base/handle covers so that the flared end faces the front of the trike. •...
- Page 10 Learn to Pedal Trike Learn to Pedal Trike Learn to Pedal Trike Learn to Pedal Trike Base/Handle • Rotate the base/handle to the upright position. Base/Handle Handle Pin • Insert the handle pin through one side of the base/handle, through the holes in the back of the frame and out through the hole in the other side of the base/handle.
- Page 11 Pedal Trike Pedal Trike Base/Handle Handle Pin • If you are converting from the learn to pedal trike mode, remove the handle pin from the base/handle and the back of the frame. Base/Handle • Rotate the base/handle down, under the trike, to the ride- on rocker position.
- Page 12 Pedal Trike Pedal Trike Storage Storage Flared End Base/Handle Cover Handle Cover Handle Pin Base/Handle • Remove the screws from the base/handle covers. • Remove the base/handle covers. • Remove the base/handle. Handle Cover Helpful Hint: To store for future use, position the handle covers with the flared end upright and attach them to the handle using the four screws.
Need help?
Do you have a question about the 73528 and is the answer not in the manual?
Questions and answers