Advertisement
Quick Links
101 N. Alloy Dr.
Fenton, MI 48430
Research, Development and Manufacturing of Precision Measuring Systems
LMI 241-BWV2 or 241-FG the LMI 440 or ASI DATAMYTE 501
This instruction will outline:
I.
GAGE CONFIGURATION....................................................................................................................................... 2
Flush Setup ............................................................................................................................................................ 2
Gap Setup............................................................................................................................................................... 6
II.
MASTERING INSTRUCTIONS .............................................................................................................................. 9
III. VERIFICATION OF THE MASTERING............................................................................................................. 11
Flush Verification................................................................................................................................................ 11
Gap Verification .................................................................................................................................................. 12
Form: CA 045
5-05-05
CONFIGURATION and MASTERING for the
2
1
4
C:\Documents and Settings\timmartin\Local Settings\Temporary Internet Files\OLK9\CA
045 LMI 241-BWV2 to 440 or 501.doc
3
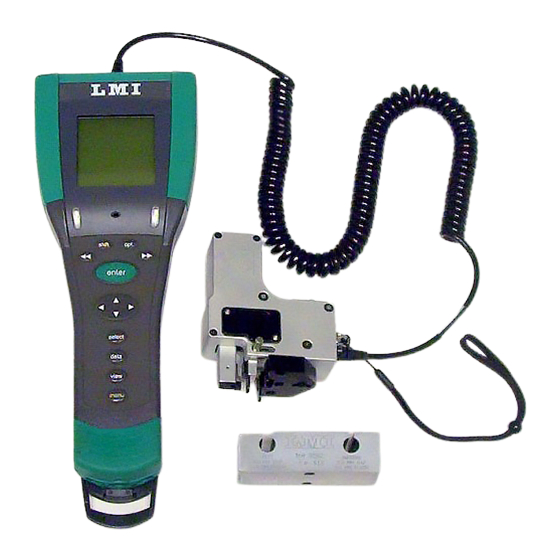
Required Equipment:
1. LMI 440 or ASI DataMyte 501
2. LMI 241BWV2 or 241-FG
3. LMI 6025 6 pin to 6pin cable
4. LMI 3062 Master Block
Ph
(810) 714-5811
Fax (810) 714-5711
CustomerService@lmicorporation.com
Page 1 of
12
Advertisement

Related Manuals for LMI 241-BWV2


Summary of Contents for LMI 241-BWV2
-
Page 1: Table Of Contents
Fax (810) 714-5711 CustomerService@lmicorporation.com Research, Development and Manufacturing of Precision Measuring Systems CONFIGURATION and MASTERING for the LMI 241-BWV2 or 241-FG the LMI 440 or ASI DATAMYTE 501 Required Equipment: 1. LMI 440 or ASI DataMyte 501 2. LMI 241BWV2 or 241-FG 3. -
Page 2: Gage Configuration
(master) point. To reverse the value enter -10 for “Scale” in step 9 & 10 Press <menu> to turn on the collector. Press ▼ to highlight “Gage”. Press <enter>. C:\Documents and Settings\timmartin\Local Settings\Temporary Internet Files\OLK9\CA Page 2 of Form: CA 045 5-05-05 045 LMI 241-BWV2 to 440 or 501.doc... - Page 3 ►► to accept the new name. Press the ► to “Configure”, by default the screen may read as follows. C:\Documents and Settings\timmartin\Local Settings\Temporary Internet Files\OLK9\CA Page 3 of Form: CA 045 May 5, 2005 045 LMI 241-BWV2 to 440 or 501.doc...
- Page 4 To make changes to the “Scale” or “Zero Master” press ▲ or ▼ to highlight “Scale” or “Zero Master” and press <enter>. This will bring up the numeric keypad. C:\Documents and Settings\timmartin\Local Settings\Temporary Internet Files\OLK9\CA Page 4 of Form: CA 045 May 5, 2005 045 LMI 241-BWV2 to 440 or 501.doc...
- Page 5 If a setting was changed by mistake or you were not done in “Configure Gages” highlight “Cancel” and press <enter>. Flush configuration is complete. C:\Documents and Settings\timmartin\Local Settings\Temporary Internet Files\OLK9\CA Page 5 of Form: CA 045 May 5, 2005 045 LMI 241-BWV2 to 440 or 501.doc...
-
Page 6: Gap Setup
Then press ►► to accept the new name. Press the ► to “Configure”, by default the screen should read as follows. C:\Documents and Settings\timmartin\Local Settings\Temporary Internet Files\OLK9\CA Page 6 of Form: CA 045 May 5, 2005 045 LMI 241-BWV2 to 440 or 501.doc... - Page 7 To make changes to the “Scale” or “Zero Master” press ▲ or ▼ to highlight “Scale” or “Zero Master” and press <enter>. This will bring up the numeric keypad. C:\Documents and Settings\timmartin\Local Settings\Temporary Internet Files\OLK9\CA Page 7 of Form: CA 045 May 5, 2005 045 LMI 241-BWV2 to 440 or 501.doc...
- Page 8 If a setting was changed by mistake or you were not done in “Configure Gages” highlight “Cancel” and press <enter>. Gap configuration complete C:\Documents and Settings\timmartin\Local Settings\Temporary Internet Files\OLK9\CA Page 8 of Form: CA 045 May 5, 2005 045 LMI 241-BWV2 to 440 or 501.doc...
-
Page 9: Mastering Instructions
From the gage list use the ▲ or ▼ keys on the data collector to choose gage file G2 and press ◄ on the collector. C:\Documents and Settings\timmartin\Local Settings\Temporary Internet Files\OLK9\CA Page 9 of Form: CA 045 May 5, 2005 045 LMI 241-BWV2 to 440 or 501.doc... - Page 10 Extend the flush tip and retract the gap finger of the LMI 241BWV2. Verify "Master Low" highlighted on the collector, press <enter>. Fully compress the flush tip and extend the gap finger of the LMI 241BWV2. With "Master Hi" highlighted on the collector press <enter>.
-
Page 11: Verification Of The Mastering
(810) 714-5811 III. VERIFICATION OF THE MASTERING This process can be performed to verify the mastering of the LMI 241-BWV2 before or after being mastered. If any of the checks fail, the gage needs to be re-mastered. Flush Verification With the flush tip extended, observe the value in the “Master Gages” screen of “Gage Port G2” in the collector. -
Page 12: Gap Verification
“Master Gages” screen of “Gage Port G3” in the collector. It must be 6.00 +/- 0.03mm. Verification Complete C:\Documents and Settings\timmartin\Local Settings\Temporary Internet Files\OLK9\CA Page 12 of Form: CA 045 May 5, 2005 045 LMI 241-BWV2 to 440 or 501.doc...
Need help?
Do you have a question about the 241-BWV2 and is the answer not in the manual?
Questions and answers