Table of Contents

Related Manuals for MRMC MRMC-1502-04


Summary of Contents for MRMC MRMC-1502-04
- Page 1 Turntable AUTOMATED PRODUCT PHOTOGRAPHY Quick Start Guide QSG Product Code: MRMC-1502-04 Products covered: MRMC-1579-01, MRMC-1566-01, MRMC-1082-00, MRMC-1563-00 CRANES AND RIGS | BROADCAST | HEADS & DSLR | PRODUCT PHOTOGRAPHY | RENTALS...
- Page 2 Turntable Quick Start Guide QSG Product Code: MRMC-1502-04 Products covered: MRMC-1579-01, MRMC-1566-01, MRMC-1082-00, MRMC-1563-00 Modification date: 26 May 2020 © 2020 Mark Roberts Motion Control ® Ltd. All rights reserved. No part of this publication may be reproduced, transmitted, or translated by any means —...
-
Page 3: Table Of Contents
Turntable Quick Start Guide Contents Turntable Quick Start Guide Turntable Quick Start Guide Chapter 1 Quick Start..............1 Important safety instructions ..........1 General care..............1 Location .................1 Intellectual property .............1 Overview .................2 Large Turntable (Ethernet) ...........3 Attaching the control box ..........3 Connecting the cables ..........5 Connecting the cables (Large Turntable that runs off Milo driver box) ..........6... - Page 4 Turntable Quick Start Guide...
-
Page 5: Chapter 1 Quick Start
Turntable Quick Start Guide Chapter 1 Quick Start Turntable Quick Start Guide Turntable Quick Start Guide Important safety instructions To ensure the best from the product, please read this manual carefully. Keep it in the safe place for future reference. To reduce the risk of electric shock, do not remove the cover from the unit. -
Page 6: Overview
Overview Thank you for using the Turntable from Mark Roberts Motion Control (MRMC). You can use the Turntable for day in and day out use in product photography. There are three sizes: Small, Medium and Large. There is also a high-speed turntable. -
Page 7: Large Turntable (Ethernet)
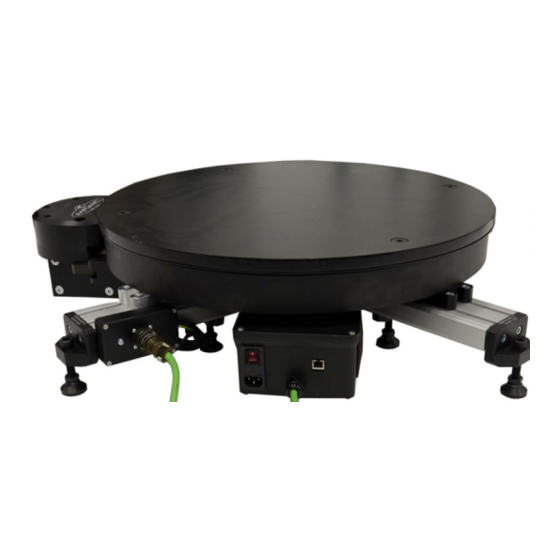
Turntable Quick Start Guide Large Turntable (Ethernet) Attaching the control box Rest the Large Turntable on the side opposite to where the connectors are. Slide the control box into the slot on the Large Turntable until you hear a slight click. - Page 8 Turntable Quick Start Guide Use an allen key to tighten the grub screw to secure the control box to the Large Turntable. Grub screw...
-
Page 9: Connecting The Cables
Turntable Quick Start Guide Connecting the cables MRMC Controller Network Hub Example controller: PC running Flair Large Turntable The diagram shows a typical application. -
Page 10: Connecting The Cables (Large Turntable That Runs Off Milo Driver Box)
Turntable Quick Start Guide Connecting the cables (Large Turntable that runs off Milo driver box) Driver box (similar to that of a Milo or Titan) Motor cable plugs to one of the axis ports... -
Page 11: Fitting The Disc
Turntable Quick Start Guide Fitting the disc Disc... -
Page 12: Adjusting The Legs
Turntable Quick Start Guide Adjusting the legs Loosen the four screws on each leg to adjust the leg for supporting larger objects on the turntable. Use a tape measure to ensure that all the legs are pulled by the same length so the turntable is balanced properly. -
Page 13: Medium Turntable
Medium Turntable The diagram shows a typical application. Attach the power cables last. The controller can be any MRMC controller such as a PC running Flair Motion Control Software or one of the MSA-based controllers such the Large Flat Panel (LFP), MSA-21 Handwheels, Joystick Controller, or Mini... -
Page 14: Adding The Outriggers
Turntable Quick Start Guide MSA. After doing this, to add the turntable in Flair, refer to Adding Ethernet Turntables in Flair on page 15. Adding the outriggers Insert the four slide nuts into the sides of the medium turntable carefully aligning them with the screw slots on the sides of the turntable. -
Page 15: Small Turntable (With Ethernet Connectivity)
The diagram shows a typical application. Attach the power cables last. After this, to add the turntable in Flair, refer to Adding Ethernet Turntables in Flair on page 15. The controller can be any MRMC controller such as a PC running Flair Motion Control Software or one of the MSA-based controllers such the Large Flat Panel (LFP), MSA-20 Handwheels, Joystick Controller, or Mini MSA. -
Page 16: Small Turntable (With External Quad Box)
Stepper motor The diagram shows a typical application. Attach the power cables last. The controller can be any MRMC controller such as a PC running Flair Motion Control Software or one of the MSA-based controllers such the Large Flat Panel (LFP), MSA-20 Handwheels, Joystick Controller, or Mini... -
Page 17: High-Speed Turntable
The ulti-box is not part of the High-speed Turntable and is procured separately. The controller can be any MRMC controller such as a PC running Flair Motion Control Software or one of the MSA-based controllers such the Large Flat Panel (LFP), MSA-21 Handwheels, Joystick Controller, or Mini... - Page 18 Turntable Quick Start Guide Network Hub USB Joystick Example controller: PC running Flair High-speed Turntable (front) Mains High-speed Turntable (rear) SERVO MOTOR MOVER...
-
Page 19: Adding Ethernet Turntables In Flair
Turntable Quick Start Guide Adding Ethernet Turntables in Flair Before you start using the Ethernet Turntable first time, once you have cabled the Turntable with the Ethernet hub and powered it up, it needs to be added to the Flair software so Flair can communicate with it. In Windows Explorer, navigate to the Flair folder, and open the Flair.ini file. - Page 20 Turntable Quick Start Guide When you get a message about network failure, click on the Network Setup button in the message: or... If the Flair installation already has a valid Ethernet connection on a network then you might not get the network failure message. In this case, start the Network Setup facility manually by choosing the Setups >...
- Page 21 Turntable Quick Start Guide Network.ini File. If Flair cannot find the Turntable on the network at the IP address shown then the node’s status is Not connected. In the Network Setup window click on Find All, then on OK in the pop-up to confirm.
-
Page 22: Resolving Ip Address Conflict
Turntable Quick Start Guide 10. Click on Load for the node belonging to the Turntable to reset and load it. It should now appear connected Turntable connected 11. Close the Network Setup window by clicking on Exit. Resolving IP Address Conflict It is possible that the IP address of the turntable is same as that of one of the existing network devices already connected with the Flair PC resulting in an IP address conflict. -
Page 23: Setting Up The Axis
Turntable Quick Start Guide see the additional board after clicking Find All in the Network Setup dialog box. Add a unique IP address to the node line of the board that has the same IP address as that of the turntable. DO NOT click Save and Apply yet. - Page 24 Turntable Quick Start Guide In the Node box, select 3 (same as the number above) and in the Port box, select 1. Click Apply and then click Save.
- Page 25 Turntable Quick Start Guide Notes...
- Page 26 Turntable Quick Start Guide Notes...
-
Page 27: Appendix 1 Back Panel
Turntable Quick Start Guide Appendix 1 Back panel Turntable Quick Start Guide Turntable Quick Start Guide Connector summary Stepper motor connector This connector connects the model mover motor cable to the stepper motor connector on the quad box. The cable can also be a split to provide 48V power to the quad box. - Page 28 Turntable Quick Start Guide Notes...
-
Page 29: Appendix 2 Specifications
Turntable Quick Start Guide Appendix 2 Specifications Turntable Quick Start Guide Turntable Quick Start Guide Large Turntable Weight: 73kg including the disc Power requirements: 5 amps from 140V from Milo power supply or 240V AC from Mains Temperature range: -10 to +45 °C Humidity tolerance: 0% to 90% relative humidity, non-condensing Rotation speed: 100°/s Load capacity: 600kg... - Page 30 Turntable Quick Start Guide...
-
Page 31: Medium Turntable
Turntable Quick Start Guide Medium Turntable Weight: 20kg Power requirements: 48 Volts DC Temperature range: -10 to +45 °C Humidity tolerance: 0% to 90% relative humidity, non-condensing Rotation speed: 90°/s Load capacity: 200kg Dimensions are shown as follows. All measurements are in mm. Medium Turntable Small Turntable Weight: 2.8Kg... - Page 32 Turntable Quick Start Guide...
-
Page 33: Small Turntable Mounting Holes
Turntable Quick Start Guide Small Turntable mounting holes M5 threaded holes, 6 mm deep and evenly spaced. These can be used to mount different sized disks based on your object size. 3/8-16 centre hole... - Page 34 Turntable Quick Start Guide Small riser plate M5 unthreaded countersunk holes for attachment to the bottom of the head, using M5 CSK (countersunk) bolts 12 mm long. Thickness: 8 mm M6 unthreaded holes 3/8-16 centre hole around the edge for threaded for a mounting the plate onto standard heavy-duty...
- Page 35 Turntable Quick Start Guide Optional riser M5 CSK (countersunk) bolts 12 mm long. Plate thickness: Small riser plate. Top and 8 mm bottom plates are identical, but the bottom one is inverted to cater for the countersunk bolts that go into the columns M5 cap-head bolts for attaching the riser to the base of the head, 12 mm...
- Page 36 Turntable Quick Start Guide Mitchell Mounting adaptor plate M5 unthreaded countersunk holes for attachment to the bottom of the head, using M5 CSK (countersunk) bolts 12 mm long. Thickness: 8 mm M8 mounting slots 3/8-16 centre hole threaded for a standard heavy-duty tripod mounting bolt.
-
Page 37: High-Speed Turntable
Turntable Quick Start Guide Small turntable - Mitchell mounting Underslung adapter plate can be used to mount small Turntable in an underslung or overslung position High-speed Turntable Weight: 2.8Kg Power requirements: 48 Volts DC Temperature range: -10 to +45 °C Humidity tolerance: 0% to 90% relative humidity, non-condensing Rotation speed: 400°/s Load capacity: 20kg... - Page 38 Turntable Quick Start Guide Notes...
- Page 39 Turntable Quick Start Guide Notes...
- Page 40 Mark Roberts Motion Control Ltd. Unit 3, South East Studios, Blindley Heath, Surrey RH7 6JP United Kingdom Telephone: +44 (0) 1342 838000 info@mrmoco.com www.mrmoco.com...
Need help?
Do you have a question about the MRMC-1502-04 and is the answer not in the manual?
Questions and answers