
Subscribe to Our Youtube Channel
Related Manuals for Motorola solutions Transfer Station II


Summary of Contents for Motorola solutions Transfer Station II
- Page 1 Transfer Station II Quick Start Guide August 2021 WGD00172 ©2021 Motorola Solutions, Inc. All rights reserved. Revision C...
- Page 2 Furthermore, the purchase of Motorola Solutions products shall not be deemed to grant either directly or by implication, estoppel or otherwise, any license under the copyrights, patents or patent applications of Motorola Solutions, except for the rights that arise by operation of law in the sale of a product.
-
Page 3: Table Of Contents
Change Username and Password Disable Transfer Station II Restart Transfer Station II Get Transfer Station II Logs Docking the V300 Camera in Transfer Station II Docking the V300 Overview Docking the V300 in a Transfer Station II Charging the Battery... - Page 4 Contents Upgrading WiFi base Firmware WiFi base upgrade Transfer Station II Quick Start Guide WGD00172 Revision C...
-
Page 5: Introduction
Introduction Introduction Welcome to the Transfer Station II Quick Start Guide. This guide walks you through the basics of setting up and using your Transfer Station II. About this document This guide covers the basic components and operation, including: About the Transfer Station II... - Page 6 Introduction This page intentionally left blank. Transfer Station II Quick Start Guide WGD00172 Revision C...
-
Page 7: Setting Up The Transfer Station Ii
In this section... Transfer Station II setup overview (page Setting up the Transfer Station II hardware (page Configuring the Transfer Station II for use with Evidence Library Software (page Prerequisites V300 components require these reserved IP addresses: 192.168.99.x (USB and WiFi base) 192.168.98.x (SmartControl) -
Page 8: Transfer Station Ii Setup Overview
Station II separately. Important! Use the Transfer Station II to upload events to EL. When the transfer station is on, the power LED is on. To set up the Transfer Station II: 1. Set up the Transfer Station II hardware. -
Page 9: Setting Up Transfer Station Ii Hardware
2. Connect the Ethernet cable to the Ethernet connector on the back of the Transfer Station II. 3. Connect the power cable to the power connector on the bottom of the Transfer Station II and plug the power cable into an electrical outlet 4. -
Page 10: Transfer Station Ii Configuration Settings
2. Open your web browser and enter https://192.168.2.20, the Transfer Station II default IP address. 3. Log in to your Transfer Station II web page on the Secure Sign In screen. 4. Enter the Username and Password (Admin, V1$T@xfr). 5. Click login. - Page 11 2. Enter the Location of the Transfer Station II. 3. Enter a unique IP address for each Transfer Station II. 4. Enter the Station ID that identifies the current Transfer Station II. Station ID fields each have a 32-character limit.
-
Page 12: V300 Settings
Setting up the Transfer Station II 6. Complete the remainder of the settings. 7. Click Save Settings. Because the Transfer Station II IP address changed, the default configuration web page is no longer valid and the system logs you out. V300 Settings 1. -
Page 13: Upgrade Transfer Station Ii
Import Service. Upgrade Transfer Station II To upgrade software or firmware, choose your files from the computer connected to the network and click Upgrade for the one you want to upgrade. Transfer Station II Quick Start Guide WGD00172 Revision C... -
Page 14: Administrative Functions
1. Enter a new Username. 2. Enter a new Password. 3. Click Save Changes. Because the login credentials changed, the server logs you out of the Transfer Station II then asks you to log in using the new credentials. Disable Transfer Station II Disable can function as another level of security. -
Page 15: Restart Transfer Station Ii
The login screen shows rebooting and once completed it shows Reboot Completed. Get Transfer Station II Logs 1. Click Get Logs to get the Transfer Station II logs. 2. Click Download log to save the file to your desktop. 3. Contact your sales representative to provide the log and the version information shown here. - Page 16 Setting up the Transfer Station II This page intentionally left blank. Transfer Station II Quick Start Guide WGD00172 Revision C...
-
Page 17: Docking The V300 Camera In Transfer Station Ii
Docking the V300 Camera in Transfer Station II Docking the V300 Camera in Transfer Station II In this section... Docking overview (page Docking the V300 Camera in a Transfer Station II (page Charging the battery (page Assigning a configuration and officer and checking out... -
Page 18: Docking The V300 Overview
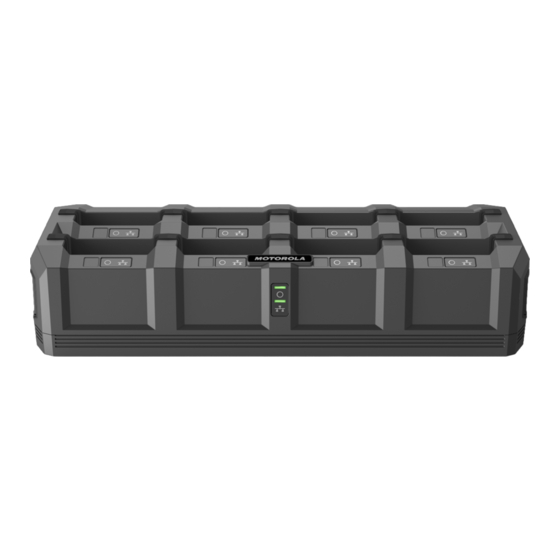
You can dock the V300 Camera with the battery or dock the stand-alone battery in any of the available slots. While docked, you can: Charge the battery Upgrade firmware for the V300 Camera from Transfer Station II Upload recorded events from Transfer Station II ® Define a Record-After-the-Fact... -
Page 19: Docking The V300 In A Transfer Station
1 Stand-alone battery 2 V300 Camera and battery 3 Slot ID Note: Slot ID stickers are included with the Transfer Station II, if you choose to use them. 4 Slot ID Transfer Station II Quick Start Guide... - Page 20 The WiFi base firmware can be downloaded to the V300 camera while docked in the Transfer Station II. When you undock the camera and battery from the Transfer Station II, they are ready for normal operation. Transfer Station II Quick Start Guide...
-
Page 21: Charging The Battery
Tip: Before using the camera for the first time, fully charge the battery and configure the camera. Motorola Solutions recommends that you use the V300 USB base (plugged into an outlet) or the transfer station inside your agency when fully charging the battery. -
Page 22: Assigning A Configuration And Officer And Checking Out
To configure the camera: 1. Dock the camera in the Transfer Station II connected to a computer with access to the Evidence Library (EL). 2. Create and then assign a configuration and an officer to the docked camera using EL. -
Page 23: Upload Events
Upload Events The V300 can upload directly to Evidence Library (EL) Cloud. You can upload recorded events from your V300 while it is docked in a Transfer Station II. Events upload automatically from a camera in the Transfer Station II. - Page 24 Docking the V300 Camera in Transfer Station II Charging Linking Green Solid Battery charged Green Solid Connected to Ethernet Green Flashing Battery charging Green Flashing Data uploading Solid Error condition Solid Error condition Amber Solid Camera docked Amber Backend not connected...
-
Page 25: Upgrading V300 Firmware
When an upgrade is pushed to the camera, the firmware is first staged on the camera, then the upgrade is applied. To upgrade the V300 firmware: 1. Dock the camera in a Transfer Station II with access to EL. If an upgrade is needed, EL notices and pushes the upgrade automatically. V300 checks EL for firmware upgrades. - Page 26 Docking the V300 Camera in Transfer Station II Upgrading WiFi base Firmware The Motorola Solutions V300 Camera automatically pulls firmware upgrades for the WiFi base from Evidence Library (EL) when the V300 is docked. Note: Evidence Library can be set up to push new firmware automatically For instructions, see your Evidence Library Online Help.
Need help?
Do you have a question about the Transfer Station II and is the answer not in the manual?
Questions and answers