
Related Manuals for DHC BT2000HD


Summary of Contents for DHC BT2000HD
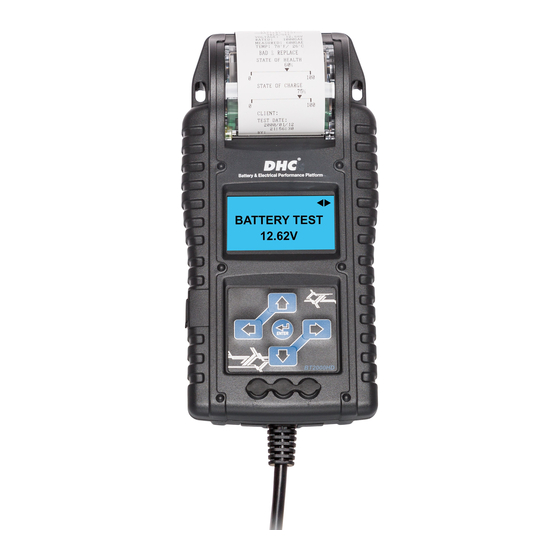
- Page 1 Model BT2000HD HEAVY DUTY BATTERY & ELECTRICAL SYSTEM ANALYZER OWNER’S MANUAL READ ENTIRE MANUAL BEFORE USING THIS PRODUCT...
- Page 2 MODEL NO. BT2000HD HEAVY DUTY BATTERY & ELECTRICAL SYSTEM ANALYZER TEST PROCEDURES / OPERATING INSTRUCTIONS IMPORTANT: 1. For testing 6 and 12 volt batteries, 12 and 24 volt cranking and charging systems and 12 volt battery pack test. 2. Suggested operation range 32℉(0℃) to 122℉(50℃) in ambient temperature.
-
Page 3: Personal Safety Precautions
WARNING: 1. Working in the vicinity of a lead acid battery is dangerous. Batteries generate explosive gases during normal battery operation. For this reason, it is of utmost importance, if you have any doubt, that each time before using your tester, you read these instructions very carefully. - Page 4 WARNING: ⚠ WARNING: This product can expose you to chemicals including arsenic, which is known to the State of California to cause cancer. For more information, go to www.P65Warnings.ca.gov. 1. Working in the vicinity of a lead acid battery is dangerous. Batteries generate explosive gases during normal battery operation.
-
Page 5: Preparing To Test
Be sure to make colors matched between the connectors and sockets as shown below. black white yellow BT2000HD backside - 3 -... -
Page 6: Battery Test
BATTERY TEST 1. Before you test a battery in a vehicle, turn off the ignition, all accessories and loads. Close all the vehicle doors and the trunk lid. 2. Make sure you have put 6 AA 1.5V batteries into the battery chamber. - Page 7 5. Press the ◄ ► key to select Battery Test. Press «ENTER» button. BATTERY TEST 6. Select USER ID if there are set up user ID’s USER ID: that have been transferred to the unit via the XXXXXX XXXXXX SYNC. Please refer to “BT2000 USB XXXXXX INSTALLATION &...
- Page 8 12. Testing battery. BATTERY TEST 13. Aim the “Temperature Measurement Sensor” 2.5 cm (1 inch) from the top or sides of the battery POINT TO BATTERY READ TEMPERATURE case and press «ENTER». Measured temperature PRESS ENTER may be varied by distance, under hood conditions and ambient temperature.
- Page 9 17. When test is completed, the display shows the results as following {Press the◄ ► key to select: SOH (STATE OF HEALTH) or SOC (STATE OF CHARGE)}. GOOD & PASS GOOD & PASS XX.XXV XXXXSAE The battery is good & capable of holding a charge. GOOD &...
- Page 10 NOTE that there might be some message displayed to different circumstances as below. LOAD ERROR LOAD ERROR The tested battery is bigger than 3000SAE (CCA). Or the connection is not properly established. Check the battery & make sure the clamp lead is properly connected. SURFACE CHARGE TEST IN VEHICLE? Batteries are sluggish and cannot convert lead...
- Page 11 PACK TEST Please make sure the following steps are followed when testing a pack of batteries. 1. The preferred test position is at lead battery terminals or lead adaptors on the stainless steel treaded studs. If the battery is not accessible, you may test at the jumper post or fastening nuts.
-
Page 12: System Test
SYSTEM TEST SYSTEM TEST XX.XXV 1. Press «ENTER» button, you will view the following screen. 2. Turn off all vehicle accessory loads such as lights, air conditioning, radio, etc. Before starting TURN OFF LOADS START ENGINE the engine. 3. When the engine is started, one of the three results will be displayed along with the actual reading measured. - Page 13 6. Press the «ENTER» key, one of the three results will be displayed along with the actual reading measured. LOW CHARGING VOLTS WHEN TEST AT IDLE The alternator is not providing sufficient current to the battery. Check the belts to ensure the alternator ALT.
- Page 14 7. Following the charging system at idle, press «ENTER» for the charging system with accessory TURN ON LOADS AND PRESS ENTER loads. Turn on the blower to high (heat), high beam headlights, and rear defogger (If equipped). Do not use cyclical loads such as air conditioning or windshield wipers. 8.
- Page 15 10. Press the «ENTER» key to continue the charging system with accessory loads. One of the three results will be displayed along with the actual testing measured. CHARGING SYSTEM HIGH WHEN TEST WITH ACC. LOADS The voltage output from the alternator to the battery exceeds the normal limits of a functioning ALT.
-
Page 16: Language Select
SETTINGS AND INFORMATION RETRIEVAL LANGUAGE SELECT 1. Hook the tester up to a battery. 2. The tester defaults to the BATTERY TEST display. Press the directional keys to get to the LANGUAGE SELECT display. 3. Press ENTER and the display will show the language options. Press the directional keys to select the language you want the tester to display. - Page 17 DC/AC Current measurement 1. Install the 9V battery. 2. Connect Clamp Meter to the jack A on BT2000HD. Press POWER. 3. Press the button ZERO. Make sure the display reads zero. 4. Press the trigger to open the transformer jaws and clamp one electrical wire.
- Page 18 TEST FLOW Press LEFT / RIGHT buttons to select the following functions when the unit is turned on. BATTERY TEST SYSTEM TEST XX.XX V XX.XX V TEST COUNTER BRIGHTNESS BAT. TEST: XXXX LANGUAGE INFORMATION SELECT VOLTMETER 2000 / 01 / 01 xx : xx : xx AMMETER CLEAR MEMORY...
-
Page 19: Warranty
WARRANTY Any battery tester defective in material or workmanship will be repaired or replaced according to published defective return test repair procedures. The existence of a defect shall be determined by the seller in accordance with published procedures. The published test procedures are available upon request.
Need help?
Do you have a question about the BT2000HD and is the answer not in the manual?
Questions and answers