Table of Contents
Advertisement
Quick Links
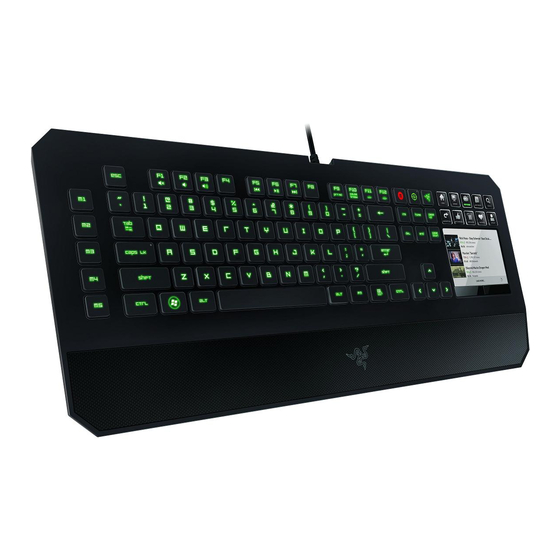
Experience a new level of game interaction and control with the Razer DeathStalker
Ultimate gaming keyboard, designed with Razer's award-winning Switchblade User
Interface. It features ten adaptive tactile keys so that you can configure an unlimited
number of key binds, macros, skills, and spells from any game. With customizable
iconography to match your personalized control layout, you're getting the most
immersive gaming experience from your keyboard.
The LCD panel on the Switchblade UI is capable of two modes. The first is a vibrant, full-
color display that delivers information display as well as letting you run your media
player or web browser from the screen without the need to exit your game
domination. Alternatively, use it as a secondary mouse input device with intuitive
gesture controls. With the Switchblade User Interface, you have everything you need
to win available at your fingertips. No excuses.
Anti-ghosting is now available for up to ten keys over the entire fully-programmable
back-lit keyboard. This means that all ten of your fingers can each actuate a command,
with all ten commands precisely registering within the game. To destroy the enemy,
don't just use one or two attacks, use ten.
Save all your settings automatically to Synapse 2.0, our own cloud system and sync
them automatically with one account, no matter where you are. Stalk your prey and
unleash a flurry of devastation with all of the controls at your disposal on the Razer
DeathStalker Ultimate.
0 | For gamers by gamers™
Advertisement
Table of Contents

Related Manuals for Razer DeathStalker Ultimate


Summary of Contents for Razer DeathStalker Ultimate
- Page 1 Save all your settings automatically to Synapse 2.0, our own cloud system and sync them automatically with one account, no matter where you are. Stalk your prey and unleash a flurry of devastation with all of the controls at your disposal on the Razer DeathStalker Ultimate.
-
Page 2: Table Of Contents
2. REGISTRATION / TECHNICAL SUPPORT ........... 2 3. TECHNICAL SPECIFICATIONS ..............3 4. DEVICE LAYOUT ..................4 5. SETTING UP YOUR RAZER DEATHSTALKER ULTIMATE ......5 6. USING YOUR RAZER DEATHSTALKER ULTIMATE ........6 7. CONFIGURING YOUR RAZER DEATHSTALKER ULTIMATE....... 14 8. -
Page 3: Package Contents / System Requirements
1. PACKAGE CONTENTS / SYSTEM REQUIREMENTS PACKAGE CONTENTS Razer Deathstalker Ultimate Gaming Keyboard Protective Film/Guide Quick Start Guide Master Guide SYSTEM REQUIREMENTS PC with two free USB 2.0 ports Windows® 7 / Windows Vista®... -
Page 4: Technical Specifications
Tri-Color Backlighting 1000Hz Ultrapolling Fully programmable keys with on the fly macro recording Razer Synapse 2.0 Enabled Dedicated Gaming Mode 5 additional macro keys Anti-Ghosting Capability For Up To 10 Simultaneous Key Presses ... -
Page 5: Device Layout
4. DEVICE LAYOUT 5 Extra Macro Keys Volume Control Keys Media Keys LED Control Keys On-The-Fly Macro Record Key Gaming Mode Key Switchblade Home Key Dynamic Adaptive Tactile Keys Multi-Touch LCD Track-Panel Track-Panel Buttons ATTENTION! The 10 Dynamic Adaptive Tactile Keys are NOT removable or user replaceable. Please do not expose the keys to any fluids as this may damage the keys. -
Page 6: Setting Up Your Razer Deathstalker Ultimate
5. SETTING UP YOUR RAZER DEATHSTALKER ULTIMATE Note: You may skip Steps 2-4 if you already have a Razer Synapse 2.0 installed and an existing account. Step 1: Plug the Razer Deathstalker Ultimate into the two USB ports of your computer. -
Page 7: Using Your Razer Deathstalker Ultimate
6. USING YOUR RAZER DEATHSTALKER ULTIMATE FUNCTION KEYS Pressing the “FN” key in combination with the function keys will activate their secondary features. Listed below are the function keys and their features’ descriptions. Function Keys Secondary Features The audio volume controls allow you to mute... - Page 8 6-key to 10-key Anti-Ghosting. Moreover, you can disable Alt + Tab and Alt + F4 through the Gaming Mode Tab on Razer Synapse 2.0 or the Gaming Mode App on the Switchblade User Interface. Gaming Mode Gaming Mode + Synapse 2.0...
- Page 9 SWITCHBLADE HOME KEY The Switchblade Home Key gives you access to applications for the Switchblade User Interface. Listed below are the applications for the Switchblade User Interface. 8 | For gamers by gamers™...
- Page 10 SWITCHBLADE APPLICATIONS Disclaimer: The features listed here require you to log in to Razer Synapse 2.0. These features are also subject to change based on the current software version and your Operating System. Trackpad Application This application allows the Switchblade User Interface to be used as a standard pointing device and numerical keys.
- Page 11 2 Finger Gestures 3 Finger Gesture Finger Movement Pinch Expand Move Horizontally Swap to previous/next set Onscreen Action Zoom Out Zoom In of Dynamic Adaptive Key mappings Numpad Application This application enables the Switchblade User Interface to be used as a standard numerical keypad or switch to its secondary function by toggling the Num Lock key.
- Page 12 You may save it to a regular key or to the currently active set of Dynamic Adaptive Tactile Keys. A prompt will appear once you have successfully saved the macro. 11 | razer™...
- Page 13 Gaming Mode Application After launching the application, the Switchblade User Interface will change into the Gaming Mode Options Screen. You may choose to disable/enable the “Windows” key by toggling the Gaming Mode On/Off. You may also choose to disable other keys during Gaming Mode by selecting the appropriate box.
- Page 14 This application enables Gmail™ users to access their e-mail accounts using the Switchblade User Interface. Clock Application After launching the application, the Switchblade User Interface will change into a digital clock which is synced to the internal clock of your operating system. 13 | razer™...
-
Page 15: Configuring Your Razer Deathstalker Ultimate
7. CONFIGURING YOUR RAZER DEATHSTALKER ULTIMATE Disclaimer: The features listed here require you to log in to Razer Synapse 2.0. These features are also subject to change based on the current software version and your Operating System. KEYBOARD TAB The Keyboard Tab is your default tab when you first install Razer Synapse 2.0. This tab allows you to customize your device’s profiles, key assignments and track-panel... - Page 16 LINK PROGRAM option and clicking the button to search for it. Each profile can be set to FN + 0 - 9 using the SHORTCUT dropdown menu for fast profile switching. 15 | razer™...
- Page 17 Customize Tab The Customize Tab is where you can modify the basic functionalities of your device such as key assignments and track-panel sensitivity to suit your gaming needs. The changes made in this tab are automatically saved to your current profile. 16 | For gamers by gamers™...
- Page 18 You may also change the key assignments of the Dynamic Adaptive Tactile Keys as well as create new sets of key mappings. 17 | razer™...
- Page 19 Key Assignment Menu Initially, each key is set to DEFAULT. However, you may change the function of these key by clicking the desired key to access Key Assignment Menu. Listed below are the customization options and their description. Default This option enables you to return the key to its original function. To choose the DEFAULT, simple select it from the Key Assignment Menu.
- Page 20 Launch Program allows you to launch a program using the assigned key. When you select Quick Launch from the Key Assignment Menu, a button will appear which allow you to search for the specific program you want to use. 19 | razer™...
- Page 21 Disable This option renders the assigned button unusable. Use Disable if you do not want to use the key or if it interferes with your gaming. Note: The following options are available exclusively for the Switchblade User Interface only. Change Key Appearance This option enables you to change the appearance of each Dynamic Adaptive Tactile Key.
- Page 22 The higher the sensitivity, the more responsive the track-panel will be. Acceleration Acceleration increases the cursor’s movement speed depending on how quickly you move your finger on the track-panel. The higher the value, the faster the cursor accelerates. 21 | razer™...
- Page 23 Lighting Tab The Lighting Tab is where you can customize the look of your gaming Keyboard by choosing from over 16 million colors for the backlight or you may select the SPECTRUM CYCLING option to allow the colors to change indefinitely. This tab is also where you can adjust the intensity of the keyboard’s LEDs by using the KEYBOARD BRIGHTNESS slider.
- Page 24 Furthermore, you can maximize the effect of Anti-Ghosting by activating the Gaming mode function. An indicator will light up when the function is currently turned ON. Similar to the Customize Tab, the changes made here are automatically saved to your current profile. 23 | razer™...
- Page 25 Settings Tab The Settings Tab allows you to set your keyboard and Switchblade User Interface to turn off when they have been idle for a certain amount of time. You can also set the Switchblade User Interface to switch to Track Pad Power Saving mode when your computer is locked.
- Page 26 To create a macro command, simply click the button and all your keystrokes and button presses will automatically register on the macro screen. When you are done recording your macro commands, click on the button to end the session. 25 | razer™...
- Page 27 The Macro section allows you to input the delay in-between commands. In RECORD DELAY the delay in-between commands are registered as how it is entered. The DEFAULT DELAY uses a predefined time (expressed in seconds) as the delay. And NO DELAY omits all the pauses in-between keystrokes and button presses.
- Page 28 The buttons gives you the option to move the command up or down. button allows you to put in additional keystrokes, button presses or time delays either before or after the selected command. 27 | razer™...
- Page 29 Once you have pressed the button, a new display window will appear beside the list of macro commands. The dropdown menu on this window allows you to choose a keystroke or a delay to be added in before or after the highlighted macro command.
- Page 30 You may add in a new set of macro commands by clicking the button on the keystroke menu; or input time delays on the duration field using the delay menu. 29 | razer™...
-
Page 31: Safety And Maintenance
8. SAFETY AND MAINTENANCE SAFETY GUIDELINES In order to achieve maximum safety while using your Razer Deathstalker Ultimate, we suggest that you adopt the following guidelines: 1. Should you have trouble operating the device properly and troubleshooting does not work, unplug the device and contact the Razer hotline or go to www.razersupport.com for support. - Page 32 MAINTENANCE AND USE The Razer Deathstalker Ultimate requires minimum maintenance to keep it in optimum condition. Once a month we recommend you unplug the device from the USB port and clean it using a soft cloth or cotton swab with a bit of warm water to prevent dirt buildup.
-
Page 33: Legalese
LIMITATION OF LIABILITY Razer shall in no event be liable for any lost profits, loss of information or data, special, incidental, indirect, punitive or consequential or incidental damages, arising in any way out of distribution of, sale of, resale of, use of, or inability to use the Product. In no event shall Razer’s liability exceed the retail purchase price of the Product. - Page 34 COSTS OF PROCUREMENT For the avoidance of doubt, in no event will Razer be liable for any costs of procurement unless it has been advised of the possibility of such damages, and in no case shall Razer be liable for any costs of procurement liability exceeding the retail purchase price of the Product.
Need help?
Do you have a question about the DeathStalker Ultimate and is the answer not in the manual?
Questions and answers