Advertisement
Advertisement

Related Manuals for Razer TARTARUS V2


Summary of Contents for Razer TARTARUS V2
- Page 1 RAZER TARTARUS V2 MASTER GUIDE...
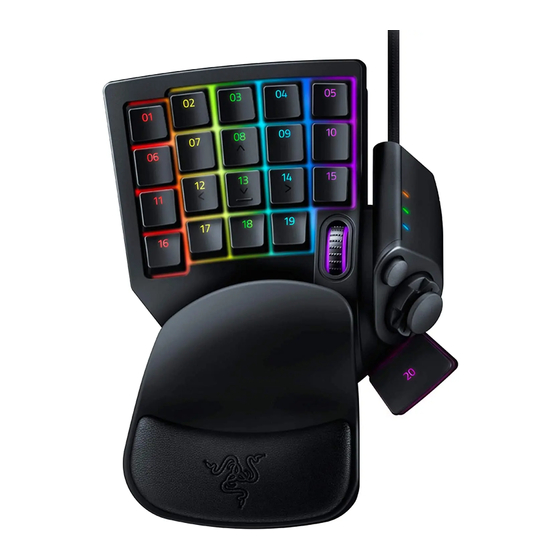
- Page 2 With the Razer Tartarus V2, you can bind commands and skills and activate them instantaneously in the palm of your hand. The Razer Tartarus V2 provides endless commands at your fingertips with 32 fully programmable mecha-membrane keys, including an 8-way directional D-pad and 3-way scroll wheel.
-
Page 3: Table Of Contents
3. TECHNICAL SPECIFICATIONS..........................5 4. DEVICE LAYOUT ..............................6 5. INSTALLING RAZER SYNAPSE 3 FOR YOUR RAZER TARTARUS V2 ............7 6. USING YOUR RAZER TARTARUS V2 ......................... 8 7. CONFIGURING YOUR RAZER TARTARUS V2 VIA RAZER SYNAPSE 3............ 10 8. -
Page 4: Package Contents / System Requirements
1. PACKAGE CONTENTS / SYSTEM REQUIREMENTS PACKAGE CONTENTS ▪ Razer Tartarus V2 gaming keypad ▪ Important Product Information Guide SYSTEM REQUIREMENTS ▪ PC with a free USB port ▪ Windows® 7 (or higher) ▪ Internet connection ▪ 500 MB of free hard disk space... -
Page 5: Technical Specifications
▪ Full anti-ghosting ▪ Unlimited macro lengths ▪ Unlimited game profiles ▪ Ergonomic form factor with adjustable palm rest ▪ Razer Synapse enabled ▪ 1000Hz Ultrapolling ▪ Braided fiber cable APPROXIMATE SIZE & WEIGHT ▪ Length: 150 mm / 5.90 in ▪... -
Page 6: Device Layout
4. DEVICE LAYOUT 19 backlit keys Spacebar actuator Adjustable palm rest 8-way directional thumb pad Scroll wheel Hyperesponse thumb key Thumb module Keymap indicator F O R GA M E RS . BY GA M E RS . -
Page 7: Installing Razer Synapse 3 For Your Razer Tartarus V2
Step 2: Install Razer Synapse 3 when prompted* or download the installer from razerzone.com/synapse3. Step 3: Register for a Razer ID or log in with an existing account. *Applicable for Windows 8 or later. F O R GA M E RS . BY GA M E RS . -
Page 8: Using Your Razer Tartarus V2
6. USING YOUR RAZER TARTARUS V2 DEFAULT KEYPAD MAPPING By default, the keys and the thumb module of your Razer Tartarus V2 have the following key assignments below. Backlit keys Thumb Module F O R GA M E RS . BY GA M E RS . - Page 9 ADJUSTING THE PALM REST You can remove the palm rest and adjust it accordingly to improve your overall gaming comfort. To do this, firmly hold your Razer keypad, then lift and reattach the palm rest to your preferred position using your other hand.
-
Page 10: Configuring Your Razer Tartarus V2 Via Razer Synapse 3
The Synapse tab is your default tab when you first launch Razer Synapse 3. Dashboard The Dashboard subtab is an overview of your Razer Synapse 3 where you can access all your Razer devices, modules, and online services. F O R GA M E RS . BY GA M E RS . - Page 11 KEYPAD The Keypad tab is the main tab for your Razer Tartarus V2. From here, you can change various settings such as each keymap s preferred key assignments Changes made under this tab are automatically saved to your system and cloud storage.
- Page 12 Hypershift mode is a secondary set of key assignments that is activated when the Hypershift key is held down. By default, the Hypershift key is assigned to the FN key of your Razer Synapse 3 supported keyboard however, you can also assign any key as a Hypershift key.
- Page 13 Sidebar Clicking the Sidebar button ( ) will reveal all current key assignments for your Razer Tartarus V2. Alternatively, you can skip to a specific key assignment by selecting it on the Customize tab. F O R GA M E RS . BY GA M E RS .
- Page 14 Upon selecting a key assignment, you may then change it to one of the following functions: Default This option enables you to return the selected key to its original setting. Joystick This option enables you to change the functionality of any key into a joystick button or an analog stick direction.
- Page 15 Click here to learn more about Advanced Chroma Effects Razer Hypershift Setting the key to Razer Hypershift will allow you to activate Hypershift mode as long as the key is held down. Launch Program Launch Program enables you to open an app or a website using the assigned key. When you select Launch Program, two choices will appear which requires you to search for a specific app you want to open, or write the address of the website you want to visit.
- Page 16 ▪ Mic Volume Down - Decreases the microphone volume. ▪ Mute Mic - Mutes the microphone. ▪ Mute All - Mutes both microphone and audio output. ▪ Play / Pause - Play, pause, or resume playback of the current media. ▪...
- Page 17 Text Function Text Function enables you to type a prewritten text with a touch of a key. Simply write your desired text on the given field and your text will be typed whenever the assigned key is pressed. This function has full Unicode support and you can also insert special symbols from character maps. Disable This option renders the assigned key unusable.
- Page 18 Lighting Brightness the luminance using the slider. Switch Off Lighting Tartarus V2 has been idle for a set amount of time. Quick Effects A number of quick effects can be selected and applied to your lighting, as listed here: Note: Only devices that support the selected lighting effect will synchronize. The keymap indicator is not customizable.
- Page 19 Razer device by clicking the Chroma Sync button ( Advanced Effects The Advanced Effects option allows you to choose a Chroma Effect you want to use on your Razer Chroma-enabled peripheral. To start making your own Chroma Effect, simply press the Chroma...
- Page 20 The Profiles tab is a convenient way of managing all your profiles and linking them to your games and applications. Devices View which Razer device is using a specific profile using the Devices subtab. To create a new profile within the selected device, simply click the add button ( ). To rename, duplicate, or delete a profile, simply press the Miscellaneous button ( ).
- Page 21 The Linked Games subtab gives you the flexibility to add games, view peripherals that are linked to games, or search for added games. You can also sort games based on alphabetical order, last played, or most played. Added games will still be listed here even if it is not linked to a Razer device.
- Page 22 To link games to connected Razer devices, simply click on a game from the list, then click the button to select the Razer device it will link with. Once linked, you may click on the Miscellaneous button ( ) of the corresponding linked device to selec F O R GA M E RS .
- Page 23 The Quick Selections drop-down menu are a preset of lighting regions which you can use to easily customize your Razer device. Alternatively, you can individually select an LED by clicking on the area or select multiple LEDs by using click and drag.
- Page 24 Apps The Apps subtab is where you can enable or disable third party integrated apps for your Razer Chroma-enabled peripherals. The Apps tab can also direct you to the Chroma Workshop where you can download these third party apps.
- Page 25 The Macros tab allows you to create, edit, and organize these macros so that you can assign them to the keys or buttons of your Razer device. You can also share macros with others using the import button ( ) and export...
- Page 26 To create a macro, simply select a macro name to store your commands, then click the Record menu. Assign a key or button for the macro on Shortcut Key field, select a delay, and select if you want to include mouse movement tracking. Once you have chosen the settings for the macro, click the Start button ( ).
- Page 27 Once you have recorded a macro, you may edit the commands you have entered by selecting each command on the macro screen. Each keystroke or button press is arranged sequentially with the first command shown at the top of the screen. The Insert drop-down menu allows you to put in additional keystrokes, button presses, type texts, run commands, loop a set of commands, or insert an entire macro group.
- Page 28 Razer devices. Reset tab The Reset tab allows you to perform a factory reset on all connected Razer devices with on-board memory and/or reset Razer Synapse tutorials to acquaint yourself again new features on its next launch.
-
Page 29: Safety And Maintenance
8. SAFETY AND MAINTENANCE SAFETY GUIDELINES In order to achieve maximum safety while using your Razer Tartarus V2, we suggest that you adopt the following guidelines: Should you have trouble operating the device properly and troubleshooting does not work, unplug the device and contact the Razer hotline or go to support.razerzone.com... - Page 30 MAINTENANCE AND USE The Razer Tartarus V2 requires minimum maintenance to keep it in optimum condition. Once a month we recommend you unplug the device from the computer and clean it using a soft cloth or cotton swab to prevent dirt buildup. Do not use soap or harsh cleaning agents.
Need help?
Do you have a question about the TARTARUS V2 and is the answer not in the manual?
Questions and answers