Advertisement
Table of Contents
- 1 Table of Contents
- 2 Package Contents / System Requirements
- 3 Registration / Technical Support
- 4 Technical Specifications
- 5 Device Layout
- 6 Installing Your Razer Blackwidow Ultimate
- 7 Using Your Razer Blackwidow Ultimate
- 8 Configuring Your Razer Blackwidow Ultimate Via Razer Synapse
- 9 Safety and Maintenance
- 10 Legalese
- Download this manual
See also:
User Manual
Advertisement
Table of Contents

Related Manuals for Razer BlackWidow Ultimate


Summary of Contents for Razer BlackWidow Ultimate
- Page 1 RAZER BLACKWIDOW ULTIMATE MASTER GUIDE...
- Page 2 The Razer BlackWidow Ultimate is the keyboard that offers extreme durability. Equipped with Razer Mechanical Switches designed for gaming, individually backlit keys with dynamic lighting effects and as well as weapon. F O R GA M E RS . BY GA M E RS .
-
Page 3: Table Of Contents
4. DEVICE LAYOUT ..............................6 5. INSTALLING YOUR RAZER BLACKWIDOW ULTIMATE ................. 7 6. USING YOUR RAZER BLACKWIDOW ULTIMATE .................... 8 7. CONFIGURING YOUR RAZER BLACKWIDOW ULTIMATE VIA RAZER SYNAPSE ........11 8. SAFETY AND MAINTENANCE ........................... 33 9. LEGALESE................................35... -
Page 4: Package Contents / System Requirements
1. PACKAGE CONTENTS / SYSTEM REQUIREMENTS PACKAGE CONTENTS ▪ Razer BlackWidow Ultimate gaming keyboard ▪ Important Product Information Guide SYSTEM REQUIREMENTS ▪ PC or Mac with a free USB port ▪ Windows® 7 / OS X® 10.8 (or higher) ▪ Internet connection ▪... -
Page 5: Registration / Technical Support
2. REGISTRATION / TECHNICAL SUPPORT REGISTRATION Register your product online at razer-id.razerzone.com/warranty using your Razer ID to get real- razer-id.razerzone.com to get a wide range of Razer benefits. serial number can be found here. TECHNICAL SUPPORT ▪ 2 years ▪ Free online technical support at razersupport.com. -
Page 6: Technical Specifications
▪ 80 million keystroke life span ▪ Water- and Dust-Resistant tested up to IP54 conditions ▪ 10 key roll-over anti-ghosting ▪ Razer Synapse enabled ▪ Individually backlit keys with dynamic lighting effects ▪ Fully programmable keys with on-the-fly macro recording ▪ Gaming mode option ▪... -
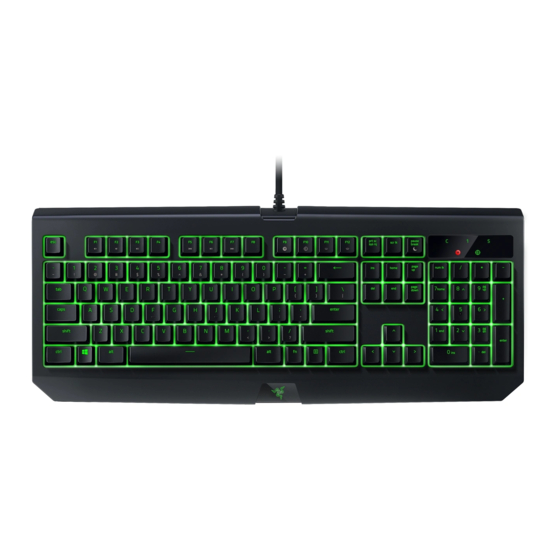
Page 7: Device Layout
4. DEVICE LAYOUT Volume control keys Media keys On-The-Fly macro record key Gaming mode key Backlight control keys Sleep mode key LED indicators F O R GA M E RS . BY GA M E RS . -
Page 8: Installing Your Razer Blackwidow Ultimate
Step 2: Install Razer Synapse when prompted* or download the installer from razerzone.com/synapse. Step 3: Register for a Razer ID or log in to Razer Synapse with an existing account. *Applicable for Windows 8 or later. F O R GA M E RS . BY GA M E RS . -
Page 9: Using Your Razer Blackwidow Ultimate
6. USING YOUR RAZER BLACKWIDOW ULTIMATE on your PC. For however, you will need to install Razer Synapse first before you can use these secondary features. Function Keys Features Description The audio volume controls allow you to mute ( decrease ( ) and increase ( ) the audio output. - Page 10 Anti-Ghosting by activating the Gaming Mode function. You can also choose to disable the Alt + Tab and Alt + F4 functions by using the Gaming Mode tab in Razer Synapse. An indicator will light up when Gaming Mode is active.
- Page 11 ON-THE-FLY MACRO RECORDING (MAC) Follow these steps to create an OTF Macro Recording: 1. Press the key to start recording. 2. The Macro Recording Indicator will light up to show that the device is ready to record. 3. Type in the keys you want to record. 4.
-
Page 12: Configuring Your Razer Blackwidow Ultimate Via Razer Synapse
Operating System. KEYBOARD TAB The Keyboard Tab is your default tab when you first install Razer Synapse. This tab allows you to customize your d F O R GA M E RS . BY GA M E RS . - Page 13 Profile A profile is a convenient way of organizing all your custom settings and you can have an infinite number of profiles at your disposal. Any changes made within each tab are automatically saved to the current profile and stored into the cloud servers. You can create a new profile by clicking the button or delete the current profile by clicking button.
- Page 14 Customize Tab The Customize Tab is where you can modify the basic functionalities of your device such as key assignments to suit your gaming needs. The changes made in this tab are automatically saved to your current profile. F O R GA M E RS . BY GA M E RS .
- Page 15 Key Assignment Menu Initially, each key is set to DEFAULT. However, you may change the function of this key by clicking the desired key to access the Key Assignment Menu. Listed below are the customization options and their description. Default This option enables you to return the key to its original function.
- Page 16 Sensitivity Stage of your Razer gaming mouse. When you select Inter-device from the Key Assignment Menu, a sub-menu will appear. DEVICE TO LINK allows you to choose which currently connected Razer device can be linked while FUNCTION allows you to choose which functionality you want to use for the linked device.
- Page 17 choose a prerecorded macro command. See the MACROS TAB to learn more about creating Macro commands. Switch Profile The Switch Profile enables you to change profiles on the fly and immediately load all your pre- configured settings. When you select Switch Profile from the Key Assignment Menu, a sub-menu will appear that will allow you to choose which profile to use.
- Page 18 Windows 8 Charms This option enables you to assign your preferred key into a Windows 8 shortcut command. Listed below are the Windows 8 charm shortcuts you can choose from: ▪ Snap App to Left Maximizes an active window to the left side of the screen. ▪...
- Page 19 Lighting Tab The Lighting Tab on Razer Synapse allows you to customize your Razer device by allowing you to choose from different basic lighting effects or create your own using the Effects Configurator. Changes made in this tab will be automatically saved to the current profile.
- Page 20 Pre-loaded lighting effects A number of pre-loaded lighting effects can be selected and applied to your keyboard lighting as a whole, such as static, breathing, etc. Select your desired effect and their corresponding properties from the bottom area of this tab. Name Description How to set up...
- Page 21 Accessible from the Lighting tab is the Effect Configurator which you can use to create advanced lighting effects for your Razer Chroma-enabled device. Click the EFFECTS CONFIGURATOR link to open the window and begin exploring the customization options for your device.
- Page 22 Gaming Mode Tab The Gaming Mode Tab allows you to customize which keys to disable when Gaming Mode is activated. Depending on your settings, you may choose to disable the Windows key, Alt + Tab and Alt + F4. An indicator will light up when the function is currently turned ON. F O R GA M E RS .
- Page 23 MACROS TAB The Macros Tab allows you to create a series of precise keystrokes and button presses. This tab also allows you to have numerous macros and extremely long macro commands at your disposal. The Macro section works similarly to Profile wherein you can rename a macro by typing on the field below MACRO NAME.
- Page 24 The Macro section allows you to input the delay in-between commands. In RECORD DELAY the delay in-between commands are registered as how it is entered. The DEFAULT DELAY uses a predefined time (expressed in seconds) as the delay. And NO DELAY omits all the pauses in- between keystrokes and button presses.
- Page 25 Once you have recorded a macro, you may edit the commands you have entered by selecting each command on the macro screen. Each keystroke or button press is arranged sequentially with the first command shown at the top of the screen. button allows you to edit a particular command and the button enables you to delete a command.
- Page 26 Once you have pressed the button, a new display window will appear beside the list of macro commands. The dropdown menu on this window allows you to choose a keystroke or a delay to be added in before or after the highlighted macro command. F O R GA M E RS .
- Page 27 You may add in a new set of macro commands by clicking the button on the keystroke menu; or input time delays on the duration field using the delay menu. F O R GA M E RS . BY GA M E RS .
- Page 28 To enable this function, click the notification icon next to your user name in the Confirm to enable the function in the dialog box that appears. Return to Razer Synapse and a new F O R GA M E RS . BY GA M E RS .
- Page 29 Games List Stats & Heatmaps work by tracking the usage of all supported devices for each game. When the feature is enabled, it automatically scans your system for installed games and adds them to the Games List located on the left side of the screen. Click to show or hide the Games List.
- Page 30 Stats Tab By default, the Stats Tab shows you the overall statistics of all your Razer devices for all games and all time. You can select a specific game via the game list on the left side, change the time period using the SHOWING dropdown menu, or the Razer device using the DEVICES dropdown menu.
- Page 31 Heatmaps Tab - Keyboard Heatmaps Tab shows the most frequently used keys on your Razer device for each game on your Games List. F O R GA M E RS . BY GA M E RS .
- Page 32 Social Media You can share your heatmap image on social media networks such as Facebook or Twitter directly from Razer Synapse. From the Heatmaps tab, click the Share button on the bottom right of the screen. You will be prompted to login to the selected social media using an existing account if you have not already done so.
- Page 33 You can al & Heatmaps window, click media network you wish to sync with. Enter your login details and wait for the connection to complete. F O R GA M E RS . BY GA M E RS .
-
Page 34: Safety And Maintenance
8. SAFETY AND MAINTENANCE SAFETY GUIDELINES In order to achieve maximum safety while using your Razer BlackWidow Ultimate, we suggest that you adopt the following guidelines: Should you have trouble operating the device properly and troubleshooting does not work, unplug the device and contact the Razer hotline or go to razersupport.com... - Page 35 Do not use soap or harsh cleaning agents. The Razer BlackWidow Ultimate is tested up to IP54 and is designed to be dust, splash and/or spill resistant. Should any spillage on the device occur, make sure that you have unplugged the device and that its USB connector is kept completely dry, before doing any of the following: ▪...
-
Page 36: Legalese
COSTS OF PROCUREMENT For the avoidance of doubt, in no event will Razer be liable for any costs of procurement unless it has been advised of the possibility of such damages, and in no case shall Razer be liable for any costs of procurement liability exceeding the retail purchase price of the Product. - Page 37 Product was purchased. If any term herein is held to be invalid or unenforceable, then such term (in so far as it is invalid or unenforceable) shall be given no effect and deemed to be excluded without invalidating any of the remaining terms. Razer reserves the right to amend any term at any time without notice.
Need help?
Do you have a question about the BlackWidow Ultimate and is the answer not in the manual?
Questions and answers