Table of Contents
Advertisement
Quick Links
Optotune 6X System
Setup Guide
1.0 MECHANICAL SETUP
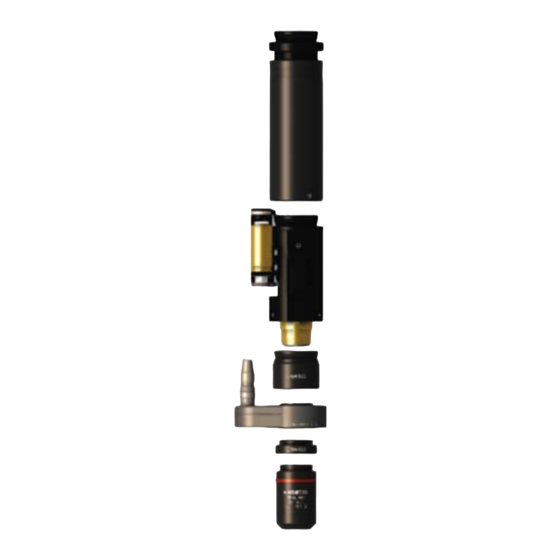
1. Steps to follow to install and set up the Optotune 6X system on a stand. Refer to System Diagram.
2.
1. Install choice of Adapter Tube (typically 1‐6015 or 1‐6218) to stand.
2. Attach 6X Sub‐assembly with no lower interface, (ex. 1‐63842, 1‐63843, 1‐64467, 1‐
63845), or the P.E. Ultra (1‐61517), and secure with 3X set screws in adapter.
3. Insert Adapter 1‐64800 or 1‐64801 depending on whether using the 6X Sub or P.E.
Ultra, respectively, dove‐tail side first, into the bottom of the 6X Sub‐assembly, and
secure with 3X set screws in the 6X sub‐assembly.
4. Thread the Optotune Lens (1‐64794) into the bottom of the Adapter, coax‐port facing
upwards.
a. Note that the Optotune Lens can continue to rotate even after fully threaded,
this is normal and used for adjustment of the Optotune's orientation.
5. Thread either the 1‐64795 Coax Interface, or the 1‐64802 Adapter depending on
whether you want to use coax lighting.
6. Refer to System Diagram to install your choice of objective lenses.
7. Thread PixeLINK Camera to Adapter Tube and connect to PC using PixeLINK USB cable
(ideally a USB3 port).
2.0 SOFTWARE SETUP
Steps for first time software setup to install Optotune Lens Driver firmware and Optotune Control Application.
2.1 O
L
PTOTUNE
ENS
1. Within the software package files, navigate to "Optotune Lens Driver ‐> Optotune Lens Driver Controller".
2. Run Setup.exe and follow the prompts.
3. Plug the Optotune Lens Driver 4i (1‐40372) into a USB port (USB2 or USB3), do not have it plugged into the
Optotune Lens yet.
4. Open your Device Manager and locate the Lens Driver in the "Ports" section.
5. Right click the Lens Driver and select "Update Driver".
6. Select "Browse my computer for driver software", then navigate to the installed location of the Optotune
Firmware, by default it's "C:\Program Files (x86)\Optotune Switzerland AG\Lens Driver
Controller\Resources\Driver", click next and follow the prompts.
7. Once done, you can connect the Optotune Lens and the Lens Driver using the Hirose Cable (1‐40370 or 1‐
40371).
2.2 N
D
AVITAR
EVICE
1. Run Setup.exe within the top‐level software package folder and follow the prompts.
This document contains information proprietary and confidential to Navitar, Inc. Any disclosure, use or duplication of this document or any of the information contained
therein for other than the specific purpose for which it was disclosed is expressly prohibited except as Navitar, Inc. may otherwise agree to in writing.
D
F
I
RIVER
IRMWARE
NSTALLATION
C
A
ONTROL
PPLICATION
Created By: John Dong
Reviewed By:
Date: 9/6/2019
I
NSTALLATION
Rev A
Page 1 of 7
1
2
3
4
5
6
Advertisement
Table of Contents

Subscribe to Our Youtube Channel
Related Manuals for Navitar Optotune 6X


Summary of Contents for Navitar Optotune 6X
- Page 1 Steps for first time software setup to install Optotune Lens Driver firmware and Optotune Control Application. 2.1 O PTOTUNE ENS RIVER IRMWARE NSTALLATION 1. Within the software package files, navigate to “Optotune Lens Driver ‐> Optotune Lens Driver Controller”. 2. Run Setup.exe and follow the prompts. 3. Plug the Optotune Lens Driver 4i (1‐40372) into a USB port (USB2 or USB3), do not have it plugged into the Optotune Lens yet. 4. Open your Device Manager and locate the Lens Driver in the “Ports” section. 5. Right click the Lens Driver and select “Update Driver”. 6. Select “Browse my computer for driver software”, then navigate to the installed location of the Optotune Firmware, by default it’s “C:\Program Files (x86)\Optotune Switzerland AG\Lens Driver Controller\Resources\Driver”, click next and follow the prompts. 7. Once done, you can connect the Optotune Lens and the Lens Driver using the Hirose Cable (1‐40370 or 1‐ 40371). 2.2 N AVITAR EVICE ONTROL PPLICATION NSTALLATION 1. Run Setup.exe within the top‐level software package folder and follow the prompts. This document contains information proprietary and confidential to Navitar, Inc. Any disclosure, use or duplication of this document or any of the information contained therein for other than the specific purpose for which it was disclosed is expressly prohibited except as Navitar, Inc. may otherwise agree to in writing. ...
- Page 2 Created By: John Dong Rev A Optotune 6X System Reviewed By: Setup Guide Date: 9/6/2019 Page 2 of 7 2. The application should start shortly after installation. 3.0 NAVITAR DEVICE CONTROL APPLICATION A high‐level description of some of the Optotune Control application’s functionality and controls. 3.1 P TARTUP 1. Make sure PixeLINK Camera is connected to PC via USB3 (USB2 will lead to significantly lower frame rates). 2. Make sure Optotune Lens is connected to the Optotune Lens Driver, and the Optotune Lens Driver is connected to the PC 3. Make sure any Navitar Motor Controllers are initialized and connected to the PC 3.2 S TART 1. Launch the application from your start menu. 2. Application will check for updates before starting and may ask for permission to install required files. 3.3 C ...
- Page 3 Date: 9/6/2019 Page 3 of 7 c. Toggle the Continuous Exposure checkbox to turn on/off the Continuous Exposure functionality which will continuously keep the Exposure Time at the optimal setting. 2. Gain: Increasing Gain will increase the brightness of the image but increase the noise as well. 3. Gamma: Adjusting Gamma will change the contrast of the image. 4. Region of Interest: ROI controls the region where the sharpness score used for auto‐focus is calculated within. Move and resize the ROI on the feature of interest to auto‐focus on. a. Toggle the visibility of the ROI control box using the Show ROI checkbox. b. Save Waypoints by clicking the “Add” button. This will save the current ROI settings to a list, allowing you to quickly switch between multiple saved ROIs. 5. Stream Control Panel: Tools for starting/stopping the stream, pausing the stream, opening a popup stream window, capturing the current frame as an image file, and recording the stream. 6. Sharpness Score: A measure of the contrast within the ROI. The higher the Sharpness Score, the more in‐focus the image. It should be noted that Sharpness Score is not normalized, meaning the sharpness scores of different images cannot be compared to describe relative focus. a. The max Sharpness Score is recorded live and can be used to compare with the current Sharpness Score reading to see if best focus has been reached. The colored button represents how close you are to best focus, with green – within 2%, yellow – within 50%, red – under 50%. Typically, one should adjust through best focus, then adjust back until button is green. Click the button to reset the max Sharpness Score. 7. Stream Panel: Displays the stream from the camera. a. Zooming: Hold Shift and scroll to digitally zoom. b. Panning: Hold Ctrl and drag to pan. This document contains information proprietary and confidential to Navitar, Inc. Any disclosure, use or duplication of this document or any of the information contained therein for other than the specific purpose for which it was disclosed is expressly prohibited except as Navitar, Inc. may otherwise agree to in writing. ...
- Page 4 PTOTUNE ENS ONTROL 1 2 3 4 1. Optical Power: The curvature of the Optotune Lens. Adjusting Focal Power will change the focus of the system. It should be noted that although the range of Optical Power is larger than the specified tuning range of the Lens, the area outside the tuning range may not be held as temperature increases. a. Drag the slider and or use the numeric control box to manually adjust the Optical Power. b. The Min and Max buttons will bring the Optical Power to its Min and Max limits. c. Hold the fine and fast jog buttons to jog the Optical Power in the corresponding direction. 2. Auto-Focus: Will automatically adjust Optical Power until image is in focus. Uses the ROI of the camera to calculate contrast. Prior to running Auto‐Focus, you should narrow Auto‐Focus Limits around where best focus is to improve Auto‐Focus reliability. a. Press the Auto button to initiate Auto‐Focus. b. Toggle the Continuous checkbox to toggle Continuous Auto‐Focus mode. This will continuously adjust Optical Power to attempt to keep the image in focus even through changes in elevation. 3. Auto-Focus Limits: The limits within which Auto‐Focus will sample in. Before running Auto‐Focus, you should narrow the limits near best focus. This will improve reliability and potentially the speed. a. Drag either end of the slider or use the numeric control boxes to adjust min and max limits. b. The Set Minimum or Set Maximum buttons will set the current Optical Power as the min or max respectively. c. The Reset button will reset the min and max limits back to the overall limits. This document contains information proprietary and confidential to Navitar, Inc. Any disclosure, use or duplication of this document or any of the information contained therein for other than the specific purpose for which it was disclosed is expressly prohibited except as Navitar, Inc. may otherwise agree to in writing. ...
- Page 5 Press Add to save current Optical Power setting as a waypoint. b. Press Go to set Optical Power to waypoint. c. Set Num Cycles to set the number of cycles you wish to run during the loop. Set to 0 to run cycles indefinitely. d. Set Delay to specify the amount of time in milliseconds to wait between iterations. e. Press Start to begin cycling through each waypoint, press Stop to stop the loop. 3.5 Z OOM ONTROL 1 2 3 1. Zoom: Controls the motorized zoom of the lens. Increasing Zoom will increase the magnification. Lighting may need to be adjusted after changing Zoom as the image may dim. a. Drag the slider and or use the numeric control box to manually adjust the Zoom. b. The Min and Max buttons will bring the Zoom to its Min and Max limits. c. Hold the fine and fast jog buttons to jog the Zoom in the corresponding direction. d. Press Stop to abort the current movement of the Zoom motor. 2. Waypoints: Save Zoom as waypoints to remember or quickly switch between multiple Zoom settings. You can also start a loop where the Zoom will automatically iterate through each saved setting for the number of cycles specified, with a specified delay between iterations. This document contains information proprietary and confidential to Navitar, Inc. Any disclosure, use or duplication of this document or any of the information contained therein for other than the specific purpose for which it was disclosed is expressly prohibited except as Navitar, Inc. may otherwise agree to in writing. ...
- Page 6 Save Settings: Settings will be applied temporarily when they are changed. Save the settings to write the current settings to flash, ensuring it will remain when the controller is turned off and on again. Reset to Default: Reset all settings to the factory default values. 4.0 PARFOCALITY PROCEDURE 6. Procedure for setting the parfocality of the 6X Optotune System. 4.1 S ETUP HECKS 1. Ensure that you have gone through Software Setup on the PC that you’re currently using. 2. Ensure that the Optotune Lens is connected to the Lens Driver via a Hirose Cable, and the Lens Driver connected to the PC via USB. 3. Ensure that the PixeLINK Camera is connected to the PC via USB3. 4. Ensure that the motorized zoom (if using a motorized zoom) is connected to the appropriate Navitar Motor Controller, turned on and initialized without issues, and is connected to the PC via USB. 5. Ensure that you’re using an Adapter Tube with adjustable parfocality. 4.2 P ROCEDURE 1. Launch the Optotune Control Application and use the camera streaming feature to look at target. 2. Set Optotune’s focal power to 0 dpt. 3. Adjust working distance until target is close to being in focus. 4. Set Zoom to high magnification. This document contains information proprietary and confidential to Navitar, Inc. Any disclosure, use or duplication of this document or any of the information contained therein for other than the specific purpose for which it was disclosed is expressly prohibited except as Navitar, Inc. may otherwise agree to in writing. ...
- Page 7 7. Adjust Adapter Tube’s z‐axis until target is in best focus. 8. Repeat Steps 4‐7 until low and high magnification is at best focus without needing further adjustments. 5.0 TROUBLESHOOTING Some tips for when you are running into issues with the software. 5.1 A PPLICATION IS OT ETECTING ONNECTED EVICES 1. Double check that the device shows up your Operating System’s Device Manager. If it is not there, check the connection. 2. Ensure that no other applications that might be using the devices are open (Pixelink Capture for example). 3. Open the Task Manager, and make sure that no other instances of the Navitar Device Control application are running. If there are other instances, force close them. 5.2 A PPLICATION IS EING LOW RAMERATE 1. Open the Task Manager, and make sure that no other instances of the Navitar Device Control application are running. If there are other instances, force close them. 2. Try restarting the application. Make sure to wait a few seconds before starting the application again after closing it. 3. If camera framerate is slow, make sure camera is connected via USB3 port. ...
Need help?
Do you have a question about the Optotune 6X and is the answer not in the manual?
Questions and answers