Trikdis FLEXi SP3 User Manual
Security control panel
Hide thumbs
Also See for FLEXi SP3:
- Installation and programming manual (48 pages) ,
- User manual (18 pages) ,
- User manual (17 pages)

Related Manuals for Trikdis FLEXi SP3


Summary of Contents for Trikdis FLEXi SP3
- Page 1 Security control panel FLEXi SP3 User manual (Crow keypad) November 2020 www.trikdis.com UAB Trikdis Draugystes g. 17, LT-51229 Kaunas, Lithuania +370 37 408 040 info@trikdis.lt...
- Page 2 FLEXi SP3 user manual Attention! Read this user manual carefully. A representative from the company installing the alarm system will explain which functions of the FLEXi SP3 security module must be activated to ensure proper protection of the premises. Copyright ©...
-
Page 3: Table Of Contents
FLEXi SP3 user manual Contents ABOUT YOUR ALARM SYSTEM ............................4 MAIN TECHNICAL SPECIFICATIONS ..........................4 POWERING THE EQUIPMENT............................4 GENERAL OPERATION OF THE ALARM SYSTEM ......................4 ............................. 4 RANSMISSION OF ALERT MESSAGES ............................5 LARM SYSTEM OPERATION MODES ............................ -
Page 4: About Your Alarm System
About your alarm system The FLEXi SP3 control panel is part of a premise security and fire alarm system. It performs sensor signal processing and signalizer control and has integrated GSM and WiFi modems that can transmit alert messages to the central monitoring station and to users’... -
Page 5: Alarm System Operation Modes
User code – a four-digit combination for arming/disarming the alarm system and for temporarily bypassing security zones. It is recommended to assign every user a personal alarm control code. The memory of the FLEXi SP3 module can store up to 40 user codes;... -
Page 6: Additional Functions
Up to 8 temperature sensors DS18B20, DS18S20 or one temperature and humidity sensor AM2301 can measurement be connected to the FLEXi SP3 module. Intervals of permitted temperatures can be set for each of them individually. If the temperature changes beyond the set interval, an event message will be formed and sent to users. -
Page 7: Quick Arming/Disarming Of The Alarm System
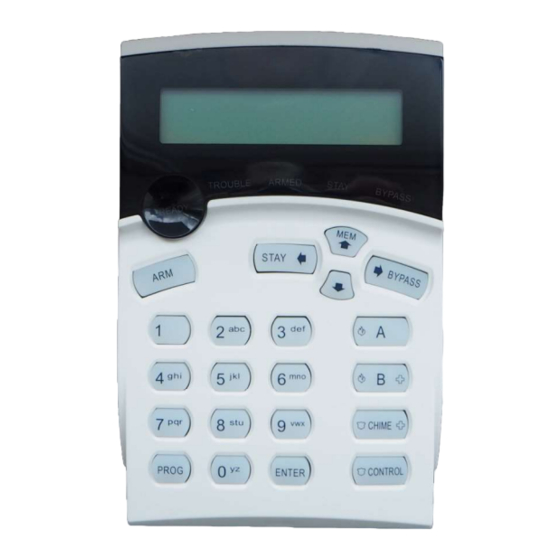
FLEXi SP3 user manual Button Description A constantly glowing indicator means that there are temporarily bypassed zones, and a blinking BYPASS indicator shows the keypad is operating in BYP mode. The button is also used for selecting temporary bypass mode. -
Page 8: Disarming The Alarm (Disarm Mode)
FLEXi SP3 user manual 4. Confirm your selection by pressing the [ENTER] button. a. On the CR-LCD keypad, the indicator [STAY] will light up. On the CR-16 keypad, the partition indicator (A, B) will start blinking. b. If the Bell Squawk function is enabled, the siren will activate once for a short period of time as the alarm switches Note: STAY mode is unavailable unless at least one zone is set to Interior STAY or Instant STAY. -
Page 9: Setting Time And Date On The Cr-Lcd Keypad
FLEXi SP3 user manual 4. The memory will be cleared after the alarm is switched on and the [MEM] indicator stops glowing. Setting time and date on the CR-LCD keypad Keypad CR-LCD Press the [PROG] button. Enter the 6-digit [Installer or Administrator code]. -
Page 10: Programming User Control Codes
FLEXi SP3 user manual Trouble group Description of the selected group [2] Battery malfunction [3] Clock not set [4] Maximum allowed current for output AUX is exceeded [5] Maximum allowed current for siren output is exceeded [6] No siren [2]: Communications... -
Page 11: Viewing And Editing The Partitions That The User Can Control Using The Cr-Lcd Keypad
FLEXi SP3 user manual 5.12.3 Viewing and editing the partitions that the user can control using the CR-LCD keypad CR-LCD keypad Press the [PROG] button. Enter the 6-digit [Installer or Administrator code]. Press the [ ] ([MEM]) button. Enter a 2-digit user number. -
Page 12: Control Using Rfid Cards (Tags)
PGMx output. Call the number of the SIM card inserted into the FLEXi SP3 security control panel. If the phone number you are calling from is specified in the module‘s memory, the control panel will answer the call and you will have to enter the control command (see control command table). -
Page 13: Control Using Sms Messages
Control using SMS messages Using SMS messages, you can control the FLEXI SP3 security control panel and change some of the panel‘s parameters. Only TrikdisConfig software can change all parameters of the module. -
Page 14: Control Of Pgm Outputs
FLEXi SP3 user manual Command Data Description STAY SYS:x Arm partition “x” in Stay mode, “x” is the partition number (1-8). E.g.: STAY 123456 SYS:1 SLEEP SYS:x Arm partition “x” in Sleep mode, “x” is the partition number (1-8). E.g.: SLEEP 123456 SYS:1 Resets the fire sensor’s output, if the output OUT is assigned the function “Fire... - Page 15 FLEXi SP3 user manual Information about the protected object Fill in the following tables. Keep this document in a safe location. Access codes Your Administrator code is ______________________________ Other access codes: Code Control key No. Code Control key No. Zones...
- Page 16 FLEXi SP3 user manual Zone Protected space Zone type Temperature sensors Sensor Serial number Controlled space Max. temperature Min. temperature www.trikdis.com November 2020...
- Page 17 FLEXi SP3 user manual Emergency call buttons Panic __________________________ Alarm system __________________________ Ambulance __________________________ Time intervals Time for entering _________________________ sec. Time for exiting _________________________ sec. Siren operation time _________________________ sec. Additional information ______________________ ____________________ __________________ (name) (phone number) (password)
Need help?
Do you have a question about the FLEXi SP3 and is the answer not in the manual?
Questions and answers