
Related Manuals for Horwin SK1


Summary of Contents for Horwin SK1
- Page 1 Please do not use Vehicle before you read this manual carefully and know function of it. Please keep this manual carefully. HORWIN SK1 USER MANUAL www.horwinglobal.com...
- Page 2 SK1 User Manual Welcome to join HORWIN family! We will guide you to understand every function of SK1 electric motorcycle and use SK1 electric motorcycle correctly and safely. To ensure your safety, please read this manual carefully before riding and ensure that you always comply with the...
-
Page 3: Safety Instructions
Safety Instructions Please read this product manual carefully, and please do not use this product until you have known the characteristics of the electric two-wheeled motorcycle. Please abide by traffic rules, do not retrograde or run red lights and do not use mobile phone while riding the motorcycle. -
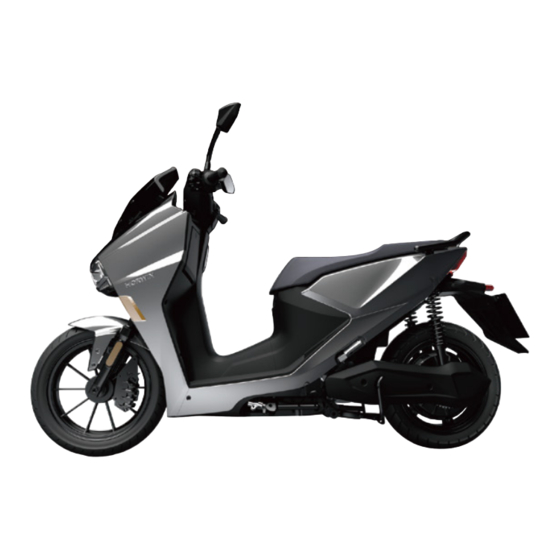
Page 4: Product Overview
Product Overview Thank you for purchasing the SK1 electric two-wheeled motorcycle, which is hereinafter referred to as SK1. Schematic Diagram of Body and Components:... -
Page 5: Description Of Parts
Description of Parts Left Side ① Headlamp ① ② ③ ④ ② Rearview mirror ③ Left combination switch ④ Saddle ⑤ Tail lamp ⑤ ⑥ Rear fender ⑪ ⑥ ⑦ Middle stand ⑩ ⑧ Side stand ⑨ ⑨ Front shock absorber ⑩... -
Page 6: Right Side
Right Side ① ② ③ ① Throttle ② Right combination switch ③ Ignition lock ⑤ ④ Footboard ⑤ Rear armrest ⑦ ⑥ Reflector ⑧ ⑥ ⑦ Rear shock absorber ⑨ ⑧ Rear fork decorative cover ⑨ Hub motor ④ Instrument and Combination Switch ⑭... - Page 7 1. Left turn signal Turn on the right turn signal lamp, the indicator flashes. 2. High beam The indicator will light up when the high beam is turned on. 3. Operational indication Indicates that the vehicle has entered a state ready to ride. Rotate the speed control handle to move the vehicle forward.
- Page 8 9. 1 Gear display (Limit 45KM/H) Display the current gear The top speed in the first gear is 15KM/H The top speed in the second gear is 30KM/H The top speed in the third gear is 45KM/H 9. 2 Gear display (Limit 25KM/H) Display the current gear The top speed in the first gear is 15KM/H The top speed in the second gear is 20KM/H...
- Page 9 Schematic Diagram of Combination Switch Left hand combination switch ⑤ Gear mode ① High/low beam Press the left, middle and right buttons to adjust the Turn the switch upward, the light is high beam; Turn gear the switch downward, the light is low beam ②...
- Page 10 Key and Remote Control Electronic Key 1. Anti-theft button: Press the button gently, then the vehicle will enter the anti-theft alarm state. When the electronic key is more than 1.2 meters away from the motorcycle, the motorcycle will automatically enter the anti-theft state. 2.
- Page 11 Mechanical Key Start Press the shut button Off to turn off the keyhole. Open the saddle Keyhole Front lock Start the Open the Ignition motorcycle saddle lock Insert the key handle into the following hole and turn counterclockwise to open the keyhole.
-
Page 12: Battery And Charger
Battery and Charger Battery Use Instructions The vehicle has two charging modes: battery charging and body charging. External charging mode Charge and discharge Charge interface interface Discharge interface 72V 36AH 72V 26AH Take out the battery, plug the charger into the charging interface, then plug into the socket and press the battery start button. - Page 13 Vehicle Charging Mode Put the battery into the battery compartment, connect the vehicle power plug to the battery, and then insert the charger charging plug into the charging interface above the footboard to charge the motorcycle. Then the charger indicator will light up and the battery will display the real-time power. Charging interface Charging interface Description of battery power indicator...
- Page 14 In the Non-Charging state, press the power display button: 72V 36AH 72V 26AH In the normal state, the indicator shows the battery power. Each grid displays 20% of power. Battery Manual Before using the battery, please make sure that the battery is the original battery, and do not use other brand or type of battery.
-
Page 15: Use Environment
Use Environment Please use the battery Please avoid the Please avoid keeping Please avoid metallic at-10℃~45℃ battery being soaked the battery close to foreign body from by liquid such as heat source, open entering the battery water, beverage and flame and inflamma- corrosive liquid ble and explosive gas (liquid) - Page 16 Charging Environment Please use the original Please charge the battery at Please do not charge the charger to charge the battery, the ambient temperature of battery for more than 8 and do not use other brand 0℃~35℃ hours, otherwise the service or type of charger to charge life of the battery will be the battery.
-
Page 17: Storage Environment
Precautions for Charger Use The charger can only be used indoor. It is strictly forbidden to charge the battery in a confined space or in the high temperature environ- ment, and the battery shall not be placed in the seat bucket or tail box during charging. During charging, plug the battery, then connect the charger to the commercial power;... - Page 18 When the battery is stored for a long time, the most suitable battery power is 50%. If the battery power is lower than 10% or higher than 90%, the battery capacity will be irreversibly attenuated. With regard to the self-consumption protection mode when the lithium battery is stored safely, the technical standards are as follows: 1.If the battery is not used for a long time, it can be stored on the vehicle (the battery plug is not unplugged) and the maximum safe storage period is 15 days, otherwise the battery feeding may be...
-
Page 19: Precautions For Battery Use
Precautions for Battery Use: When using the battery for the first time, please drain the battery as much as possible, then fully charge it before formally using it, so as to ensure that the actual capacity of the battery is as accurate as the electric quantity displayed on the instrument. -
Page 20: Riding Guide
Riding Guide Precautions for Preparation Drinking is a direct cause of death in motorcycle driving. Every year, 50% of drivers die from driving after drinking. Do not drive after drinking Before your first drive, we strongly request you to: Read the user manual; Confirm that you have fully understood all safety information;... -
Page 21: Driver Training
It's necessary to improve your driving skills. Even if you have the experience of riding other motorcycles before, you still need to take time to get familiar with the working principle and driving control of SK1. Please practice driving the motorcycle in a safe place until your skills are mature and you have got used to the size and weight of SK1. -
Page 22: Loading Instructions
Please follow all load limits and other loading information in this manual. Loading Instructions The maximum capacity of SK1 is 270KG, including weight of driver and passenger(s), as well as all compo- nents of the vehicle body. Your SK1 shall be preferentially used for you and your passenger(s). However, if you want to load more goods, we suggest to use saddle bag. - Page 23 Instructions for Braking Before riding the vehicle, it is necessary to check whether the front and rear brake handles can work normally Excessive sudden braking may cause dead lock and slide of wheel, reducing control over the motorcycle. In this case, release the brake lever and continuously drive forward until the control restores, then brake more gently.
-
Page 24: Product Manual
Closing the Riding System The methods of turning off the riding system are as follows: 1. Lay down the side stand, the "READY" on the instrument will not light up, the electrical system of the whole vehicle is in standby state, and the vehicle will not move forward after the throttle is turned. -
Page 25: Service Tips
Service Tips Please turn off the vehicle power before cleaning the vehicle. Do not flush with strong water jet directly which may cause fault to mechanical components by damp. Mileage count/time interval (whichever comes first) Inspection Item Throttle operation Turning the throttle to ensure stable riding and √... - Page 26 Front and rear braking systems √ √ √ √ √ √ √ √ Check the thickness of hose and bolts Replace the brake fluid (**) √ √ √ Front and rear brake light switches √ √ √ √ √ √ √...
- Page 27 (*) Unless you have the appropriate tools, service data and mechanical qualifications, otherwise, the vehicle shall be inspected by your HORWIN authorized dealer. (* *) For safety reasons, we recommend that these items can only be provided by your authorized HORWIN dealer.
-
Page 28: Troubleshooting
Troubleshooting Troubleshooting of the Whole Vehicle Phenomenon Cause Treatment Method Treatment Method Turn on the power 1 Check whether the connectors of the battery switch and the The vehicle is not powered are plugged on the vehicle properly vehicle has no 2 The battery is under undervoltage condition, power output please charge the battery... - Page 29 Controller Flashing Protection Characteristics of Controller System Frequency of Overvoltage protection The battery voltage is higher than the set value Undervoltage protection The battery voltage is lower than the set value Motor Overcurrent Protection The phase line of the motor is short-circuited. The stalling time of the motor exceeds the set Stalling Protection value...
- Page 30 Cleaning of the Vehicle Please mix tap water and neutral detergent to scrub the vehicle. After scrubbing the vehicle, wipe the surface with a soft cloth. Please do not directly flush both sides and inside of the instrument with a high-pressure water gun. Electronic components, such as charging interface and controller, are in the side cover above the footboard, so please do not flush them directly, so as to avoid the water damage.
-
Page 31: Basic Parameter
Basic Parameter 1993 mm 790 mm 742mm 1136 mm... - Page 32 HORWIN SK1 & SK1 Light DIMENSIONS Length: 1993mm Width: 742mm Height: 1136mm Seat height: 790mm Motor Type Hub Motor Controller Battery 72V, 36AH / 72V, 26AH ( optionally with second battery ) MEASUREMENTS Front hub MT 2.5×14 Technically permissible 270KG Rear hub MT 3.0×14...
-
Page 33: Warranty Registration Form
Note: This form shall be completed by the customer and shall be filed by the dealer. Policy of Warranty Thank you very much for purchasing SK3 electric motorcycle produced by HORWIN. In order to provide users with comprehensive service guarantee, according to relevant laws and regulations and relevant national regulations on after-sales service, and in combination with product characteristics, the specific provisions... - Page 34 Warranty Standards of Spare Parts Item Spare Parts Warranty Scope Warranty Period When the vehicle is used within the normal Frame, handle load and road range, there is natural snap, 24 months desoldering or fracture on the vehicle Front/rear hub, front/rear shock absorber, chain, chain wheel, tire, 12 months Vehicle Body...
- Page 35 Item Spare Parts Warranty Scope Warranty Period Controller, display instrument. Handle, main cable, flasher, horn and remote alarm. Electric door 12 months lock (including auxiliary lock and key) DC-DC converter and Due to product reasons, the performance combination switch Electrical parts failure or quality problem occurs and cannot be repaired Headlight assembly, rear...
- Page 36 Instructions to other items not covered by warranty standard Based on the above table, if the items are beyond the time limit and scope of three guarantees, they are beyond the scope of three-guarantee service. Other parts not included in the above table, such as brake shoe, brake oil, power socket, cable, USB, PP and appearance parts, are vulnerable and consumable parts and cannot enjoy the "Three-Guarantee"...
- Page 37 Repair& Maintenance Records In order to enhance your warranty experience, please be sure to repair and maintain your vehicle at our authorized dealers. And please record in the form below and stamp the dealer's seal. Model: Frame No.: Motor No.: The 1st service Date: Range:...
- Page 38 The 7th service Date: Range: Dealer's stamp The 8th service Date: Range: Dealer's stamp The 9th service Date: Range: Dealer's stamp The 10th service Date: Range: Dealer's stamp The 11th service Date: Range: Dealer's stamp The 12th service Date: Range: Dealer's stamp The 13th service Date:...
- Page 39 The 15th service Date: Range: Dealer's stamp The 16th service Date: Range: Dealer's stamp The 17th service Date: Range: Dealer's stamp The 18th service Date: Range: Dealer's stamp The 19th service Date: Range: Dealer's stamp The 20th service Date: Range: Dealer's stamp...
- Page 40 HORWIN Headquater Building No. 33-1&3 | Hengsheng Science & Technology Park Beitanghe Rd | Tianning district | Changzhou | Jiangsu phone.: +86 519 68976665 | email: horwin@horwinglobal.com European Headquater Kammersdorf 173 | A-2033 Kammersdorf phone.: +43 2953 2325 | email: info@horwin.eu www.horwin.eu...
Need help?
Do you have a question about the SK1 and is the answer not in the manual?
Questions and answers
® Throttle grip indicator light The indicator lights up if the throttle grip is not in the starting position (zero position) or is defective.