Table of Contents
Advertisement
Quick Links
The world's best-selling electric floor heating brand
CAUTION: Read all instructions carefully before installation.
Save this Installation Manual for future reference.
GENERAL SAFETY INSTRUCTIONS
1. THIS UNIT SHOULD BE INSTALLED, OPENED AND REPAIRED BY QUALIFIED
PERSONNEL ONLY!
2. To avoid shock hazard do not open the front cover with power
connected to the DS-9C or any controlled equipment.
SELECTING A MOUNTING LOCATION FOR THE DS-9C
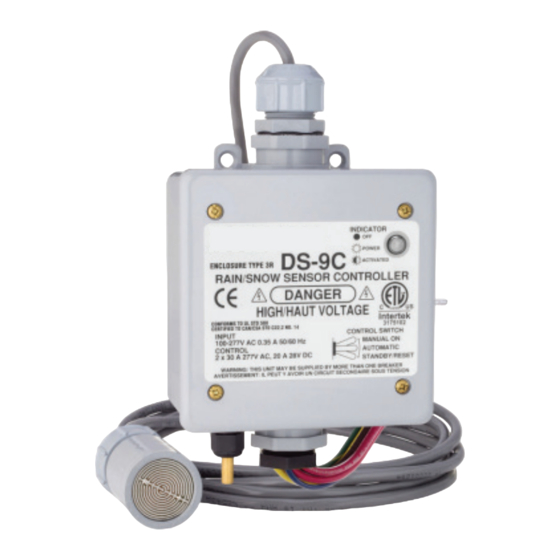
The small corded device with the interleaved grid is the remote precipitation or "moisture" sensor.
The brass cylinder protruding from the bottom of the DS-9C enclosure is the temperature sensor.
For reliable rain and snow detection the moisture sensor must be exposed to a clear view of the sky. Reference
p2 "Moisture Sensor Mounting & Termination" for guidance in mounting the DS-9C moisture sensor. For
proper temperature detection the DS-9C enclosure must be mounted outdoors, away from furnace vents,
dryer vents, and other sources of heat. When powered, the DS-9C moisture grid will always remain hot.
This is normal. This allows the sensor to continuously melt/evaporate rain and snow from the grid.
The DS-9C enclosure can be mounted by screwing the base conduit hub onto an appropriate size freestanding
conduit or by using the mounting holes in each corner of the enclosure.
DO NOT DRILL HOLES THROUGH THE ENCLOSURE FOR MOUNTING!
This can allow water into the enclosure
causing a potential shock hazard. It is
recommended that a weatherproof junction
box be mounted below the DS-9C for
termination of the power and load pigtails
to the building wiring.
Use Care When Replacing the Front
Cover. Do Not Pinch the Gasket or
Overtighten the Screws.
ALWAYS FOLLOW LOCAL AND NATIONAL ELECTRICAL CODES.
WARMUP INC.
USA: us@warmup.com
Tel.: 1-888-927-6333
www.warmup.com
DS-9C RAIN/SNOW SENSOR CONTROLLER
INSTALLATION INSTRUCTIONS
™
CANADA: ca@warmup.com
Tel.: 1-888-592-7687
www.warmup.ca
The world's best-selling electric floor heating brand
™
Advertisement
Table of Contents

Summary of Contents for Warmup DS-9C
- Page 1 DS-9C enclosure must be mounted outdoors, away from furnace vents, dryer vents, and other sources of heat. When powered, the DS-9C moisture grid will always remain hot. This is normal. This allows the sensor to continuously melt/evaporate rain and snow from the grid.
- Page 2 Do not add additional cable to the interface. Erratic operation may result. (If the sensor lead needs to be extended, please contact Warmup to order an EX-50.) Strip the outer insulation and shield from the cable and terminate each conductor following the color code printed on the circuit board.
- Page 3 The DEL configuration switch activates the Delay-Off drying cycle timer on the DS- 9C. The timer allows the DS-9C to continue to operate and dry the heated surface through evaporation once precipitation has stopped. The drying cycle reduces the chance of moisture left behind refreezing into ice.
- Page 4 The world’s best-selling electric floor heating brand The DS-9C precipitation sensor is very sensitive and can detect a single snow flake or rain drop. However, if the DS-9C is mounted in an area susceptible to high winds, overhanging trees, or blowing ground snow, nuisance triggering may occur.
- Page 5 DO NOT ATTEMPT TO INCREASE SWITCHING CAPACITY BY WIRING THE RELAYS IN PARALLEL. These are just some of the possible wiring schemes that can be used to connect the DS-9C to your load for control. Remember, these are only suggestions. You should always consult a qualified electrician...
- Page 6 POWER & ACTIVATION INDICATOR A green lamp shines through a lens on the cover of the DS-9C to indicate operational status. If this lamp is OFF the DS-9C is not receiving power. If this lamp is steady ON the DS-9C is powered but not triggered.
- Page 7 Within the limitations of this warranty, inoperative units should be returned, freight prepaid, to Warmup, and we will repair or replace, at our option, at no charge to you with return freight paid by Warmup. It is agreed that such repair or replacement is the exclusive remedy available from Warmup and that Warmup IS NOT RESPONSIBLE FOR DAMAGES OF ANY KIND, INCLUDING INCIDENTAL AND CONSEQUENTIAL DAMAGE.


Need help?
Do you have a question about the DS-9C and is the answer not in the manual?
Questions and answers