Advertisement
Available languages
Available languages
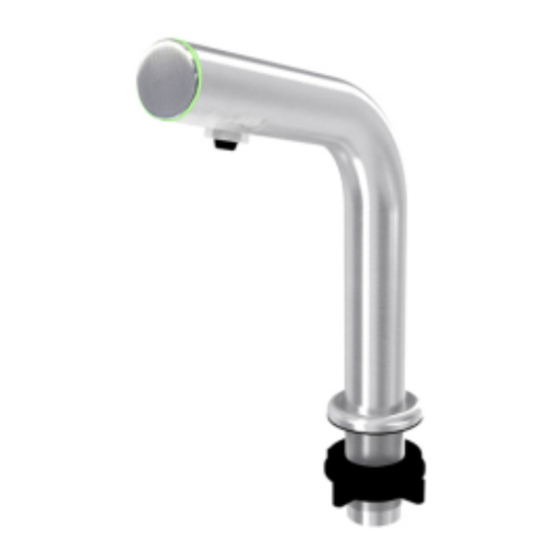
Touch-free Deck-mounted
Soap Dispenser
1. SPECIFICATIONS:
Soap Tank Capacity: 1500 ml (50.7 fl oz)
Adaptor Type Required: 6 VAC Plug-In Adaptor
Room Temperature: 5~40 °C (41~104 °F)
Dispensing Volume: 0.6~0.8 ml (0.02~0.026 fl oz)
Applicable Viscosity Range: 1~5 cP (1~5 mPas)
Operation Mode: Automatic
Sensor range approximately 10 +/-2 cm.
A solid green light indicates the dispenser is on standby, ready to dispense soap.
A solid red light indicates wrong type of soap or motor failure.
A flash of red every 2 seconds indicates the soap tank is empty.
A quickly flashing red (5 times per second) indicates that the sensor is blocked.
After connecting to power or refilling soap tank, the dispenser will continue dispensing soap for a maximum of 10 times
until the user removes hands.
Soap dispenser will dispense once every 48 hours if there is no action in between to avoid a clog of the tip.
2. INSTALLATION
STEPS:
1
1" [ 25 mm]
Ø
5
1. Drill a 1 Ø25 mm] hole (drawing 1).
" [
2. Put the soap dispenser through the hole (drawing 2).
Place the rubber washer & nylon washer in the thread on the shaft.
Use the nut to fasten the soap dispenser.
3. Make sure the soap rubber tube can touch the wall in order to find the best position to install the control box assembly. Ensure the length
of tubing is long enough to allow the reservoir bottle to be easily removed.
4. Put the mounting template in the best installation position on the wall according to the position of the holes in the mounting template.
Then drill 3 holes 9/32 [7 mm] and put the 3 wall plugs in the holes (drawing 3).
"
5. Put two fixing screws into the top wall plugs, but leave a 1/4
control box assembly can hang properly (drawing 4).
6. When the control box assembly has been hung on the wall, fasten the third screw into the bottom wall plug (drawing 5).
7. Pull up the soap pump, fill with the foam soap and then push down the soap pump until you hear it snap into place (drawing 6).
8. Connect the wires of the soap dispenser to the wire of the control box assembly (drawing 7).
Connect the tube of the soap dispenser to the connector on the soap pump, and push the spring to the bottom as shown
on the image (drawing 7).
9. Push the soap tank into the track. Make sure the soap pump plate is under the pump actuator before you put back the soap tank,
so the soap dispenser can work properly (drawing 8).
10. Plug in an AC adapter to supply power (drawing 8). Installation finished.
2
rubber
nylon
Touch the Mounting template
to find the best position for installing
6
5-9/16"
[140.6 mm]
1"
Ø25
[
.4 mm]
3
7
A
B
[6 mm] space between the head of the screw and wall, so the
"
MODEL SD01-003SFL
:
SD01-003CFL
6
-5/8
"
[167.7 mm]
4
9/32" [7 mm]
8
8
pump actuator
8
plate
1/4" [6 mm]
AC
1
Advertisement
Table of Contents

Related Manuals for Franke SD01-003SFL


Summary of Contents for Franke SD01-003SFL
- Page 1 Touch-free Deck-mounted Soap Dispenser MODEL SD01-003SFL 1. SPECIFICATIONS: SD01-003CFL Soap Tank Capacity: 1500 ml (50.7 fl oz) 5-9/16" [140.6 mm] Adaptor Type Required: 6 VAC Plug-In Adaptor 1" Room Temperature: 5~40 °C (41~104 °F) Ø25 .4 mm] Dispensing Volume: 0.6~0.8 ml (0.02~0.026 fl oz)
- Page 2 3. RECOMMENDED INSTALLATION: 13/16" [20 mm] 1-3/16" [30 mm] 4. CHANGE OR CLEAN THE OUTLET: a) Remove the power supply. When the volume of foam soap is found reduced, remove the foaming net by L key and wash it. c) It is recommended to clean the foaming net and its outlet every three months.
- Page 3 Distributeur de savon sans contact, monté sur plage Modèles : SD01-003SFL, SD01-003CFL 1. Spécifications • Capacité du réservoir de savon : 1 500 mL (50,7 oz. fluides) 5-9/16 po • Type d’adaptateur requis : adaptateur enfichable 6 V CA • Température ambiante : 5-40 °C (41-104 °F) 1 po •...
- Page 4 Distributeur de savon sans contact, monté sur plage Modèles : SD01-003SFL, SD01-003CFL 9. Insérer le réservoir à savon dans la glissière. S'assurer que la plaque de la pompe à savon se trouve en dessous de la commande de pompe avant de remettre en place le réservoir à savon, afin d'assurer le bon fonctionnement du distributeur de savon (dessin 8).
Need help?
Do you have a question about the SD01-003SFL and is the answer not in the manual?
Questions and answers