Advertisement
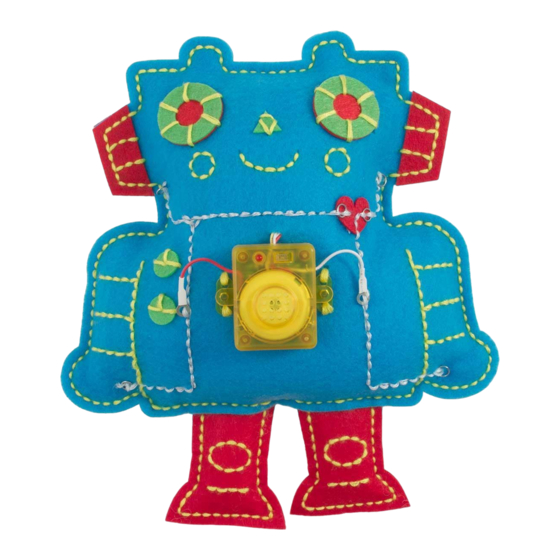
10. Before sewing the front and the back felt shapes together, carefully check that all conductive thread is connected properly with the
sections of the circuit. After switching on the module, touch both metal rings on the hands of the robot (5 & 6) at the same time to make
the robot come alive! Touch the metal rings on the robot's cheeks (1 & 2) and the rings inside the heart (3 & 4) to activate the module
again and make sure the light and sound functions are working properly.
If there is no sound/light: • Check that the module switched on. • Check that the metal rings and two extension cords from the LED module
are well-connected. Otherwise, you may need to re-stitch conductive thread to strengthen the connection. • Restitch around where the
turning points of the circuit to allow the electricity to flow smoothly. • Moisten your hands to increase the conductivity of your body.
11. Align corresponding holes on all the pairs of pre-cut felt shapes, with the felt legs put in between the front and back of the robot as
shown. Start by sewing front and back felt body pieces together with the legs, using the yellow thread and the back stitch sewing
technique as shown.
12. Continue stitching to join all the felt together. Before you finish stitching, leave a small part of the body unstitched to fill the robot with
stuffing. Finish the stitching and tuck in the flap as shown to seal the stuffing inside. Your robot is now complete! Take off the flap and
empty out the stuffing if you need to make any repairs or adjust the LED lights inside your robot.
13. Human Circuit Activity: Join hands with your robot and as many friends as you like to bring the robot to life! You can also experiment
with different materials to see which ones electricity can flow through to complete the robot's circuit.
F. HOW IT WORKS
The circuit you stitched together becomes complete when your hands touch the metal rings, allowing an electrical current to flow smoothly
and connect the two ends of the module. Your body becomes part of the circuit when the electrical current flows through your body and
into the small circuits inside the module. This happens because a battery always has two poles; a positive one and a negative one. At the
positive pole, there are very few electrons, while there are a lot of electrons at the negative pole. If the positive poles and negative poles
are connected electrons move to correct the imbalance, creating an electrical current. The module's smaller circuits are then able to
transform the energy from the electrical current into light and sound.
G. FUN FACTS
1. Around the year 1800, Alesandro Volta discovered that a copper and a zinc plate would produce electricity when connected by a cloth
moistened by salt water. His discovery was the foundation for many of the amazing battery-related inventions we use today!
2. Electricity was discovered by the ancient Greeks who demonstrated that rubbing fur against tree resin (amber) made the two become
attracted to each other.
3. The speed at which electrons flow within an electrical current is often close to the speed of light which is 1,079,252,850 kilometers per
hour.
4. A team at the Korea Institute of Science and Technology created a sprinting robot inspired by a velociraptor dinosaur. The robot,
named raptor, has two nimble legs and a mechanism similar to a tail which allow it to run at a top speed of 46 kilometers an hour. That is
even faster than Olympic gold medalist Usain Bolt's top speed!
QUESTIONS AND COMMENTS
We value you as a customer and your satisfaction with this product is important to us. If you have any comments or questions, or you find any parts of this
kit missing or defective, please contact our distributor in your country, whose address is printed on the packaging. You are also welcome to contact our
marketing support team via email: infodesk@4M-IND.com, fax (852) 25911566, telephone (852) 28936241, or our website: WWW.4M-IND.COM.
STITCH-A-CIRCUIT
ROBOT
A. SAFETY MESSAGES
1) Adult assistance and supervision is required at all times. 2) This kit is intended for children over the age of 8. 3) This kit and its
finished product contain small parts which may cause choking if misused. Keep away from children under the age of 3. 4) To prevent
possible short circuits, never touch the contacts inside the battery case with any metal objects.
B. USE OF BATTERIES
1) Use 2 x 1.5V button cell batteries (Model AG13/LR44). 2) For the best results, always use fresh
batteries. 3) Make sure you insert the batteries with the correct polarity. 4) Remove the batteries from
the kit when not in use. 5) Replace exhausted batteries straight away to avoid possible damage to the
kit. 6) Rechargeable batteries must be removed from the kit before recharging. 7) Rechargeable
batteries must be recharged under adult supervision. 8) Make sure the supply terminals in the battery
case are not short circuited. 9) Do not attempt to recharge non-rechargeable batteries. 10) Do not mix
old and new batteries. 11) Do not mix alkaline, standard (carbon-zinc), or rechargeable batteries. 12)
Unscrew the battery case to replace the batteries. Adult-supervision is required. 13) WARNING:
Dispose of used batteries immediately. Keep new and used batteries away from children. If you think
batteries might have been swallowed or placed inside any part of the body, seek immediate medical
attention.
C. CONTENTS
Part; A: 1 set of pre-cut felt shapes, B: 1 sound & light LED circuit module with 2 plastic base holders (2x 1.5V AG13/LR44 button cell
batteries included), C: 1 spool of conductive thread, D: 2 spools of embroidery thread, E: 2 plastic needles, F: 6 metal rings, G: stuffing. A
pair of scissors and tape is required but is not included. (Adult supervision is required when using scissors.)
D. STITCHING TECHNIQUES
BACK STITCH
[Back Stitch] Before you start to make your robot, first learn how to back stitch by following the numbered guidelines in the diagram. A
back stitch is a reliable way to hold 2 layers of fabric together or for making an outline.
[Single Thread Knot] This is the most common sewing technique to create a thin stitch. The string can easily separate from the needle
which will cause a few stitches to come loose. Stitch carefully so that you don't pull the thread out of the needle by accident while sewing.
[Double thread knot] This knot makes the thread thicker to create a reliable stitched circuit. The thick thread makes it easier for your
robot to conduct electricity. Fold a piece of thread in half and slide one end through the needle hole. Pull it through until the piece of
folded thread is in the middle of the hole. Tie a knot with the four ends so the thread won't slide out of the needle while you are sewing.
WARNING
PLEASE SCAN THE QR CODE FOR VIEWING MULTI-LANGUAGE INSTRUCTIONS
CHOKING HAZARD - Small parts.
Not for children under 3 years old.
TO PARENTS: PLEASE READ THROUGH THESE
INSTRUCTIONS BEFORE PROVIDING GUIDANCE
TO YOUR CHILDREN
SINGLE THREAD KNOT
DOUBLE THREAD KNOT
Advertisement
Table of Contents

Related Manuals for 4M STITCH-A-CIRCUIT ROBOT


Summary of Contents for 4M STITCH-A-CIRCUIT ROBOT
- Page 1 You are also welcome to contact our marketing support team via email: infodesk@4M-IND.com, fax (852) 25911566, telephone (852) 28936241, or our website: WWW.4M-IND.COM.
- Page 2 E. CREATING THE CIRCUIT 5. After you turn on the LED module, hold the two small metal circles at the end of the wires coming out of the module to turn on the red 1. Pick up the front felt shapes of the robot body and the legs. Cut a piece of yellow thread about 60-70 cm in length and stitch the felt as and yellow LED lights.
Need help?
Do you have a question about the STITCH-A-CIRCUIT ROBOT and is the answer not in the manual?
Questions and answers