Table of Contents
Advertisement
Quick Links
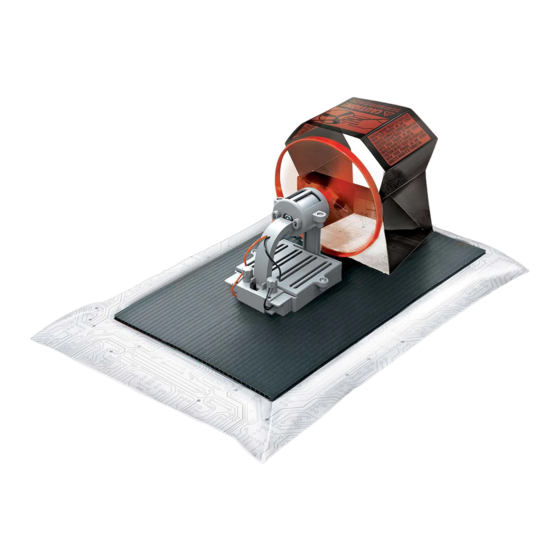
HOVER RACER
A. SAFETY MESSAGES
1. This kit is intended for children aged 10 and over. All pro
assembly and operations should be done under adult supe
2. This kit and the finished product contain small parts
constitute a choking hazard if used inappropriately. Keep
children under 3 years of age.
3. To prevent potential short-circuits, never touch the contacts inside
the battery compartment with any metal object.
4. Carefully examine the plastic propeller before you put in on the motor spindle. If you see any defects
in the blades or on the outer rim, do not run the motor. Refer to the Questions and Comments section
on this sheet and contact our customer service for a replacement.
5. The propeller spins at high speed when the motor is turned on. To prevent potential injuries, do not
touch it with your fingers or any objects. Adult supervision required.
6. Verify that the switch is turned off when inserting/replacing the batteries. Otherwise the propeller will
spin immediately once all batteries are installed.
B. USE OF BATTERIES
1. Requires four 1.5V AAA batteries (not included).
2. For best results always use fresh batteries.
3. Make sure you insert the batteries with the correct polarities.
4. Remove the batteries from the kit when not in use.
5. Replace exhausted batteries straight away to avoid possible damage to the kit.
6. Rechargeable batteries must be removed from the kit before recharging.
7. Rechargeable batteries should be recharged under adult supervision.
8. Make sure that the supply terminals in the battery case are not short circuited.
9. Do not attempt to recharge non-rechargeable batteries.
10. Do not mix old and new batteries.
11. Do not mix alkaline, standard (carbon-zinc), or rechargeable batteries.
C. CONTENTS
0
Base panel
0
®
Also required but not included: 4 x 1.5V AAA batteries,small crosshead screwdriver.
D.ASSEMBLY
Follow these steps to assemble your Hover Racer.
ASSEMBLING THE HOVER BASE BODY
a
1. Take the base panel. Apply double-sided adhesive tape along the three edges on one side as shown.
El
2. Apply double-sided adhesive tape on one side of the duct template as shown. Trim the excess tape.
3. Peel off the backing from the two smaller pieces of the tape. Apply the pieces of tape to the duct
template and fold it into shape.
PLEASE SCAN T H E QR CODE FDR VIEWING MULTI-LANGUAGE INSTRUCTIONS.
,.. "''"" _,.,, " •• ,. t"' "'""" "'
•
,
, nstrnct,ons m,11;
ng,es poor ce k;t.
"::I
QR-Code, um die mehrsprachige Anleitu ng fur dieses Set
anzusehen. NL. Scan de QR-code om de instructies voor
n
a
•
•
deze set in verschillende talen te bekiJken. IT. Scans1ona ii
����;� �t ts:
E��
au n
��!ri6Jfg�WR
1
r
s
r. / ���: �;:i ,r� fttl l\,�A -
•
. . .
[!]
ject-related
A
WARNING:
rvision.
CHOKING HAZARD - Small parts.
which may
Not for Children under 3 years.
away from
TD PARENTS, PLEASE READ THRDUGH THESE INSTRUCTIDNS
BEFORE GIVING GUIDANCE TD YDUR CHILDREN.
Plastic skirt
Arch template
©
El
II
B,tte scanne den
D .
n
���� v��
�;�
r
u � ��o�!!
2
1
i
*
i
QR::J- �1i:A �-V/ LZ,
4. Remove the backing from the remaining pieces of tape on the duct template.
Push it up through the cut-out in the base so that its side tabs stick to the underside of the base.
B
5. Turn to the back of the base again. Apply a length of double-sided adhesive tape to the rear edge of
the base panel. Trim the excess tape. This will be used for sticking on the skirt in the later steps.
6. Pick up the plastic skirt. The skirt is composed of two layers of plastic. On one layer there is a printed
shaded area. Cut this area away with a pair of scissors.
Remarks: Do not cut both layers of the skirt, instead only the specified layer.
a
7. Place the plastic skirt on a flat surface, with the cut side facing up (see step 6). You should be able
to read the printed remark "This side facing up". Press the plastic to make it as flat as possible. Secure
it in position by applying reusable adhesives to the corners, as shown. Remove the backing from the
double-sided adhesive tape around the edge of the base. Pick up the base panel and position it so that
the duct is directly on top of the plastic skirt's inner rim where the shaded surface has been cut. You
may now very slowly lower the base onto the plastic skirt. Ensure that the base is placed centrally over
the skirt with the edges aligned with the dotted lines printed on the plastic skirt. (Tip: you can line up
two books along the dotted lines. Use them as a guide when lowering the base panel. This will help you
to adhere the panel centrally on the skirt.) Press firmly down on the base to ensure that the skirt sticks
to the tape. Afterwards, remove the reusable adhesives at the four corners of the plastic skirt.
8. Fold the arch template into shape and insert its tabs into the slots in the duct.
Advertisement
Table of Contents

Related Manuals for 4M KidzRobotix HOVER RACER


Summary of Contents for 4M KidzRobotix HOVER RACER
- Page 1 HOVER RACER PLEASE SCAN T H E QR CODE FDR VIEWING MULTI-LANGUAGE INSTRUCTIONS. ,.. "''"" _,.,, " •• ,. t"' "'""" "' • , nstrnct,ons m,11; ng,es poor ce k;t. B,tte scanne den "::I QR-Code, um die mehrsprachige Anleitu ng fur dieses Set anzusehen.
Need help?
Do you have a question about the KidzRobotix HOVER RACER and is the answer not in the manual?
Questions and answers