Advertisement
Table of Contents
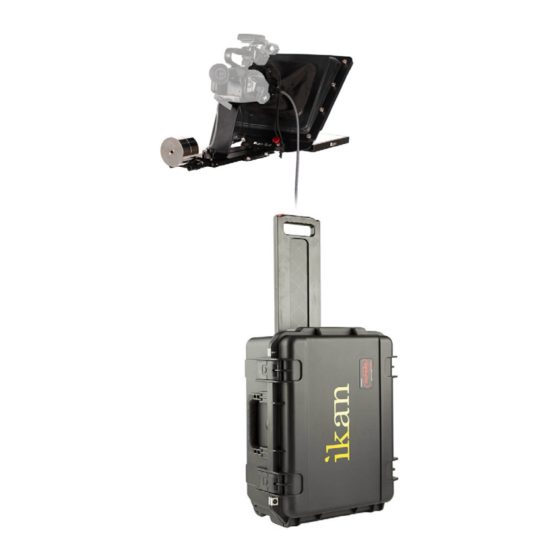
PT4500-P2P-TK / PT4700-P2P-TK
P2P Interview System with 2 x High Bright Teleprompters, Hard Cases, & HDMI Connection Cables
What's Included
2 x Teleprompter Bases
2 x Brackets with Glass
2 x Teleprompter Hoods with Boot
2 x Monitors
www.ikancorp.com | 1.713.272.8822 | sales@ikancorp.com
2 x AC Adapters with Cord
2 x 25 ft. HDMI Cables
2 x PrompterPro Software
2 x Counterweight Set (2 x 2.5 lbs)
Quick Start Guide
4 x D-Ring ¼-20" Screws
4 x Hex Keys
6 x Height Risers (3 per unit)
2 x Hard Cases
Advertisement
Table of Contents

Subscribe to Our Youtube Channel
Related Manuals for Ikan PT4500-P2P-TK


Summary of Contents for Ikan PT4500-P2P-TK
- Page 1 Quick Start Guide PT4500-P2P-TK / PT4700-P2P-TK P2P Interview System with 2 x High Bright Teleprompters, Hard Cases, & HDMI Connection Cables What’s Included 4 x D-Ring ¼-20” Screws 2 x Teleprompter Bases 2 x AC Adapters with Cord 4 x Hex Keys 2 x Brackets with Glass 2 x 25 ft.
- Page 2 Teleprompter Assmebly Setup Step 1 Step 2 Place the teleprompter glass frame on a flat surface and remove the four Align and attach the teleprompter hood with the 8 screw pegs from the screws as shown. teleprompter frame. Step 3 Step 4 The metal frame is directional.
- Page 3 Step 5 Extend the teleprompter hood open and attach teleprompter boot using the clips. It is suggested to align the seam with the bottom of the teleprompter hood. Step 6 Remove the monitor mounts from the teleprompter base using the included larger 4mm hex key to loosen from the 15mm rods. www.ikancorp.com | 1.713.272.8822 | sales@ikancorp.com...
- Page 4 Step 7 Attach the monitor mounts on the back of the monitor’s VESA compatible threads using the 4 included screws and provided 2mm hex key. Step 8 After the monitor mounts are attached, adjust the 15mm rods to accommodate the monitor. Leave about 1 inch of room for the teleprompter bracket. Make sure the 15mm rods go through both set of monitor mounts.
- Page 5 Step 9 Step 10 While sliding the teleprompter bracket into the slot of the teleprompter Once the bracket is in place, tighten the side screw to lock in place. Double base pull on the red knob to allow the bracket to fully slide in. check and make sure all the screws are tightened with the included hex keys.
- Page 6 Foam Case To make your teleprompter more portable, we packed it in a reusable, high-quality foam. The shape and size of the foam was designed to fit into Ikan’s PT-CASE-V2. ** DO NOT THROW AWAY FOAM CASE ** Watch our VIDEO TUTORIAL on how to assemble Ikan Professional Telepromopters https://youtu.be/5TjIxzBc_Vc...
-
Page 7: Monitor Ports
Monitor Ports Monitor Menu Settings Video Config Contrast (White Level) Brightness (Black Level) Tint (Chroma Hue) Chroma (Chroma Saturation) Sharpness (Detail) RGB Setup – Manually configure RGB Return System Config Menu Duration – Set duration of how long menu stays on screen Video Ratio –... -
Page 8: Specifications
Specifications PT4500 PT4700 Aspect Ratio Aspect Ratio Backlight Backlight Brightness 1000 nits Brightness 1000 nits Build Material Aluminum Build Material Aluminum Diagonal 15” Diagonal 17” Input Signal Composite BNC, VGA, HDMI Input Signal Composite BNC, VGA, HDMI Input Voltage DC 12v / 4A Input Voltage DC 12v / 4A Power Consumption... -
Page 9: Learn More
Damage caused by abuse or misuse, dismantling, or changes to the product not made by the company. • Damage caused by natural disaster, abnormal voltage, and environmental factors, etc. ©2021 Ikan International. All rights reserved. www.ikancorp.com | 1.713.272.8822 | sales@ikancorp.com...
Need help?
Do you have a question about the PT4500-P2P-TK and is the answer not in the manual?
Questions and answers