
Related Manuals for REDGUM Brand LC0901

Summary of Contents for REDGUM Brand LC0901
- Page 1 ULTRACARE MOBILE HEIGHT ADJUSTABLE LIFT CHAIR LC0901 USER MANUAL EDITION 1 Please read and keep these instructions redgumbrand.com.au...
- Page 2 Any information contained in this user manual shall not be photocopied, reproduced or translated into any other languages without the prior written consent of REDGUM Brand. REDGUM Brand strives to provide the highest quality products possible. Products are subject to change without notice.
-
Page 3: Table Of Contents
ASSEMBLY - BATTERY CONNECTION ASSEMBLY - MAINS POWER CONNECTION ASSEMBLY - BATTERY CHARGING USAGE GUIDELINES - CHAIR POSITIONING AND CASTORS USAGE GUIDELINES - HANDSET CONTROLS USAGE GUIDELINES - DO’s + DON’Ts PRODUCT CARE - INSPECTIONS / CLEANING WARRANTY REDGUM BRAND PRODUCT RANGE redgumbrand.com.au... - Page 4 INTRODUCTION Thank you for purchasing this quality REDGUM Brand product. If you have any issues or questions about the ULTRACARE Mobile Lift Chair please contact your local distributor or REDGUM Brand direct: T: +61 8 9248 4180 E: sales@for-de.com.au A: 1 Business Way, Malaga Western Australia 6090 INTENDED USE This product has limitations and should be used in accordance to these guidelines.
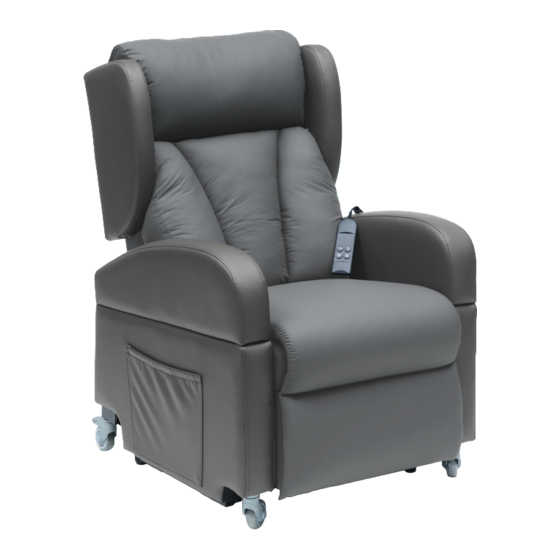
- Page 5 Product Weight: Base: 48.3 kg / Backrest: 7.5kg / Armrest: 2.8kg / Wing: 1.8kg Combined weight: 65kg Battery: Removable rechargable Lithium-ion battery pack 25.2V - 2550mA - 65Wh Please contact REDGUM Brand if you would like any further information. redgumbrand.com.au...
- Page 6 ASSEMBLY - UNPACK and INSPECT SUPPLIED PARTS Ensure you have been supplied with the following parts: PUSH HANDLE (x1) BACKREST (x1) LEFT WING (x1) RIGHT WING (x1) ARMREST (x2) BASE (x1) redgumbrand.com.au...
- Page 7 NOTE: Parts shown on this page are not to scale BATTERY BATTERY CHARGER (x1) (x1) POWER CABLE (x1) BOLT (x4) CHECK HANDSET TOOL REQUIRED (not supplied) IN SIDE POCKET - Large phillips head screwdriver IMPORTANT NOTE Check the product for any visible damage. If you see any damage or suspect a fault DO NOT USE YOUR PRODUCT and contact your supplier for support.
-
Page 8: Assembly - Attach Push Handle To Backrest
ASSEMBLY - ATTACH PUSH HANDLE TO BACKREST Please follow these steps to attach the push handle to backrest: 1. Line up push handle holes with backrest holes. 2. Using large phillips head screwdriver fix push handle into position using 4 Bolts. Bolt Push Handle NOTE:... -
Page 9: Assembly - Attach Backrest To Chair Base
ASSEMBLY - ATTACH BACKREST TO CHAIR BASE Please follow these steps to attach the backrest Backrest to the chair base: 1. Position the chair base as shown. 2. Align the backrest over the chair base with the padded front facing toward front of chair base. -
Page 10: Assembly - Attach Armrest To Chair Base
ASSEMBLY - ATTACH ARMRESTS TO CHAIR BASE Please follow these steps to attach the armrests to chair base: 1. Align the armrest location pins Armrest to the holes in the chair base. 2. Slide the armrest location pins into the holes on chair. 3. - Page 11 ASSEMBLY - ATTACH WINGS TO BACKREST Please follow these steps to attach the wings to the backrest: 1. Align the bracket on the wing with the bracket Wings on the side of the backrest. 2. Slide the wing down onto the bracket. 3.
-
Page 12: Assembly - Battery Connection
ASSEMBLY - BATTERY CONNECTION Please follow these steps to connect the battery. 1. Locate the battery port on the back of the chair. (Can be found behind backrest cover flap) 2. Align the battery horizontally with the port. 3. Plug the battery in and turn 90° clockwise. Press the button on battery to check power level (4 lights = fully charged / 1 light = recharge) IMPORTANT NOTE:... - Page 13 ASSEMBLY - MAINS POWER CONNECTION Please follow these steps Port to connect the lift chair to mains power. 1. Position the chair near GPO plug. It is recommended that you plug the lift chair directly into mains power. Try to avoid using extension cords.
-
Page 14: Assembly - Battery Charging
ASSEMBLY - BATTERY CHARGING Please follow these steps to charge the battery. 1. Check battery level by pressing button. Power cable plug Lights indicate power level: - 4 lights = full battery Battery - 1 light = recharge required charger 2. -
Page 15: Usage Guidelines - Do's + Don'ts
USAGE GUIDELINES - CHAIR POSITIONING AND CASTORS Prior to using the Lift Chair please follow these steps to position the chair as required: - Position the chair on a flat and level floor. - The lift chair should be placed near a power point if being plugged into mains power. - Page 16 USAGE GUIDELINES - HANDSET CONTROLS The Lift Chair comes with a handset that controls the various movement of the chair Depress the relevant button to achieve the required movement: Lower down the chair Raise the chair up Press button to go from lift Press button to go from to sitting to reclined position.
- Page 17 - Do not expose the lift chair to excessive heat, humidity or dust. - When moving the lift chair hold from the base - not backrest or armrests. If you are unsure about any of these precautions please contact your local distributor or REDGUM Brand direct for further information. redgumbrand.com.au...
- Page 18 Stop using lift chair immediately if you suspect damage or any other fault. If in any doubt, please do not issue or use, but immediately contact your local distributor or REDGUM Brand direct for advice and service support. CLEANING Clean your lift chair coverings using a non-abrasive cleaner or mild detergent with a soft cloth.
-
Page 19: Warranty
If you have any issues or questions about your lift chair please contact your local distributor or REDGUM Brand direct on: T: +61 8 9248 4180 E: sales@for-de.com.au... - Page 20 DISTRIBUTOR: Proudly Australian Owned and Operated redgumbrand.com.au...
Need help?
Do you have a question about the LC0901 and is the answer not in the manual?
Questions and answers