Table of Contents
Advertisement
Quick Links
sauder.com
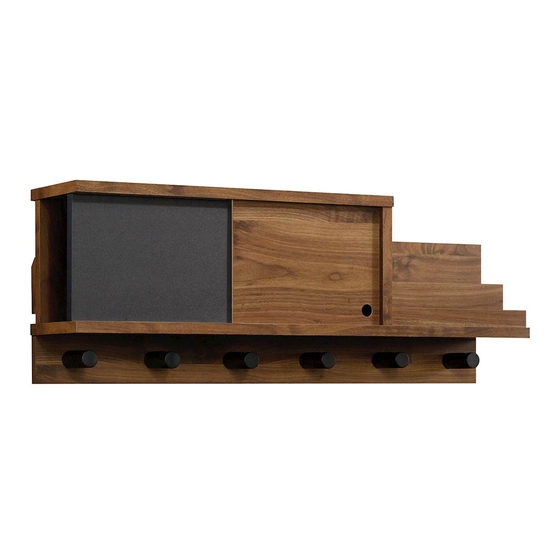
Wall Organizer
Harvey Park Collection | Model 420869
Need help? Visit Sauder.com to view video assembly tips or chat with a live rep.
Prefer the phone? Call 1-800-523-3987.
Share your journey!
We don't mess around.
NOTE: THIS INSTRUCTION
BOOKLET CONTAINS IMPORTANT
SAFETY INFORMATION.
PLEASE READ AND KEEP FOR
FUTURE REFERENCE.
English pg 1-15
Français pg 16-18
Español pg 19-21
Lot # 398397
03/09/17
Purchased: __________________
Be sure to give us a ring before
making any returns. 1-800-523-3987
Advertisement
Table of Contents

Related Manuals for Sauder Harvey Park 420869


Summary of Contents for Sauder Harvey Park 420869
- Page 1 Harvey Park Collection | Model 420869 NOTE: THIS INSTRUCTION BOOKLET CONTAINS IMPORTANT SAFETY INFORMATION. Need help? Visit Sauder.com to view video assembly tips or chat with a live rep. PLEASE READ AND KEEP FOR FUTURE REFERENCE. Prefer the phone? Call 1-800-523-3987.
- Page 2 Part Identifi cation No. 2 Phillips Screwdriver Tip Shown Actual Size Hardware Identifi cation Assembly Steps 5-15 Hammer Not actual size Français 16-18 Español 19-21 Level Safety Pencil Warranty Electric drill with 3/8" bit (ONLY in indicated step) Page 2 420869 www.sauder.com/services...
-
Page 3: Part Identification
RIGHT END (1) UPRIGHT (1) WALL MOUNT (1) TOP (1) CHALKBOARD (1) WALL CLEAT (1) SHELF (1) TALL DIVIDER (1) SHORT DIVIDER (1) LOWER BACK (1) MIDDLE DIVIDER (1) PEG HOOK (6) BACK (1) SLIDING DOOR (1) www.sauder.com/services 420869 Page 3... -
Page 4: Hardware Identification
WALL ANCHOR - 2 APPLIQUE CARD - 1 BLACK 1-7/8" FLAT HEAD SCREW - 17 SILVER 1-1/8" FLAT HEAD SCREW - 8 100S BLACK 2-3/4" FLAT HEAD SCREW - 2 BROWN 1-1/2" FLAT HEAD SCREW - 6 Page 4 420869 www.sauder.com/services... - Page 5 Fasten the BACK (E) to the SHELF (C). Use two BLACK å 1-7/8" FLAT HEAD SCREWS (2S). Finished edge Finished edge Long fi nished edge Groove BLACK 1-7/8" FLAT HEAD SCREW (4 used in this step) www.sauder.com/services 420869 Page 5...
- Page 6 Fasten the CHALKBOARD (G) to the SHELF (C). å Use two BLACK 1-7/8" FLAT HEAD SCREWS (2S). NOTE: Be sure the textured surface is facing up. å Small holes BLACK 1-7/8" FLAT HEAD SCREW (4 used in this step) Page 6 420869 www.sauder.com/services...
- Page 7 Fasten the DIVIDERS (H, I, and M) to the SHELF (C). å Use six SILVER 1-1/8" FLAT HEAD SCREWS (10S). Outer edge The hole in each DIVIDER must be closer to the outer edge. SILVER 1-1/8" FLAT HEAD SCREW (6 used in this step) www.sauder.com/services 420869 Page 7...
- Page 8 NOTE: Be sure the WOOD DOWELS insert into the holes in the TOP (B). å Using your hammer, gently tap the DOOR STOP (4R) into the SHELF (C). å BLACK 1-7/8" FLAT HEAD SCREW (6 used in this step) Long fi nished edge Groove Page 8 420869 www.sauder.com/services...
- Page 9 Fasten six PEG HOOKS (N) to the LOWER BACK (D). å Use six BROWN 1-1/2" FLAT HEAD SCREWS (14S). These holes must be here. BROWN 1-1/2" FLAT HEAD SCREW (6 used in this step) Indention facing up (6 used) www.sauder.com/services 420869 Page 9...
- Page 10 Carefully turn your unit onto its front edges. å Fasten the LOWER BACK (D) to the SHELF (C). å Use three BLACK 1-7/8" FLAT HEAD SCREWS (2S). PEG HOOKS facing down BLACK 1-7/8" FLAT HEAD SCREW (3 used in this step) Page 10 420869 www.sauder.com/services...
- Page 11 Use two SILVER 1-1/8" FLAT HEAD SCREWS (10S). Peel APPLIQUES from the APPLIQUE CARD (76P) and å stick them onto the screw heads in the TOP (B). SILVER 1-1/8" FLAT HEAD SCREW (2 used in this step) Finished edge Angled edge www.sauder.com/services 420869 Page 11...
- Page 12 MOUNT (K). Then, turn the WALL ANCHOR onto the end of the bolt. Fasten the WALL MOUNT (K) to your wall. å Angled edge against wall 100S BLACK 2-3/4" FLAT HEAD SCREW Finished (2 used into your wall studs) edge Wall Anchor Washer Bolt Large hole Page 12 420869 www.sauder.com/services...
-
Page 13: Side View
Carefully set the Wall Organizer onto the WALL MOUNT (K). - SIDE VIEW - å NOTE: The angled edge of the WALL CLEAT (L) will rest on å the angled edge of the WALL MOUNT (K). www.sauder.com/services 420869 Page 13... - Page 14 SLIDING DOOR into the groove in the TOP (B), then insert the bottom edge of the SLIDING DOOR into the groove in the SHELF (C). The hole will be located near the top edge when the opposite surface is chosen. Page 14 420869 www.sauder.com/services...
- Page 15 This completes assembly. Clean with a damp cloth. å Wipe dry. And to celebrate, why not share your success story? 10 lbs. 5 lbs. total 5 lbs. 5 lbs. 5 lbs. each www.sauder.com/services 420869 Page 15...
-
Page 16: Liste De Pièces
élément et conserver le livret pour future référence. EXTRÉMITÉ DROITE ..........1 26F CHEVILLE EN BOIS ...........2 Pour contacter Sauder DESSUS ................1 55M DISPOSITIF D'ANCRAGE MURAL ....2 en ce qui concerne cet TABLETTE ................1 76P FICHE D'APPLIQUÉS ..........1 élément, faire référence... - Page 17 Fixer les DIVISEURS (H, I et M) à la TABLETTE (C). Utiliser six VIS Avec précaution, retourner l'élément sur ses chants avant. TÊTE PLATE 28 mm ARGENTÉES (10S). Fixer l'ARRIÈRE INFÉRIEUR (D) à la TABLETTE (C). Utiliser trois VIS TÊTE PLATE 48 mm NOIRES (2S). www.sauder.com/services 420869 Page 17...
- Page 18 MURAL (55M). Insérer le boulon et rondelle à travers le gros trou de la FIXATION MURALE (K). Ensuite, faire tourner le DISPOSITIF D’ANCRAGE MURAL sur l'extrémité du boulon. Fixer la FIXATION MURALE (K) sur le mur. Page 18 420869 www.sauder.com/services...
-
Page 19: Lista De Partes
26F PASADOR DE MADERA .........2 et conserver le livret pour future référence. PANEL SUPERIOR ............1 55M ANCLAJE DE PARED ..........2 Pour contacter Sauder ESTANTE ................1 76P TARJETA CON APLICACIONES .......1 en ce qui concerne cet DORSO INFERIOR ............1 TOPE DE LA PUERTA ..........1 élément, faire référence... - Page 20 Cuidadosamente voltee la unidad para que repose sobre los TORNILLOS PLATEADOS DE CABEZA PERDIDA de 28 mm (10S). bordes delanteros. Fije el DORSO INFERIOR (D) al ESTANTE (C). Utilice tres TORNILLOS NEGROS DE CABEZA PERDIDA de 48 mm (2S). Page 20 420869 www.sauder.com/services...
- Page 21 PARED (55M). Inserte el perno y la arandela a través del agujero grande del SOPORTE DE PARED (K). A continuación, gire el SOPORTE DE PARED sobre el extremo del perno. Fije el SOPORTE DE PARED (K) a la pared. www.sauder.com/services 420869 Page 21...
- Page 22 • Los muebles sobrecargados. • Riesgo de lesiones. • Nunca exceda los límites de peso • Los muebles sobrecargados pueden indicados en las instrucciones. romperse. Page 22 420869 www.sauder.com/services...
-
Page 23: Year Limited Warranty
à compter de la date d'achat la première fois et qui sont signalés à Sauder dans les limites de couverture de la contre tout défaut de matériaux ou de fabrication des composantes de mobilier Sauder. - Page 24 Dear Valued Customer: So, how did it go? Thanks so much for choosing Sauder® furniture. I hope the Set a world record for speed? purchase and assembly process was a positive experience Feeling good about yourself? and you feel good about the furniture you just built. If you Nice.
Need help?
Do you have a question about the Harvey Park 420869 and is the answer not in the manual?
Questions and answers