Table of Contents
Advertisement
Advertisement
Table of Contents

Related Manuals for Masimo Radius PCG


Summary of Contents for Masimo Radius PCG
- Page 1 Operator's Manual Radius PCG™ Mainstream Capnograph...
- Page 3 There may be information provided in this manual that is not relevant for your system. General knowledge of capnography and an understanding of the features and functions of Radius PCG are prerequisites for its proper use. Do not operate Radius PCG without completely reading and understanding these instructions. If you encounter any serious incident with product, please notify the competent authority in your country and the manufacturer.
- Page 4 60601-1:14 Patents: www.masimo.com/patents.htm ®, Masimo®, Radius®, and Root®, are federally registered trademarks of Masimo Corporation. Radius PCG™ and XTP™ are trademarks of Masimo Corporation. All other trademarks and registered trademarks are property of their respective owners. © 2021 Masimo Corporation www.masimo.com...
-
Page 5: Table Of Contents
Contents About this Manual --------------------------------------------------------------------------------------------------------- 5 Product Description, Features and Intended Use --------------------------------------------------------------------- 7 Safety Information, Warnings and Cautions -------------------------------------------------------------------------- 9 Chapter 1: Technology Overview -------------------------------------------------------------------------------------- 15 Chapter 2: Description -------------------------------------------------------------------------------------------------- 19 Chapter 3: Basic Setup and Use --------------------------------------------------------------------------------------- 21 Chapter 4: Operation ---------------------------------------------------------------------------------------------------- 27 Chapter 5: Alarms and Messages ------------------------------------------------------------------------------------- 37 Chapter 6: Troubleshooting -------------------------------------------------------------------------------------------- 41... -
Page 7: About This Manual
About this Manual This manual explains how to set up and use Radius PCG™. Important safety information relating to general use of Radius PCG appears in this manual. Read and follow any warnings, cautions, and notes presented throughout this manual. The following are explanations of warnings, cautions, and notes. -
Page 9: Product Description, Features And Intended Use
The Radius PCG™ (model: EMMA Bluetooth) is a quantitative mainstream carbon dioxide monitor comprised of a Sensor Body that fits on top of a disposable EMMA Airway Adapter. The Radius PCG™ includes Bluetooth wireless technology so that data can be transferred to a paired device. Intended Use Radius PCG™... -
Page 11: Safety Information, Warnings And Cautions
WARNING: Do not use the Radius PCG during magnetic resonance imaging (MRI) or in an MRI environment. Performance Warnings and Cautions WARNING: Radius PCG is intended only as an adjunct in patient assessment. It shall be used in conjunction with the assessment of clinical signs and symptoms. - Page 12 WARNING: Portable RF communications equipment (including peripherals such as antenna cables and external antennas) should be used no closer than 30 cm (12 inches) to any part of the Radius PCG. Otherwise, degradation of the performance of the Radius PCG could result.
- Page 13 CAUTION: Remove alkaline batteries when the Radius PCG will not be in use for more than 30 days to avoid damage to the device due to batteries that may leak.
- Page 14 CAUTION: Do not clean Radius PCG with any chemical other than those specified in Maintenance and Cleaning of this manual. These substances may affect the device’s materials and damage internal parts. CAUTION: The Radius PCG device and EMMA Airway Adapters are non-sterile devices. Do not submerge Radius PCG device or EMMA Airway Adapters in any cleaning solution or attempt to sterilize by autoclave, irradiation, steam, gas, ethylene oxide or any other method.
- Page 15 Section 21, Category M emissions and Section 20, Category R immunity. Avoid using the device in environments with or in close proximity to electrical fields higher than 100 V/m in frequency range of 4 GHz and 8 GHz (i.e., rotational radars) to minimize interruptions in performance. www.masimo.com Masimo...
-
Page 17: Chapter 1: Technology Overview
Chapter 1: Technology Overview The following chapter contains general descriptions about parameters, measurements, and the technology used in Radius PCG. Principles of Operation The measurement of CO in the breathing gas mixture is based on the fact that different gas components absorb infrared light at specific wavelengths. - Page 18 1 Spectrometer with optical filter wheel and infrared detector 2 Infrared light beam 3 Infrared light source 4 Respiratory gas www.masimo.com Masimo...
- Page 19 The Airway Adapter is available in two models: Adult/Pediatric and Infant. Radius PCG operates to specification with either Airway Adapter model when used with its appropriate patient population.
-
Page 21: Chapter 2: Description
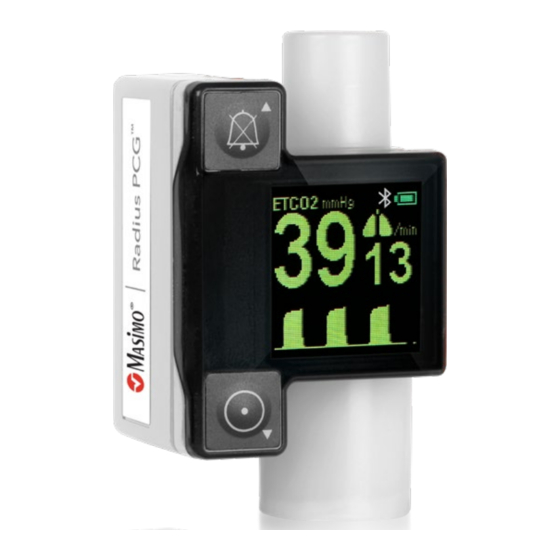
Chapter 2: Description This chapter contains the description of the Radius PCG physical features. General System Description The Radius PCG system includes the following: • Radius PCG Device • Two (2) AAA Batteries For a complete list of compatible EMMA Airway Adapters, visit www.masimo.com. - Page 22 3 Lanyard attachment 4 Alarm Silence button 5 EtCO Value 6 Capnogram 7 Power On button 8 EMMA Airway Adapter 9 Alarm Status 10 Respiratory Rate Value 11 Battery Status Indicator 12 Bluetooth Indicator 13 Radius PCG Sensor Body www.masimo.com Masimo...
-
Page 23: Chapter 3: Basic Setup And Use
This chapter contains information about setting up Radius PCG before use. Installing Batteries Unpack and inspect the Radius PCG for external damage. Please contact your local distributor in case of damage. Press the Battery Cover release button into the Radius PCG Sensor Body until the Battery Cover pops off. - Page 24 Open the battery compartment and insert two (2) AAA batteries. Make sure the batteries are fitted according to the indicated polarity. After battery installation, snap the Battery Cover back into place. www.masimo.com Masimo...
- Page 25 Attaching Airway Adapter Snap the EMMA Airway Adapter into the Radius PCG Capnograph. It will click into place when properly inserted. www.masimo.com Masimo...
- Page 26 Connecting to a Tube or Mask The Radius PCG can be connected to a patient using an endotracheal tube or mask. The following pictures illustrate these two methods of connection. Endotracheal tube Mask www.masimo.com Masimo...
- Page 27 Power On To power on Radius PCG, press the Power On button. When the Radius PCG is ready the EtCO Value displays “0” and the Respiratory Rate Value displays dashes “- -“. www.masimo.com Masimo...
- Page 28 Note: The device will not automatically power off if there is an alarm condition other than a No Adapter alarm detected (e.g. Clogged Adapter). Bluetooth Setup For Radius PCG Bluetooth Setup instructions for connection with Root, see Pairing Radius PCG to Root on page 67. www.masimo.com Masimo...
-
Page 29: Chapter 4: Operation
Chapter 4: Operation The information in this chapter assumes that Radius PCG is set up and ready for use. This chapter provides necessary information for proper operation of the device. Do not operate Radius PCG without completely reading and understanding these instructions. - Page 30 Capnogram is saturated. Auto Brightness To extend battery life time the Radius PCG display has an automatic brightness control which will be activated during stable conditions. Any change in displayed vital parameters, alarm or pressing any button will return the Radius PCG display to normal brightness.
- Page 31 (Battery OK or Weak). When batteries are low, the Battery Status Indicator starts blinking. Battery Status Battery Voltage* Battery Status Indicator >2.4V Weak 2.2V to 2.4V www.masimo.com Masimo...
- Page 32 To extend battery life time the Radius PCG display has an automatic brightness control, which will be activated during stable conditions. Any change in displayed vital parameters, alarm or pressing any button will return the Radius PCG display to normal brightness.
- Page 33 Controls The Radius PCG has one Power On and one Alarm Silence button. These buttons are also be used for adjusting the high and low EtCO alarm limits up and down. 1 Power On/Adjust Down button 2 Alarm Silence/Adjust Up button www.masimo.com...
- Page 34 (kPa) OFF; 0.1 – 8.9 kPa 1.1 – 9.9 kPa; OFF Note: The alarm limits will be reset to default values after Radius PCG powers off. If the high EtCO limit is decreased close to the low EtCO limit, the low limit will be automatically adjusted in order to maintain a minimum difference of 10 mmHg (1.0 kPa) between the high and low alarm limit.
- Page 35 If no buttons have been activated for a short period during alarm limit adjustment, the Radius PCG will automatically resume normal operation. Low EtCO2 Alarm Press and hold the Power On button until the display shows the “Lo ETCO2 Screen” and the EtCO display shows the current low EtCO alarm limit.
- Page 36 EtCO alarm by adjusting the limit above 99 mmHg (9.9 kPa). The Radius PCG will indicate this setting by showing "- -" on the EtCO display during the adjustment routine. If no button has been activated for a short period, the Radius PCG will automatically resume normal operation.
- Page 37 Bluetooth Operation The Radius PCG Bluetooth provides a Bluetooth Low Energy (LE) wireless option to allow the transfer of data to a paired device. The paired connection only allows the Radius PCG to communicate to a single device at a time to minimize the risk of unauthorized data access.
- Page 38 Press the On button once (1) again to enable Bluetooth. When Bluetooth is enabled, the Bluetooth symbol (A) and the serial number (B) for the Radius PCG display on the screen as shown. Note: If Radius PCG is off, it must be turned on before Bluetooth can be enabled.
-
Page 39: Chapter 5: Alarms And Messages
Chapter 5: Alarms and Messages Alarms and Messages The Radius PCG is equipped with an Alarm Status Indicator and an audible alarm. The audible alarm can be silenced for 2 minutes by pressing the Alarm Silence button. See Controls on page 31. - Page 40 = 0 at t = 20 t = 40, 60, 80, ... Alarm Alarm Priority: Low Alarm Priority: Low Alarm Priority: Medium No Breath (((•))) (((•))) (((•))) (((•))) (((•))) (((•))) Low EtCO High EtCO Clogged Adapter (((•))) www.masimo.com Masimo...
- Page 41 "40 sec later than t = 0", "60 sec later than t = 0", "80 sec later than t = 0" etc. For Low EtCO and Hi EtCO , there is a 20 sec delay before t = 0 when the alarm condition is indicated (i.e. the Alarm Signal Generation Delay is 20 sec). www.masimo.com Masimo...
- Page 42 Note 1: EtCO value displays momentary CO during No Breath. Note 2: RR value displays "- -" steady if no breath at all detected from power on. Note 3: Perform Zeroing procedure. See Zeroing Procedure on page 60. www.masimo.com Masimo...
-
Page 43: Chapter 6: Troubleshooting
Chapter 6: Troubleshooting Troubleshooting Radius PCG Error Possible Causes Recommended Solutions Indicates that an EMMA Airway Connect an EMMA Airway Adapter. See No Adapter alarm is displayed Adapter needs to be installed. Attaching Airway Adapter on page 23. Clogged Adapter alarm is... - Page 44 Error Possible Causes Recommended Solutions Numbers appear dim • Pressing any button will return the Radius PCG Automatic brightness display to normal brightness. See Controls on control is activated. page 31. • Exposed to bright lights or sunlight. Measurement does not display •...
-
Page 45: Chapter 7: Specifications
Chapter 7: Specifications Radius PCG Specifications Display Range Measurement Display Range EtCO (End-Tidal CO ) [1], [2] * 0 mmHg to 99 mmHg 0 kPa to 9.9 kPa RR (Respiration Rate) 3 BPM to 150 BPM * ETCO2 will be within specification for respiration rates up to 150 bpm [3]... - Page 46 10 to 95% RH (condensing) at a water vapor partial pressure not exceeding 50 Storage Humidity hPa (95 % RH at 32 °C) 60 to 120kPa [1] Operating Atmospheric Pressure (i.e. Altitude up to 4000 m) Storage Atmospheric Pressure 50 to 120 kPa www.masimo.com Masimo...
- Page 47 96 x 96 pixel RGB OLED-display Expected Service Life 5 Years Alarms Audio Alarm Description Alarm Characteristic Description No Breath, Low ETCO2, High ETCO2, Clogged Adapter, No Alarm Volume v≥ 57 dB(A); ≤ 67 Adapter, Zero point adjustment, Low Battery dB(A) www.masimo.com Masimo...
- Page 48 Protection against harm from solid and IP44, Protection from tools and small wires greater than 1mm in diameter liquid ingress and from water spray from any direction. Mode of Operation Continuous operation Sterility No part of Radius PCG is sterile www.masimo.com Masimo...
- Page 49 Radio Modes Bluetooth LE (v4.0) FCC ID: VKF-EMMABT FCC parts 15.207 and 15.247 Canada IC: 7362A-EMMABT RSS-247 Europe RED 2014/53/EU ETSI EN 300 328 ETSI EN 301 489-1 ETSI EN 301 489-17 Japan Japanese Radio Law, Item 19 of Article 2-1 www.masimo.com Masimo...
- Page 50 No drift Recovery Time After Defibrillator Unaffected Test Highest Surface Temperature At Ambient Temperature Surface Temperature 23°C / 73°F 30°C / 86°F 50°C / 122°F 57°C / 135°F Data Output Specifications Breath Detection Adaptive threshold, minimum 1kPa CO change. www.masimo.com Masimo...
- Page 51 In operation and full accuracy within 15 seconds. Warm-up time after storage A warm-up period of 15 minutes is required before Radius PCG is ready for use after at -40°C being stored with batteries mounted at −40°C when the ambient temperature is 20°C.
- Page 52 Guidance and Manufacturer's Declaration-Electromagnetic Compatibility Radius PCG is intended for use in professional environments (e.g., intensive care unit, patient room and operating suite) and transport environments (e.g., emergency services, road ambulances, and aircrafts). Radius PCG has not been evaluated for special environments (e.g., near Magnetic resonance imaging (MRI) systems).
- Page 53 During immunity testing the essential performance of Radius PCG was assessed based upon the gas measurement accuracy (see Citation [4]) including gas reading alarm conditions, or generation of technical alarm conditions. For higher immunity conditions above 100 V/m at frequencies between 4 GHz to 8 GHz (i.e., exposure to rotational radar), the essential performance was determined based upon the return of the device to normal operation without permanent damage.
- Page 54 20 V/m 20 V/m RF communication equipment should be used no closer to any part RTCA DO-160G, of the Radius PCG than the recommended separation distances (100 MHz 100 MHz to Section 20, calculated from the equation. Otherwise, degradation of the...
- Page 55 The Radius PCG is intended for use in an electromagnetic environment in which radiated RF disturbances are controlled. The customer or the user of the Radius PCG gas analyzer can help prevent electromagnetic interference by maintaining a minimum distance between portable and mobile RF communications equipment (transmitters) and the Radius PCG gas analyzer as recommended below, according to the maximum output power of the communications equipment.
- Page 56 Symbols The following symbols are found on the Radius PCG, or packaging and are defined below. Symbols Definition Symbols Definition Follow Instructions for use Defibrillation Proof Type BF Catalog number (model number) Serial number Lot Code Manufacturer Use by Date...
- Page 57 Identifies unit has been registered as a radio Non-ionizing electromagnetic radiation device Federal Communications Commission (FCC) licensing Instructions/Directions for Use/Manuals are available in electronic format @http://www.Masimo.com/TechDocs Note: eIFU is not available in all countries. www.masimo.com Masimo...
- Page 58 O typically increases CO -readings by 10% • 60 vol% of O typically decreases CO -readings by 4% (Radius PCG compensates CO -values for influence from 21% O as default) • 5 vol% of ENF, ISO, SEV typically increases CO -readings by 8% •...
-
Page 59: Chapter 8: Service And Maintenance
CAUTION: Do not immerse Radius PCG in any liquid. CAUTION: Do not apply excessive pressure on the IR-windows. Note: Before cleaning Radius PCG, remove the batteries and make sure the battery cover is re-attached correctly. To clean Radius PCG, follow the instructions below: Remove the Airway Adapter. - Page 60 Repeat the above cleaning step using a fresh cloth or wipe. Allow the Radius PCG device to dry thoroughly before using again. The surfaces of Radius PCG have been tested to be chemically resistant to the following disinfectants/solutions: • 70% Isopropyl alcohol •...
- Page 61 Insert two new AAA type batteries into the battery compartment. Make sure that the batteries are fitted according to the polarity marking. When the batteries are properly fitted, gently snap the battery cover back into place. Note: Always carry spare batteries in the Radius PCG pouch. www.masimo.com Masimo...
- Page 62 When the Service value “0” is shown, zeroing of the Radius Code PCG is complete.* * The Radius PCG will return to normal measuring mode when the Service value has reached "0" or if any of the buttons are released. www.masimo.com...
- Page 63 Gas Span Check The Radius PCG does not require any routine calibration. A gas span check is recommended at regular intervals to make sure the measurement is within accuracy levels. The suggested interval for gas span check is once every year.
- Page 64 37-42 4,9-5,6 If the unit is reading within the above range then your Radius PCG has been successfully verified. If the unit is not reading within the above range, disconnect the Airway Adapter from the gas cylinder, and perform a Zeroing procedure and then repeat the Gas span check procedure.
- Page 65 Service and Return Procedure Contact Masimo for product support. If needed, an RMA will be provided for repair or replacement. Masimo can be reached at 800-326-4890. For customers outside the United States, local contact information can be found at http://service.masimo.com.
- Page 66 Masimo; (e) used with other products, like new sensors, reprocessed sensors, or other accessories, not intended by Masimo to be used with the Product; (f) not used or maintained as provided in the operator’s manual or as otherwise provided in its labeling; (g) reprocessed, reconditioned, or recycled;...
- Page 67 Product. Additionally, Masimo will not be liable for any incidental, indirect, special, or consequential loss, damage, or expense arising from the use or loss of use of any Products or Software. In no event shall Masimo’s liability arising from any Product or Software (under contract, warranty, tort, strict liability, or otherwise) exceed the amount paid by purchaser for the Product or Software.
- Page 68 Product or the Software on a temporary basis. Purchaser shall not assign or transfer this License, in whole or in part, by operation of law or otherwise without Masimo's prior written consent; except that the Software and all of Purchaser’s rights hereunder shall transfer automatically to any party that legally acquires title to the Product with which this Software is included.
-
Page 69: Appendix A: Operation With Root
Radius PCG and your external device may occur. Note: Radius PCG can be paired to Root while an ISA Sidestream Gas Analyzer is connected to Root through the MOC-9 connection, however, the Unable to handle Capnography channel on Bluetooth message displays, and the Capnography window is populated from the ISA Sidestream Gas Analyzer. - Page 70 Select the Device Settings menu icon. Select the Bluetooth menu icon. Note: If Bluetooth is Off, turn it On, select OK and wait for the Masimo device MAC address to appear before proceeding to the next step. On the Bluetooth screen, select the EMMA Pair button. The Pair EMMA screen displays.
- Page 71 Press/select the desired Radius PCG under the Devices Found list, and then press/select the Pair button. After pressing/selecting the Pair button, Root returns to the Bluetooth screen. • The MAC address for Radius PCG displays on the screen. • displays next to the MAC address. See Accessing the Radius PCG Info The Info screen icon Screen on page 84.
- Page 72 Confirm Correct Radius PCG Connection To confirm the correct Radius PCG is paired to Root, verify that the Radius PCG serial number displayed on the About screen matches the serial number displayed on the Radius PCG screen when Bluetooth is enabled. See About on page...
- Page 73 The Masimo device and Radius PCG communication should resume. If a communication issue continues, forget Radius PCG on the Masimo device (disconnect) and pair again. See Disconnecting Radius PCG from the Masimo Device on page 85. Operation Capnography Window Parameters and measurements display in the Capnography window. Capnography parameters display by default as numeric values and as a graphical representation.
- Page 74 See Parameter Settings on page 74. Toggle Waveform On/Off See Capnograph Display on page 73. * FiCO does not display on the Radius PCG device. FiCO only displays on Root as a placeholder and parameter values are not displayed. www.masimo.com...
- Page 75 Accessing Main Menu Options To access the Main Menu options: At the bottom right corner of the touchscreen, press/select the Main Menu icon. With Radius PCG connected to the Masimo device, the Main Menu options change and are reflected below. Layout Device Settings See Chapter 3: Operation of the Operator's Manual, Root®.
- Page 76 Capnography setting changes made on the Masimo device are NOT transferred to the Radius PCG device. Changes to Capnography settings for the Radius PCG device are made on the device itself (and are NOT transfered to the Masimo device). See Chapter 4: Operation on page 27 for information about settings for the Radius PCG device.
- Page 77 WARNING: Alarm limits on the Radius PCG device and the Masimo device are set independently of each other. If alarm limits are not set the same, the Masimo device may not alarm at the same time as the Radius PCG device. See Chapter 4: Operation on page 27 for information on adjusting alarm limits on the Radius PCG device.
- Page 78 * Capnography setting changes made on the Masimo device are not transferred to the Radius PCG device. Changes to Capnography settings for the Radius PCG device are made on the device itself. See Chapter 4: Operation on page 27 for information about settings for the Radius PCG device.
- Page 79 WARNING: Alarm limits on the Radius PCG device and the Masimo device are set independently of each other. If alarm limits are not set the same, the Masimo device may not alarm at the same time as the Radius PCG device. See Chapter 4: Operation on page 27 for information on adjusting alarm limits on the Radius PCG device.
- Page 80 * Capnography setting changes made on the Masimo device are not transferred to the Radius PCG device. Changes to Capnography settings for the Radius PCG device are made on the device itself. See Chapter 4: Operation on page 27 for information about settings for the Radius PCG device.
- Page 81 WARNING: Alarm limits on the Radius PCG device and the Masimo device are set independently of each other. If alarm limits are not set the same, the Masimo device may not alarm at the same time as the Radius PCG device. See Chapter 4: Operation on page 27 for information on adjusting alarm limits on the Radius PCG device.
- Page 82 * Capnography setting changes made on the Masimo device are not transferred to the Radius PCG device. Changes to Capnography settings for the Radius PCG device are made on the device itself. See Chapter 4: Operation on page 27 for information about settings for the Radius PCG device.
- Page 83 0.0 to 24.9 vol% in steps of 0.1 FiCO value displayed. 0.0 kPa 0.0 to 29.9 kPa in steps of 0.1 0 mmHg 0 to 224 mmHg in steps of 1 0 to 149 in steps of 1 www.masimo.com Masimo...
- Page 84 * Capnography setting changes made on the Masimo device are not transferred to the Radius PCG device. Changes to Capnography settings for the Radius PCG device are made on the device itself. See Chapter 4: Operation on page 27 for information about settings for the Radius PCG device.
- Page 85 Bluetooth Enables or disables Bluetooth connectivity. Off On or Off EMMA Pairs Radius PCG to Root. Pair, Info* * After paring, the Radius PCG Info screen can be accessed through the Bluetooth screen. See the Accessing the Radius PCG Info Screen on page 84. www.masimo.com Masimo...
- Page 86 About Listed under Capnography, use the About screen to view information for the Radius PCG device. These details may be helpful during troubleshooting. Item* Description Serial number Displays the Radius PCG serial number.** HW Version Displays the Radius PCG hardware version number.** SW Version Displays the Radius PCG software version number.**...
- Page 87 Disconnecting Radius PCG from the Masimo Device To disconnect Radius PCG from the Masimo device, perform the following: Access the Radius PCG Info Screen. See Accessing the Radius PCG Info Screen on page 84. Press/select the Forget button. On the Forget Device pop-up window, press/select the Forget button to confirm.
- Page 88 Root Messages The following section lists common Radius PCG related messages that may appear on the Masimo device, their potential causes, and next steps. Alarm/Exception Activation Alarm Next Steps Messages Priority Indicates no breath is detected within High No Breath •...
- Page 89 * Radius PCG does not reconnect automatically after disconnecting the capnography device from the MOC-9 connection. Radius PCG must be disconnected and paired again to communicate with Root and display its data on the Main Screen. Troubleshooting Radius PCG with Root...
- Page 90 Masimo device. may be off. turned on. • • Radius PCG may be out of Ensure Radius PCG is within range of the Bluetooth range with the Masimo device when pairing. Masimo device. • Radius PCG requires service. See Service and •...
- Page 91 * The display ranges in this table represent the display ranges on Root and do not represent the display ranges for Radius PCG. For Radius PCG specifications, see Radius PCG Specifications on page 43. ** FiCO does not display on the Radius PCG device, FiCO only displays on Root.
- Page 92 0 to 8 vol% 0 to 8 kPa 0 to 60 mmHg Bluetooth Operational Range Bluetooth Operational Range Maximum distance from Masimo Device Approx. 32 feet (10 meters) Minimum Root Software Version Device Specifications Root Software greater than v2.0.9.6 www.masimo.com...
-
Page 93: Appendix B: Concepts Of Alarm Response Delay
Signal Generation Delay is the time from the onset of an alarm condition to the generation of its alarm signal. The graphic below is a simplified illustration of the concept of alarm response delay and does not reflect actual lengths of delays. www.masimo.com Masimo... - Page 94 The Alarm Signal Generation Delay is graphically represented as t – t in the figure above to show the delay due to alarm system strategy and communication time. • The overall alarm system delay time is graphically represented as t – t www.masimo.com Masimo...
- Page 96 300617/LAB-10347G-0621...
Need help?
Do you have a question about the Radius PCG and is the answer not in the manual?
Questions and answers