Table of Contents
Advertisement
Quick Links
Advertisement
Table of Contents
Troubleshooting

Related Manuals for Masimo Radical-7


Summary of Contents for Masimo Radical-7
- Page 1 Radical-7 Operator's Manual...
- Page 3 The Radical-7 operating instructions provide the necessary information for proper operation of all models of the Radical-7 Pulse CO-Oximeter system. There may be information provided in this manual that is not relevant for your system. General knowledge of pulse oximetry and an understanding of the features and functions of the Radical-7 are prerequisites for its proper use.
-
Page 5: Table Of Contents
Chapter 1: Technology Overview ------------------------------------------------------------------------ 23 Signal Extraction Technology (SET) ---------------------------------------------------------------- 23 rainbow Pulse CO-Oximetry Technology ----------------------------------------------------------- 25 rainbow Acoustic Monitoring (RAM) Technology ------------------------------------------------- 29 Chapter 2: Radical-7 Descriptions --------------------------------------------------------------------- 33 General System Description ------------------------------------------------------------------------- 33 Functionality of the Radical-7 ------------------------------------------------------------------------ 34 Handheld ----------------------------------------------------------------------------------------------- 35... - Page 6 Profiles Overview --------------------------------------------------------------------------------------- 89 Changing Profiles ------------------------------------------------------------------------------------- 90 Replacing Factory Default Settings for Adult and Neo Profiles -------------------------------- 93 Powering Off the Radical-7 --------------------------------------------------------------------------- 94 Chapter 6: Alarms and Messages ----------------------------------------------------------------------- 95 About Alarms ------------------------------------------------------------------------------------------- 95 Silencing the Alarms ---------------------------------------------------------------------------------- 95...
- Page 7 Performance Verification --------------------------------------------------------------------------- 128 Repair Policy ------------------------------------------------------------------------------------------ 130 Return Procedure ------------------------------------------------------------------------------------- 130 Contacting Masimo ---------------------------------------------------------------------------------- 131 Appendix: Best Practices for Comparisons to Reference Measurements ----------------------- 133 Best Practices Checklist for Continuous SpHb Comparisons --------------------------------- 133 Best Practices Checklist for SpCO Comparisons ------------------------------------------------ 136...
-
Page 9: About This Manual
This manual explains how to set up and use the Radical-7 Pulse CO-Oximeter. Important safety information relating to general use of the Radical-7 appears in this manual. Read and follow any warnings, cautions, and notes presented throughout this manual. The following are explanations of warnings, cautions, and notes. -
Page 11: Product Description, Indications For Use, Contraindications, And Features
(SpHb), carboxyhemoglobin (SpCO), methemoglobin (SpMet), total oxygen content (SpOC), Pleth Variability Index (PVI), and Acoustic Respiration Rate (RRa). The Radical-7 can be used as either a Handheld or a Standalone monitor. The Radical-7 features a touchscreen Liquid Crystal Display (LCD) that continuously displays numeric values for all parameters. -
Page 12: Indications For Use
(SpCO), methemoglobin saturation (SpMet), total hemoglobin concentration (SpHb), and/or respiratory rate (RRa). The Masimo Radical-7 and accessories have been validated and are indicated for use with adult, pediatric, and neonatal patients during both no motion and motion conditions, and for patients who are well or poorly perfused in hospitals, hospital-type facilities, mobile, and home environments. -
Page 13: Safety Information, Warnings, And Cautions
Safety Information, Warnings, and Cautions The following section lists warnings, caution, notes, and safety information. The Radical-7 is designed to minimize the possibility of hazards from errors in the software program by following sound Engineering Design Processes, Risk Analysis and Software Validation. - Page 14 Note: SpO2, SpCO, SpMet, and SpHb are empirically calibrated in healthy adult volunteers with normal levels of carboxyhemoglobin (COHb) and methemoglobin (MetHb). Note: The Radical-7 cannot measure elevated levels of COHb or MetHb. Note: Inaccurate SpO2 readings may be caused by: •...
- Page 15 Radical-7 Safety Information, Warnings, and Cautions Note: Inaccurate SpO2 readings may be caused by: • Intravascular dyes such as indocyanine green or methylene blue • Externally applied coloring and texture such as nail polish, acrylic nails, glitter, etc. • Elevated levels of bilirubin •...
-
Page 16: Device Related Safety Information, Warnings, And Cautions
Device Related Safety Information, Warnings, and Cautions This section contains device related safety information. Warning Explosion hazard: Do not use the Radical-7 in the presence of flammable anesthetics or other flammable substance in combination with air, oxygen-enriched environments, or nitrous oxide. - Page 17 Note: The Radical-7 can be used during defibrillation, but the readings may be inaccurate for up to 20 seconds. Note: Do not place containers with liquids on or near the Radical-7. Liquids spilled on the instrument may cause it to perform inaccurately or fail.
- Page 18 Note: If the Radical Docking Station is compatible with SafetyNet, Vuelink is not supported. Use the Radical-7 in accordance with Environmental Specifications section in of this manual. This device complies with part 15 of the FCC Rules. Operation is subject to the following two conditions: (1) This device may not cause harmful interference, and (2) this device must accept any interference received, including interference that may cause undesired operation.
-
Page 19: Electrical Safety Information, Warnings, And Cautions
Dispose of used batteries according to required country or regional instructions. Caution Risk of explosion if battery is replaced with an incorrect type. Replace with Masimo supplied parts only. Caution At Low Battery, connect the Radical-7 to AC power to prevent loss of power. www.masimo.com Masimo... - Page 20 Note: All external instrument connections to the Analog Output/Nurse Call connector must be IEC-60950 compliant. Note: It is recommended that the Radical-7 Handheld is docked to the Docking Station that is attached to an AC power source when it is not in use to ensure that the battery remains fully charged.
-
Page 21: Alarm Related Safety Information, Warnings, And Cautions
Note: Use the power cord as the means to disconnect the instrument from the main power supply. Note: If the Radical-7 Handheld has not been used or charged within seven (7) days or more, then recharge the battery prior to use. -
Page 22: Sensor Related Safety Information, Warnings, And Cautions
Caution Do not place the Radical-7 against a surface that may cause the alarm to be muffled. Caution To ensure that alarm limits are appropriate for the patient being monitored, check the limits each time the Radical-7 is used. - Page 23 (DFU). Note: Do not expose the Masimo sensors used with Radical-7 to moisture, liquids or a humid environment, as this may make the sensor perform inaccurately or fail.
-
Page 25: Chapter 1: Technology Overview
(sometimes referred to as noise). Masimo SET pulse oximetry utilizes parallel engines and adaptive digital filtering. Adaptive filters are powerful because they are able to adapt to the varying physiologic signals and/or noise and separate them by looking at the whole signal and breaking it down to its fundamental components. -
Page 26: Masimo Set Dst
SpO2 and pulse rate. Functional Oxygen Saturation The Radical-7 is calibrated to measure and display functional oxygen saturation (SpO2): the amount of oxyhemoglobin expressed as a percentage of the hemoglobin that is available to transport oxygen. -
Page 27: Rainbow Pulse Co-Oximetry Technology
Radical-7 Chapter 1: Technology Overview General Description for Pulse Rate (PR) Pulse rate (PR) , measured in beats per minute (BPM) is based on the optical detection of peripheral flow pulse. General Description for Perfusion Index (PI) The Perfusion Index (PI) is the ratio of the pulsatile blood flow to the non-pulsatile or static blood in peripheral tissue. - Page 28 Light Emitting Diodes (LEDs) (7 + wavelengths) Detector Once the Radical-7 receives the signal from the sensor, it utilizes proprietary algorithms to calculate the patient’s functional oxygen saturation (SpO2 [%]), blood levels of carboxyhemoglobin (SpCO [%]), methemoglobin (SpMet [%]), total hemoglobin concentration (SpHb [g/dL]) and pulse rate (PR).
- Page 29 The blood gas and/or laboratory CO-Oximetry measurements may differ from the SpO2, SpCO, SpMet, SpHb, and SpOC measurements of the Radical-7. Any comparisons should be simultaneous, meaning the measurement on the device should be noted at the exact time that blood is drawn.
- Page 30 Radical-7 Chapter 1: Technology Overview General Description for Total Arterial Oxygen Content (CaO2) Oxygen (O2) is carried in the blood in two forms, either dissolved in plasma or combined with hemoglobin. The amount of oxygen in the arterial blood is termed the oxygen content (CaO2) and is measured in units of ml O2/dL blood.
-
Page 31: Rainbow Acoustic Monitoring (Ram) Technology
Cautions on page 11. SpCO, SpMet, and SpHb Measurements During Patient Motion The Radical-7 displays measurements of SpCO, SpMet, and SpHb during patient motion. However, because of the changes in the physiological parameters such as blood volume, arterial-venous coupling, etc. that occur during patient motion, the accuracy of such measurements may not be reliable during excessive motion. - Page 32 Radical-7 Chapter 1: Technology Overview the lung tissue, thoracic wall and trachea to the surface where they may be heard with the aid of a stethoscope, a microphone or more sophisticated devices. rainbow Acoustic Monitoring Architecture The following figure illustrates how a respiratory sound produced by a patient can be turned into a numerical measurement that corresponds to a respiratory parameter.
- Page 33 Radical-7 Chapter 1: Technology Overview Signal Processing The digital signal produced by the acquisition system is converted into a measurement that corresponds to the respiratory parameter of interest. As shown in the previous figure, this can be performed by, for example, determining the digital signal envelope or outline which in turn may be utilized to determine the respiratory rate.
-
Page 35: Chapter 2: Radical-7 Descriptions
Chapter 2: Radical-7 Descriptions The following chapter contains the Radical-7 descriptions, including descriptions of the Handheld monitor , the Standalone monitor, and the optional SatShare monitor interface. General System Description The Radical-7 system includes the following: Instrument Patient Cable Sensor www.masimo.com... -
Page 36: Functionality Of The Radical-7
The Standalone features Nurse Call, analog output, and serial output. Monitor Interface The Radical-7 interfaces to the SpO2 input module of multi-parameter patient monitors to upgrade conventional pulse oximetry technology on the multi-parameter monitor to Masimo SET technology. Utilizing a SatShare cable, the standalone... -
Page 37: Handheld
The Profile button provides instant access to the Profile Screen. See Chapter 5: Profiles on page 4 Power button To turn on the Radical-7, press the Power button. To turn off, press and hold the button for more than 2 seconds. - Page 38 Radical-7 Chapter 2: Radical-7 Descriptions Handheld Back Panel The Handheld back panel features the connection to the Docking Station, an accessory mount for the pole clamp accessory, and access to the Handheld battery pack. Item Description The Handheld interfaces with the Docking Station through this connector.
-
Page 39: Standalone
Radical-7 Chapter 2: Radical-7 Descriptions Standalone When the Handheld is placed into the Docking Station, they become a full-featured standalone system. In this manual, when the Handheld and the Docking Station are connected, they are referred to Standalone. The Standalone acts as a battery charger for the Handheld and has AC power connection capabilities. - Page 40 Radical-7 Chapter 2: Radical-7 Descriptions Standalone Front Panel The following figure and corresponding text review the features of the Radical-7 Standalone. Note that when the Standalone is turned on, all indicator LEDs initially turn on and off at start up.
- Page 41 Radical-7 Chapter 2: Radical-7 Descriptions Standalone Back Panel The following figure and corresponding text review the features of the Radical-7 Standalone. Item Connector Description Serial Output Use the Serial Output connector with a ferrite bead connector installed to connect a serial instrument, including a serial printer, a monitoring system or PC to the Radical-7.
-
Page 42: Monitor Interface With Satshare
Use the Equipotential Ground connector for grounding. Ground connector Monitor Interface With SatShare The Radical-7 has a unique SatShare interface that links to most existing multi-parameter patient monitors through a SatShare cable. • Upgrades any approved and validated monitor to Masimo SET performance by... -
Page 43: Chapter 3: Setup
Chapter 3: Setup The following chapter contains information about setting up the Radical-7 before use. Unpacking and Inspection To unpack and inspect the device Remove the instrument from the shipping carton and examine it for signs of shipping damage. Check all materials against the packing list. Save all packing materials, invoice and bill of lading. -
Page 44: Setting Up The Docking Station
Place the Docking Station on a stable hard flat surface near the patient. Always place the Radical-7 on a dry surface. Maintain a minimum of 3 cm (1 inch) free space around the Radical-7. Make sure that the Radical-7 speaker is not covered to avoid a muffled alarm sound. -
Page 45: Setting Up For Spacelabs Flexport
Setting Up for SpaceLabs Flexport To set up for use with SpaceLabs Flexport On the Radical-7, on the device output screen, for the serial option, select SpaceLabs Flexport. Connect one end of the Spacelabs Flexport cable to the Serial Output connector on the Docking Station. -
Page 46: Setting Up And Using Satshare
SatShare, the values reported by the Radical-7 are to be considered the correct values. It is possible to use the Radical-7 with SatShare while the Radical-7 is not connected to AC power. However, in this configuration, battery run time is reduced. -
Page 47: Chapter 4: Operation
Chapter 4: Operation The following chapter contains information about using the Radical-7. Using the Touchscreen and Buttons Display View To access other screens, touch a value on the Display View. See About the Display View on page Profiles button To the access the Profiles screen, press Profiles. -
Page 48: Using Screen Lock
Radical-7 Chapter 4: Operation Using Screen Lock When turned on, the Screen Lock feature may prevent unintentional interaction with Display View. Using the Screen Lock feature When turned on, any interaction with the Display View triggers the Screen Lock feature. -
Page 49: Navigating The Radical-7
Radical-7 Chapter 4: Operation Navigating the Radical-7 Navigate the Radical-7 screens via the Display View or the Main Menu. Display View The following is the primary interactive screen that the user views. To access the Main Menu screen • Touch the gear icon at the lower right corner of the display. -
Page 50: About The Display View
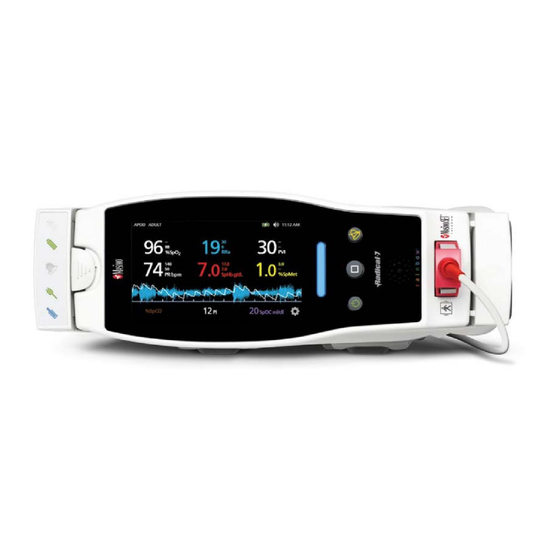
Radical-7 Chapter 4: Operation About the Display View The Display View consists of different areas: Status Bar. See About the Status Bar on page 49. Parameter Display. See Changing the Size of Parameter Values on page 50. Trend Field. See Waveform and Trend Views on page 52. - Page 51 Radical-7 Chapter 4: Operation Small Parameter View. See Accessing the Main Menu on page 57. About the Status Bar The Status Bar is visible on the top portion of the Display View. Status Bar Access additional screens, more information, or toggle features by touching directly on any of the following indicators in the Status Bar.
- Page 52 Radical-7 Chapter 4: Operation Changing the Size of Parameter Values To change the size of parameter values on the Display View On the Small Parameter view, touch and hold any one of the parameters, as shown above. When the parameter value dims, shakes, and grows in size, drag and drop that parameter above the Trend Field.
- Page 53 Radical-7 Chapter 4: Operation Trend Field The Trend Field allows users to access various customizable views. See Trends on page 77. To access trend, waveform, or customize the views on the Display View screen Touch the Trend Field, as shown below.
- Page 54 Radical-7 Chapter 4: Operation Swipe up or swipe down the available options. Touch on the desired option. The Trend Field displays trend data specific to the option that was selected. Pulse Rate Blip Bar The Pulse Rate Blip Bar is a visual indicator that dynamically pulses to convey the monitoring status of pulse rate.
- Page 55 Radical-7 Chapter 4: Operation Pleth + Sig IQ View Shows the parameter values on the top of the screen. The waveform is located below the parameter values. The Small Parameter view is located along the bottom of the screen. This view contains the Pleth Waveform with signal quality indications only.
- Page 56 Radical-7 Chapter 4: Operation Acoustic Waveform View Shows the parameter values on the top of the screen. The RRa waveform is located below the parameter values. The Small Parameter view is located along the bottom of the screen. Acoustic Respiratory Rate (RRa) must be available for this feature to be shown. This view contains acoustic respiratory rate waveform only.
-
Page 57: Sensitivity Modes Overview
Trend Field. Sensitivity Modes Overview Three sensitivity levels enable a clinician to tailor the response of the Radical-7 to the needs of the particular patient situation. Access the menu by touching on the indicator in the upper left corner of the Display View. The sensitivity levels are as follows: •... -
Page 58: Changing Sensitivity Modes
Radical-7 Chapter 4: Operation Changing Sensitivity Modes There are two ways to change the sensitivity modes. Press the indication on the top left of the Display View. Alternatively, from the Main Menu, touch the Profiles icon. From the Profiles screen, select the desired mode by scrolling up or down. Then select OK. -
Page 59: Accessing The Main Menu
Radical-7 Chapter 4: Operation Accessing the Main Menu To access Main Menu from the Display View, touch the gear icon on the bottom right corner of the Small Parameter View. Navigating the Main Menu • From the Main Menu screen, touch the icons for any of the following screens: Device Settings See Device Settings on page 71. - Page 60 Radical-7 Chapter 4: Operation Parameter Settings See Parameter Settings on page 59. Profiles See Changing Profiles on page 90. 3D Alarms See 3D Alarms on page 97. Trends See Trends on page 77 and Trend Field on page 51. Sound See Sounds on page 70.
-
Page 61: Parameter Settings
Radical-7 Chapter 4: Operation Parameter Settings The following is an example of the Parameter Settings screen. Only parameters that have been loaded onto the system will be visible. To access any of the available parameter setting screens From the Parameter Settings screen, to access the desired parameter, flick the on-screen icons left or right. - Page 62 Radical-7 Chapter 4: Operation About Parameter Information Additional information about each parameter is available. To access additional information about parameters From the parameter settings screen, touch the About icon. The following is an example for SpHb. An About screen appears for the selected parameter.
- Page 63 Radical-7 Chapter 4: Operation Alarms for SpO2 From the Alarms screen, change any of the following options: Factory Default Options Description Configurable Options Settings 2% to 99% in steps of High Limit is the upper High Limit threshold that triggers an When set to Off, alarm alarm.
- Page 64 Radical-7 Chapter 4: Operation SpHb Settings From the SpHb Settings screen, access any of the following screens: SpHb Alarms on page 62. Additional Settings for SpHb on page 63. About Parameter Information on page 60. SpHb Alarms From the Alarms screen, change any of the following options:...
- Page 65 Radical-7 Chapter 4: Operation Additional Settings for SpHb From the Additional Settings screen, change any of the following options: Options Description Factory Default User Configurable Settings Settings Averaging Time The length of time over Medium Short, Medium, or Long which the system calculates the average of all data points.
- Page 66 When the Radical-7 is set to FastSat On, the averaging algorithm evaluates all the saturation values providing an averaged saturation value that is a better representation of the patient’s current oxygenation status.
- Page 67 Respiration Rate (RR) The Radical-7 can determine respiration rate (RR) either by the acoustic signal (RRa) or, if installed, by the plethysmographic waveform (RRp). When using an acoustic sensor, respiration rate (RR) is determined by the acoustic (RRa) signal.
- Page 68 Radical-7 Chapter 4: Operation RRa Alarms From the Alarms screen, change any of the following options: Options Description Factory Configurable Options Default Settings High Limit The High Limit is upper 30 breaths 6 to 69 breaths per minute in threshold that triggers...
- Page 69 Radical-7 Chapter 4: Operation PVI Settings From the PVI Settings screen, access any of the following options: PVI Alarms on page 67. Additional Settings for PVI on page 67. About Parameter Information on page 60 PVI Alarms From the Additional Settings screen, change any of the following options:...
- Page 70 Radical-7 Chapter 4: Operation SpCO Alarms From the SpCO Settings screen, access the following screens: Options Description Factory User Configurable Settings Default Settings High Limit The High Limit is the upper 2% to 98%, in steps of 1%, or threshold that triggers an alarm.
- Page 71 Radical-7 Chapter 4: Operation SpOC Settings From the SpOC Settings screen, access the following screens: SpOC Alarms on page 69. About Parameter Information on page 60. SpOC Alarms From the SpOC Alarms screen, access the following screens: Options Description Factory...
-
Page 72: Sounds
Radical-7 Chapter 4: Operation Sounds From the Sounds screen, change any of the following options: Options Description Factory User Configurable Settings Default Settings Alarm Volume Sets the alarm Level 4 Level 1 to 4 volume and provides a sample of the alarm volume. -
Page 73: Device Settings
Radical-7 Chapter 4: Operation Device Settings The following is an example of the Device Settings screen. From the Device Settings screen, access any of the following options: Screen Orientation on page 75. Localization on page 74. WiFi on page 75. - Page 74 Radical-7 Chapter 4: Operation Access Control The Access Control screen is protected by a Password screen. Password Screen Using the Password screen On the Password screen, enter the following numbers: 6 2 7 4 No numbers will be displayed, only asterisks (****).
- Page 75 Radical-7 Chapter 4: Operation Access Control Screen From the Access Control screen, change any of the following options: Options Description Factory User Configurable Settings Default Settings All Mute All patient alarm Disabled Enabled or disabled conditions are If enabled, All Mute and All Mute silenced.
- Page 76 Radical-7 Chapter 4: Operation Factory Options are restored Press Restore to return to factory Defaults to factory values. default values. Localization From the Localization screen, change any of the following options: Options Description Factory Default User Configurable Settings Settings Current Date...
- Page 77 WiFi When the Radical-7 is connected to a WiFi network, the Wifi icon located on the Status Bar conveys the strength of the Wifi connection. See About the Status Bar on page 49. From the Wifi screen, change any of the following options:...
- Page 78 Radical-7 Chapter 4: Operation Battery From the Battery screen, view the following information: • Battery icon that conveys remaining battery charge as a green color. • Battery icon that conveys that battery charging status. See About the Status Bar on page 49.
-
Page 79: Trends
Radical-7 Chapter 4: Operation Depending on the Analog 2 Pleth, SIQ, 0V Output, 1V configuration, the following Output, SpO2 0% to 100%, parameters are output SpO2 50% to 100%, or Pulse continuously on the Analog 1 rate and Analog 2. - Page 80 Radical-7 Chapter 4: Operation The following is an example of trend information for SpO2 as it appears in the Full Trend screen. Changing Between Trend Views To toggle between Display View and Full Trend From the Display View, in the Trend Field, touch the icon as shown below.
- Page 81 Radical-7 Chapter 4: Operation www.masimo.com Masimo...
- Page 82 Radical-7 Chapter 4: Operation Manipulating Trend Data To manipulate the view of trend data On the Full Trend screen, with a pinch gesture, using two fingers, the user can zoom in and out of the trend time scale. The user can add parameters to the Trend view by dragging and dropping parameters from the Small Parameter view.
- Page 83 Radical-7 Chapter 4: Operation To view past patient trend data, swipe the trend display to the left or to the right. To exit a Trend view, press the Home button. Changing Time Selection of Trend Data Users can change the time display of trend data. The time options that can be selected are 10 minutes, 30 minutes, 1 hour, 2 hours, 4 hours, 8 hours, 12 hours, or 24 hours.
- Page 84 Radical-7 Chapter 4: Operation • From the Full Trend screen, touch the Time Selection icon, and select a time option. Using the Histogram Feature Users can view trend data using the Histogram feature. When turned on, the Histogram feature displays current trend data as a histogram.
- Page 85 Radical-7 Chapter 4: Operation Touch the Histogram icon. Current trend data displays as a histogram. To turn off the Histogram feature • Touch the Trends icon, as shown. www.masimo.com Masimo...
- Page 86 Radical-7 Chapter 4: Operation Changing Trend Settings Change the maximum value and the minimum value of the Y axis for any of the available parameters. To adjust the trend settings for any of the available parameters From the Main Menu screen, touch the Trends icon.
- Page 87 Radical-7 Chapter 4: Operation From the Parameter Trends screen, touch the slider for the Y-axis maximum or the Y-axis minimum.The following is an example of the SpO2 Trend screen. Select the desired setting by scrolling up or down. When finished, select OK. The following example shows the Y axis range for SpO2 as it appears on the left side of the screen.
- Page 88 Radical-7 Chapter 4: Operation Deleting Trend Data The user can delete patient trend data that has been stored on the Radical-7. To delete patient trend data From the Trends screen, touch the Trend Settings icon. From the Trend Settings screen, touch Clear, and then touch OK. This deletes all stored trend data.
-
Page 89: About
Radical-7 Chapter 4: Operation About For information about parameters, see About Parameter Information on page 60. From the About screen, view any of the following options: Options Description Serial Number Displays the serial number of the Handheld. Displays the version number of the instrument board software. -
Page 91: Chapter 5: Profiles
If no changes are made to settings, then after a power cycle, the Radical-7 automatically resets to the Adult profile because Adult is the factory default profile. If the Profile setting is changed to NEO or CUSTOM, then after a power cycle, the Radical-7 remembers the previously selected Profile setting. -
Page 92: Changing Profiles
Chapter 5: Profiles The Radical-7 conveys the active profile by changing the color of the Profiles button. To restore all Radical-7 settings to factory default settings, see Access Control on page 72. Changing Profiles Changing Profiles is done in the Profiles Settings screen. There are different ways to access the Profiles Settings screen. - Page 93 Radical-7 Chapter 5: Profiles • Alternatively, from the Main Menu screen, touch the Profiles icon. www.masimo.com Masimo...
- Page 94 Radical-7 Chapter 5: Profiles To change Patient Type From the Profile screen, touch the Patient Type field. Select the desired Patient Type by scrolling up or down. When finished, touch OK. To confirm selection, check the Status Bar. From the Profiles screen, change any of the following options:...
-
Page 95: Replacing Factory Default Settings For Adult And Neo Profiles
Neonatal are saved instead of the factory default settings, the Profile button changes to same blue or pink color. See Profiles Overview on page 89. A user can also load preferred profile configurations into the Radical-7 using a separate tool. To change the factory default settings for Adult or Neonatal profile settings Make the preferred changes to any of the Radical-7 settings. -
Page 96: Powering Off The Radical-7
Radical-7 Chapter 5: Profiles Powering Off the Radical-7 When turning off the Radical-7, the device remembers the preferred settings. To turn off the Radical-7 Press and hold the button for more than 2 seconds. To confirm the shutdown process, the following screen appears. -
Page 97: Chapter 6: Alarms And Messages
For more information, see Chapter 7: Troubleshooting on page 105. About Alarms The Radical-7 visually and audibly indicates alarm conditions that the system detects. Audible alarms may be silenced, without affecting the operation of visual alarms. See Safety Information, Warnings, and Cautions on page 11 and Alarm Related Safety Information, Warnings, and Cautions on page 19. - Page 98 Radical-7 Chapter 6: Alarms and Messages The following is an example of a typical alarm due to parameter limit violation. To silence or dismiss alarms: • Touch Silence (the highlighted area of the Status Bar). Audible alarms can be temporarily suspended by pressing the Alarm Silence button. When alarms are in the suspend state, pressing the Alarm Silence button cancels the alarm suspend.
-
Page 99: 3D Alarms
Radical-7 Chapter 6: Alarms and Messages 3D Alarms 3D Alarms include the Desat Index Alarm and the PI Delta Alarm. Desat Index Alarm Overview on page 97. Perfusion Index (PI) Delta Alarm Overview on page 98. Desat Index Alarm Overview... - Page 100 The PI Delta provides an audible and visual alert to important changes in perfusion compared to the patient’s baseline PI rate. The baseline is set by the Radical-7 once the user has enabled the alarm. The baseline is 30 seconds of currently averaged PI. The feature includes a user-selectable PI Delta Alarm.
-
Page 101: Messages
Radical-7 Chapter 6: Alarms and Messages PI Delta Alarms From the Alarms screen, change any of the following options: Options Description Factory User Configurable Settings Default Settings Set Baseline See Perfusion Index (PI) On or Off Delta Alarm Overview on page 98. - Page 102 Next steps: Replace with a proper Masimo sensor. SpHb sensor is attached to a instrument without SpHb installed. Next steps: Use a non-SpHb sensor. Contact your local Masimo Representative to learn more about the optional SpHb upgrade. Incompatible Adhesive Sensor Message Message: •...
- Page 103 Message: (Pulse CO-Ox) SpO2 Only Mode Occurs during an unsuccessful sensor initialization/pulse search routine or during monitoring. Next steps: See the directions for use provided with your sensor. Use a Masimo light shield to cover the sensor and adjust the sensor. Low Battery Message Battery charge is low.
- Page 104 Next steps: Ensure proper sensor application. Check sensor to see if it is working properly. If not, replace the sensor. See Successful Monitoring for SpHb on page 27. Speaker Failure Message Instrument requires service. Next steps: Contact Masimo Tech Support. Chapter 9: Service and Maintenance on page 125. No Cable Connected Message Message: •...
- Page 105 Radical-7 Chapter 6: Alarms and Messages No Sensor Connected Message Message: • (Pulse CO-Ox) No Sensor Connected, or • (RAM) No Sensor Connected Sensor not fully inserted into the connector. May be an incorrect sensor or a defective sensor or cable.
- Page 106 Service Required Message Internal Failure. Instrument requires service. The message fills the entire display. This is a numeric error code. Next steps: Contact Masimo for service, see Chapter 9: Service and Maintenance on page 125. Incompatible Cable Message Message: (Pulse CO-Ox) Incompatible Cable Not a proper cable.
-
Page 107: Chapter 7: Troubleshooting
• Check the sensor and ensure proper sensor application. The sensor must be well secured to the site for the Radical-7 Pulse CO-Oximeter to maintain accurate readings. Misalignment of the sensor’s emitter and detector can result in smaller signals and cause erroneous readings. -
Page 108: Low Perfusion
Radical-7 Chapter 7: Troubleshooting Dimly Lit Parameters When the signal quality is very low, the accuracy of measurements may be compromised, the parameter may be dimly lit, and the parameter may display dashes instead of a numeric value. Low Perfusion It has been suggested that at extremely low perfusion levels, pulse oximeters can measure peripheral saturation, which may differ from central arterial saturation This "localized... -
Page 109: Troubleshooting The Radical-7
Next steps: Replace the fuses. For details, see Replacing the Fuses on page 127. Instrument Turns On But Screen is Blank The viewing contrast is not correct. Next steps: Adjust the brightness setting. See Brightness on page 76. If the condition persists, requires service. See. Contacting Masimo on page 131. www.masimo.com Masimo... - Page 110 Internal failure. Next steps: To silence an alarm, press the Alarm Silence button. If alarm continues to sound, turn off the Radical-7. If necessary, remove Handheld battery. Requires service. See Contacting Masimo on page 131. Buttons Do Not Work When Pressed Internal failure.
-
Page 111: Chapter 8: Specifications
Chapter 8: Specifications The following chapter contains specifications for the Radical-7 Handheld, compatible Docking Stations, and the Standalone system. Performance Measurement Range SpO2 0% to 100% SpMet 0% to 99.9% SpCO 0% to 99% SpHb 0 g/dL to 25 g/dL... - Page 112 Radical-7 Chapter 8: Specifications Adults, Infants, Pediatrics ± 2% Neonates ± 3% Motion [3] 70% to 100% Adults, Infants, Pediatrics, Neonates ± 3% Low Perfusion [4] Adults, Infants, Pediatrics, Neonates ± 2% Pulse Rate Accuracy Pulse rate range 25 bpm to 240 bpm...
-
Page 113: Resolution
Radical-7 Chapter 8: Specifications Resolution Parameter Step Size %SpO2 %SpCO %SpMet 0.1% SpHb g/dL 0.1 g/dL Pulse Rate 1 beats per minute Respiration Rate 1 breath per minute Electrical Standalone AC Power requirements 100 to 240 VAC, 47 to 63 Hz... -
Page 114: Physical Characteristics
Radical-7 Chapter 8: Specifications Operating Humidity 5% to 95%, non-condensing Operating Altitude 500 mbar to 1060 mbar -1000 ft to 18,000 ft (-304 m to 5,486 m) Physical Characteristics Dimensions Handheld 8.9” x 3.5” x 2.1” (22.6 cm x 8.9cm x 5.3 cm) Standalone 3.5”... -
Page 115: Display Indicators
Radical-7 Chapter 8: Specifications SpMet 0.1% to 99.5% SpHb 1.0 g/dL to 24.5 g/dL 5 breaths per minute to 69 breaths per minute 0.03% to 19% 1% to 99% Pulse Rate 30 bpm to 235 bpm SpOC 1 g/dL to 34 g/dL... -
Page 116: Compliance
Radical-7 Chapter 8: Specifications Dot Pitch 0.25 mm Compliance EMC Compliance • EN55011: Radiated Emissions (CISPRR 11, 2009 Amendment A1:2010, Class B) • EN55011: Conducted Emissions (CISPRR 11, 2009 Amendment A1:2010, Class B) • EN301 489-17: Radiated Emissions (EN 301 489-01 V1.8.1:2008, Class B) •... -
Page 117: Output Interface
Radical-7 Chapter 8: Specifications Type of Protection Class 1 (on AC power), Internally powered (on battery power) Degree of Protection-Patient Cable Type BF-Applied Part Degree of Protection-SatShare Cable Type CF-Applied Part Mode of Operation Continuous Output Interface SatShare (RDS-1). See Serial Interface Specifications on page 116. -
Page 118: Serial Interface Specifications
The digital interface for serial communication is based on the standard RS-232 protocol. The Radical-7 by default always outputs ASCII 1 text data through the serial port, unless the user selects a different output mode. To interface with the Radical-7 and receive serial text data, connect a serial interface cable with a ferrite bead installed to the serial output connector located on the back of the Radical-7 Docking Station. -
Page 119: Analog Output And Nurse Call Specifications
Radical-7 Chapter 8: Specifications Signal name No Connection No Connection No Connection No Connection Analog Output and Nurse Call Specifications Analog Out and Nurse Call are accessible on the same female high-density DB-15 connector. Analog Output and Nurse Call interface are only available when the Handheld is attached to the Docking Station. - Page 120 1 Volt. Calibrate the analog recording system to those levels before use. Nurse Call The Nurse Call feature is available when the Radical-7 is operating as a standalone. Nurse Call is based on the relay closing or opening depending on alarm, Low Signal IQ events, or both.
-
Page 121: Symbols
Radical-7 Chapter 8: Specifications Symbols The following symbols are found on the Radical-7, Docking Station, or packaging and are defined below. Some of the interfaces and symbols are not available on all versions of the Docking Station. Symbols Definition Symbols... -
Page 122: Iso Country Codes (Fcc And Eu)
Radical-7 Chapter 8: Specifications Mark of conformity Caution to European Medical Instrument Directive 93/42/EEC Federal law Name of Manufacturer restricts this device to sale by or on the order of a physician (USA FDA) Underwriter's Wireless features can Laboratories Inc. - Page 123 Radical-7 Chapter 8: Specifications San Marino France Germany Ghana Greece Guatemala Honduras Hong Kong Hungary India Iraq Israel Italy Jordan Kazakhstan Kenya Kuwait Laos Lebanon Libya Malta Mauritius Monaco Morocco Mozambique Netherlands New Caledonia Nigeria Norway Oman Palestinian Panama Papua New Guinea PG...
-
Page 124: Citations
7 days to 135 days old and weighting between 0.5 kgs and 4.25 kgs. Seventy-nine (79) data samples were collected over a range of 70% to 100% SaO2 and 0.5% to 2.5% HbMet with a resultant accuracy of 2.9% SpO2 and 0.9% SpMet. Contact Masimo for testing specifications. - Page 125 Radical-7 Chapter 8: Specifications www.masimo.com Masimo...
-
Page 127: Chapter 9: Service And Maintenance
The Radical-7 Handheld includes a lithium ion rechargeable battery. The Radical-7 Docking Station may include the optional 6.5 amp-hour nickel metal hydride rechargeable battery. Before using the Radical-7 as a Handheld or as a transport monitor, the Handheld rechargeable battery and the optional Docking Station rechargeable battery must be fully charged. - Page 128 Estimated Run Times of Battery Power The following tables outline the estimated run times of the battery-powered Radical-7. The time estimates are based on a Radical-7 with fully charged batteries. The time estimates are also based on a Radical-7 with and without the back-light illuminated.
-
Page 129: Replacing The Batteries
Radical-7 is turned off. To replace the rechargeable Handheld battery Turn off the Radical-7 Handheld off and remove the patient cable connection. If docked, detach the Handheld from the Docking Station. Loosen the closure screw on the battery compartment door and lift out the battery. -
Page 130: Performance Verification
To test the performance of the Radical-7 following repairs or during routine maintenance, follow the procedure outlined in this chapter. If the Radical-7 fails any of the described tests, discontinue its use and correct the problem before returning the instrument back to the user. - Page 131 To conduct a test with the optional Masimo SET Tester Turn off and then turn on the Radical-7. Use the Patient Cable connector on the Radical-7 to connect the Masimo SET Tester to the Radical-7. See the directions for use that were provided with the Masimo SET Tester.
-
Page 132: Repair Policy
When the Radical-7 is fully charged, the Handheld Battery Charging indicator turns off. Turn on the Radical-7 on and verify that the Battery indicator shows a full charge. Repair Policy Masimo or an authorized Service Department must perform warranty repair and service. Do not use malfunctioning equipment. -
Page 133: Contacting Masimo
www.masimo.com... - Page 134 Sales & End-User License Agreement This document is a legal agreement between you (“purchaser”) and Masimo corporation (“Masimo”) for the purchase of this product (“product”) and a license in the included or embedded software (“software”) except as otherwise expressly agreed in a separate contract for the acquisition of this product, the following terms are the entire agreement between the parties regarding your purchase of this product.
-
Page 135: Appendix: Best Practices For Comparisons To Reference Measurements
• Examine the finger while placed in the sensors to ensure the emitter and detector are directly aligned on top of each other and there is no gap between the sensor and fingertip. www.masimo.com Masimo... - Page 136 Ensure cable runs flat over the top of the hand directly in the middle of the finger with no kinks or twists so the cable does not pull on the sensor. • Cover sensor with Masimo-provided shielding to avoid light interference. www.masimo.com Masimo...
- Page 137 Radical-7 Appendix: Best Practices for Comparisons to Reference Measurements • Secure sensor cable to patient’s arm with tape. • Instruct subjects to remain still without any sensor movement. • Connect sensor cable to device without pulling on sensor. • Wait until SpHb measurement is stable (one minute) before recording SpHb values.
-
Page 138: Best Practices Checklist For Spco Comparisons
Radical-7 Appendix: Best Practices for Comparisons to Reference Measurements Best Practices Checklist for SpCO Comparisons Ensure SpCO device is powered on and connected to computer with automatic data capture. After venous blood draw, SpCO testing must be initiated within 30 seconds (COHb can change rapidly). - Page 139 Ensure cable runs flat over the top of the hand directly in the middle of the finger with no kinks or twists so the cable does not pull on the sensor. • Cover sensor with Masimo-provided shielding to avoid light interference. • Secure sensor cable to patient’s arm with tape.
-
Page 140: Best Practices Checklist For Acoustic Respiration Rate Comparisons
Radical-7 Appendix: Best Practices for Comparisons to Reference Measurements Best Practices Checklist for Acoustic Respiration Rate Comparisons Acoustic Sensor placement: The Acoustic sensor has a small black arrow on the front (see figure below), when placing the sensor the black arrow should point forward to the anterior of subject’s body. - Page 141 Radical-7 Appendix: Best Practices for Comparisons to Reference Measurements Place sensor tape on skin. Gently press on sensor tape from center outward so adhesive forms a good contact with patient's skin. Ensure there are no skin folds or air gaps under sensor pad.
- Page 142 Radical-7 Appendix: Best Practices for Comparisons to Reference Measurements Document patient events and time of event (based on computer clock). Include events that may affect performance, these include: • Patient talking, picking at the sensor or nasal cannula, excessive movement, ambient noise present, fans or air blowing at sensor ...
- Page 143 Radical-7 Appendix: Best Practices for Comparisons to Reference Measurements www.masimo.com Masimo...
-
Page 145: Index
Additional Settings for SpO2 • 60, 61 Technology Overview • 23 Alarm Limit Test • 128 Chapter 2 Alarm Related Safety Information, Radical-7 Descriptions • 33 Warnings, and Cautions • 19, 95 Chapter 3 Alarms • 112 Setup • 41 Alarms for SpO2 •... - Page 146 Cleaning • 125, 130 (SpMet) • 30 Compliance • 114 General Description for Oxygen Saturation (SpO2) • 24 Contacting Masimo • 107, 108, 130, 131 General Description for Perfusion Index Continuous Speaker Tone • 108 (PI) • 25 Contraindications • 10 General Description for Pleth Variability Index (PVI) •...
- Page 147 Pleth + Sig IQ + Acoustic View • 54 Low SpHb SIQ Message • 102 Pleth + Sig IQ View • 53 Low SpMet SIQ Message • 102 Powering Off the Radical-7 • 94 Power-On Self Test • 128 PR Alarms • 63 PR Settings • 59, 63 Manipulating Trend Data •...
- Page 148 Symbols • 119 44, 115, 116, 129 Service Required Message • 104 Setting Up and Using SatShare • 40, 44 Testing with the optional Masimo SET Setting Up for Philips, Agilent, or HP Tester • 129 VueLink • 42 Trend Field • 51, 58 Setting Up for SpaceLabs Flexport •...
- Page 149 Radical-7 Index Unexpectedly High SpCO Reading • 107 Unpacking and Inspection • 41 Using Screen Lock • 46 Using the Histogram Feature • 82 Using the Home Button • 46 Using the Touchscreen and Buttons • 45 Warranty • 131 Waveform and Trend Views •...
- Page 152 35322/LAB-5475F 0913...
Need help?
Do you have a question about the Radical-7 and is the answer not in the manual?
Questions and answers