Table of Contents
Advertisement
Quick Links
amperes
Thank you
for choosing another quality product from Amperes Electronics.
Amperes has upgraded the protocols in PD series paging microphones, MatriMix as well as PMX system. With this
harmonised data, all the equipments can be used or interchanged seamlessly. As such, the firmware of TD6240 has
been upgraded as well, to cater for the needs.
We shall endeavor to make products with contemporary needs and yet expandable for future upgrades. We are
sure you make the right decision to choose Amperes, which is not only offering the product that meets your budget,
but perform beyond your expectation.
We appreciate that you read through the manual to avoid any mishandling as well as to explore the full potential this
unit can offer. Keep this manual for future reference and we believe that you are getting an optimum product in its
class.
GROUP RECALL
G1
G2
G3
G4
G5
G6
G7
G8
SIREN
ALL CALL
Digital Paging Microphone
INSTRUCTION MANUAL
DIGITAL PAGING MICROPHONE
PD1280
F1
F2
1
2
4
5
8
7
CLR
0
CHIME
REPEAT
+
TALK
PD1280
version 1/13
harmonised protocol
F3
3
6
9
ADD
August 2013
Advertisement
Table of Contents

Related Manuals for Amperes PD1280


Summary of Contents for Amperes PD1280
- Page 1 We shall endeavor to make products with contemporary needs and yet expandable for future upgrades. We are sure you make the right decision to choose Amperes, which is not only offering the product that meets your budget, but perform beyond your expectation.
-
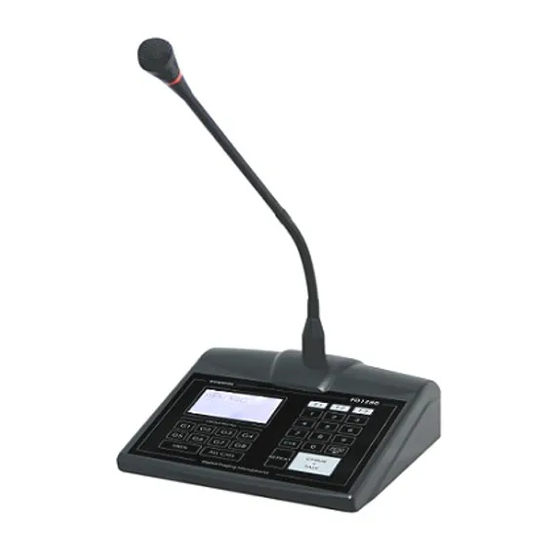
Page 2: Product Descriptions
The search for contemporary design with unsurpassed features ends with PD1280. It is suitable for large scale installations, of up to 256 zones, multi point paging stations with 9 priority levels, soft touch buttons and big LCD graphic panel for ease of monitoring and programming. - Page 3 Use a DC24V power adaptor supplied for powering the unit. 16. PAGING MIC CONNECTION (EX2800) amperes Connect to the paging mic via this RJ45 connector. For pin configuration, refer to the diagram. PD1280 Digital Paging Microphone PAGE 3...
-
Page 4: Application Schematic
Application Schematic Please ensure that priority level is set at each paging console PD1280 Paging Mic before operating. Unit 2 Each loop / circuit may consist of several paging mics, which PD1280 Paging Mic can be set at different priority... - Page 5 The Diagram shows the connectivity using Fiber Optic for long distance mic connectivity with IP setup. Multipoint paging setup is possible and the paging mic shall operate in similar manner as of using conventional system. amperes PD1280 Digital Paging Microphone PAGE 5...
-
Page 6: Connecting The Unit
Connecting The Unit For Single unit paging mic, set priority level to 0 (PD1280) Priority 1 is highest. Rear view of PD1280 Cat5e cable (supplied) Remote location EX2800 External Conn Unit 24V DC via power adaptor 2 pair screen cable (audio output and RS485 data) To mixer input ;... -
Page 7: Power Amplifier
Connecting to IP Paging System Rear view of PD1280 Audio RS485 iPX5150 CLIENT iPX5100 SERVER Network Switch DC V ETHERNET SERIAL NO : iPx 5100 10BASE-T RS232 amperes ETHERNET PAGING MANAGEMENT SERVER ON/OFF RESET ETHERNET ADDRESS : ETHERNET SUBNET :... - Page 8 Connecting The Unit ( Multi Point ) 2 nos Paging Mic in same circuit. PD1280 Note : Can be set to either different priority or same level. Cat5e 24V DC PD1280 EX2800 2P Screen PD1280 24V DC EX2800 PD1280 24V DC...
- Page 9 EX1103 PD1280 Unit 1 Mic Extender Cat5e Cat5e MS1103 Mic Splitter Power for PD1280 is drawn directly PD1280 Unit 2 from MxP2188 via Cat5e cable. Note : Cat5e Length shall not exceed 50 m, to avoid voltage drop as well as noise to audio line.
-
Page 10: Unit Startup
2) Press “Add” button for next 3) Press CLR for Exit setup mode When using for the first time, a sample setup is required such as: 1) Setting priority level 2) Optional setting for chime output, grouping, time out etc. amperes electronics PAGE 10... - Page 11 ADD ( Next ) 8. SYSTEM INFO Firmware version informa- tion ADD ( Next ) 9. MEMORY REST To reset and clear memo- ries to factory default ADD ( Next ) 10. SAVE & EXIT? amperes PD1280 Digital Paging Microphone PAGE 11...
-
Page 12: Setup - Sub Menu
Press ‘0’ for Save 2.2 2nd Chime : Press ‘ADD’ to select 2nd Chime Press “0” for Enter 2.2 2nd Chime : Down Press ‘ADD’ to select Tone Press ‘0’ for Save Press ‘CLR’, Return to main menu amperes electronics PAGE 12... -
Page 13: Zone Setting
4.1 Max Zone : Factory default setting is 248 We recommend this setting to be done to enable faster Press ‘ADD’ for Select response during paging. Press ‘0’ for Save amperes PD1280 Digital Paging Microphone PAGE 13... -
Page 14: System Info
Press “0” for Enter 7.1 Name: Press “ ADD ” for Select Press “0” to Next 7.1 Name: AMPERES Press “0” to Save Press “ ADD ” for Next 7.2 Address: Press “CLR” for Exit Return to Main Page amperes electronics PAGE 14... -
Page 15: Memory Reset
Press G1 Button momentarily (2 seconds) can be lumped under single group to allow simultaneous Saving paging to all the floors. Group 1 To Recall : amperes Press ‘G1’ and Press ‘Chime + Talk’ PD1280 Digital Paging Microphone PAGE 15... -
Page 16: Operating The Unit
A successful paging can only be achieve if TD6240 is connected, without it would be incomplete installation. Initial setup such as priority level should be set. PD1280 can be linked to TD6240 for zone decoding, or used in MatriMix system for matrix installations. Follow the simple steps below to begin paging 1. -
Page 17: Technical Specifications
100 - 12 kHz S / N ratio >65 dB @ 1 KHz Gooseneck mic length 400 mm 230 x 192 x 65 mm (Excluding Mic) Dimension (W x H x D) Weight Appr. 1.6kg amperes PD1280 Digital Paging Microphone PAGE 17... -
Page 18: Communication Ports
2. Run bootloader program at your PC and the windows should appear (Diagram 2) 3. At PD1280, press ‘0’ button for select menu - Select menu number 8 - System Info and Select 8.2 - update 4. Press ‘0’ and enter for update 5. - Page 19 Communication Ports (Continue) Diagram 3 Diagram 4 Diagram 5 amperes PAGE 19 PD1280 Digital Paging Microphone...
- Page 20 Only Amperes Electronics Service Centres are allowed to make warranty repairs : a list of Amperes Electronics Service Centres may be asked for by the purchaser or send directly to Amperes Electronics Sdn Bhd at 70 Jalan Industri PBP 3, Tmn Perindustrian Pusat Bandar Puchong, 47100, Puchong, Selangor, Malaysia or its authorized master distributor, Amperes Global Marketing.
Need help?
Do you have a question about the PD1280 and is the answer not in the manual?
Questions and answers