Table of Contents
Advertisement
Available languages
Available languages
Quick Links
DATA12, DATA14, DATA38
DATA12, DATA14, DATA38
1/4", 3/8", 1/2" Dr. Digital Angle Torque Adaptor
1/4" Torque Range . . . . . . . . . . . . . . . . . . . . . . . . . . . . . . . . 30 N-m / 22.12 ft-lb
3/8" Torque Range . . . . . . . . . . . . . . . . . . . . . . . . . . . . . . . . 135 N-m / 99.5 ft-lb
1/2" Torque Range . . . . . . . . . . . . . . . . . . . . . . . . . . . . . . . 340 N-m / 250.7 ft-lb
Accuracy (*1) . . . . . . . . . . . . . . . . . . . . . . . . . . . . . . .(CW°G±3%) (CCW°G±4%)
Accuracy (*2) . . . . . . . . . . . . . . . . . . . +/- 2° ( rotating 90° at speed of 30°/sec)
Data Memory Values . . . . . . . . . . . . . . . . . . . . . . . . . . . . . . . . . . . . . . . . . . . 50
Number of Presets . . . . . . . . . . . . . . . . . . . . . . . . . . . . . . . . . . . . . . . . . . . . . . . 9
Operation Modes . . . . . . . . . . . . . . . . . . . . . . . . . . . . . . . . . . . . Peak Hold/Track
Unit Selection . . . . . . . . . . . . . . . . . . . . . . . . . . . N-m, ft-lb, in-lb, kg-cm, degree
Audible Alarm . . . . . . . . . . . . . . . . . . . . . . . . . . . . . . . . . . . . . . . . . . . . . . . . . Yes
Buttons . . . . . . . . . . . . . . . . . . . . . . . . . . . . . . . . . . . . . . . . . . . . . . . . . . . . . . . . 5
LED Indicator . . . . . . . . . . . . . . . . . . . . . . . . . . . . . . . . . . . . . . . . . . . . . 12 LED's
Batteries . . . . . . . . . . . . . . . . . . . . . . . . . . . . . . . . . . . . . . . . . . . . . . . . . . . 2 AAA
Battery Life-Continuous Operation (*3) . . . . . . . . . . . . . . . . . . . . . . . . . . . 24 Hrs
Battery Life-Standby (*3) . . . . . . . . . . . . . . . . . . . . . . . . . . . . . . . . . . . . . . 1 Year
Operating Temperature . . . . . . . . . . . . . . . . . . . . . . . . . . . . . . . . . . -10ºF ~ 60ºF
Storage Temperature . . . . . . . . . . . . . . . . . . . . . . . . . . . . . . . . . . . . -20ºF ~ 70ºF
Humidity . . . . . . . . . . . . . . . . . . . . . . . . . . . . . . . . . .Up to 90% non-condensing
DATA12, DATA14, DATA38
SPECIFICATIONS
1
WARNING
AlwAys reAd
instructions
before using
tools
AlwAys weAr
sAfety
goggles
not
wAterproof
Rev. 02/15/12
Advertisement
Table of Contents

Subscribe to Our Youtube Channel
Summary of Contents for Napa Carlyle DATA12
- Page 1 DATA12, DATA14, DATA38 DATA12, DATA14, DATA38 1/4", 3/8", 1/2" Dr. Digital Angle Torque Adaptor SPECIFICATIONS WARNING 1/4" Torque Range ....... . 30 N-m / 22.12 ft-lb 3/8"...
- Page 2 SPECIFICATIONS Notes from Page 1: *6: Environmental test: a. Dry heat *1: The accuracy of the readout is guaranteed from 20% to 100% of maximum range + /- 1 increment. For b. Cold maintaining accuracy, calibrate the adaptor at regular c. Damp heat intervals (1 year recommended). d. Change of temperature *2: The angle accuracy is guaranteed at ±2° when e. Impact (shock)
-
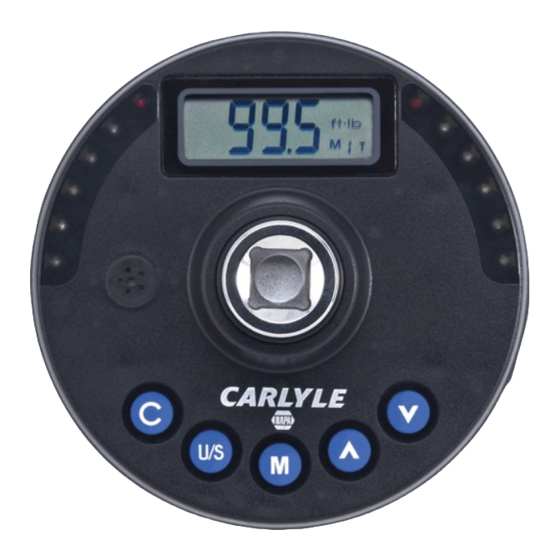
Page 3: Features And Functions
FEATURES AND FUNCTIONS 1. LED Indicator 5. Units 8. Power On/Clear Button 12. Communication Port 2. Buzzer 6. Peak/Track Mode 9. Unit/Setting Button (Authorized service center use only) 3. LCD Readout 7. Memory Number 10. Per-setting Button 13. Extension Bar 4. Torque/Angle Value 11. Up/Down Button 14. Battery Cover REPLACEMENT PARTS AVAILABLE AS: RSDATABC Battery Cap RSDATA38CS Blow Mold Case for DATA38... -
Page 4: Auto Power Off
POWER ON AND AUTO ZERO RESET • Attach the adaptor on the tool. • Gently press to power on. • Auto zero-reset will be processed first. • The adaptor will be started in torque or angle mode. Which mode will be started depends on in which mode the adaptor is powered-off last time. • In torque mode, a target torque screen will be shown. • If the adaptor is moving again and again, the • In angle mode, after several seconds of angle zero- zero reset will not stop. reset, a angle screen will be shown (See zero reset Finally, will be shown. section on this manual.) (Refer to “ERROR MESSAGE”) • If it takes too long in angle reset, press to reset again. ATTENTION: 1. If appears, refer to “ERROR MESSAGE”. 2. -
Page 5: Hardware Test
HARDWARE TEST To do a hardware reset, remove the battery and • re-install it. If the adaptor does not function normally or • appears, please go through the reset process to restart the adaptor. SETTING TORQUE VALUES LOW VOLTAGE INDICATOR If the battery voltage is too low, the meter will display a battery symbol and then turn off. Replace batteries. shows that the adaptor does not work functionally, please do hardware reset. Refer to “HARDWARE RESET”. Er-- indicator In angle mode, if the adaptor rotates too fast, will be shown. Press to zero reset the adaptor. When shows during power-on process, it means this adaptor has been applied to more than 110% of maximum torque. In angle mode, if the adaptor does not reset successfully for a period of time, will be shown. Press to do zero-reset again and place the adaptor on a flat surface to reset. - Page 6 SETUP STEP 1: INSTALL THE ADAPTOR AND POWER ON EX. Select units Press to power on the adaptor. • In.lb. In.lb ft.lb. Ft.lb STEP 2: DO NOT APPLY FORCES ON ADAPTOR STEP 3: TARGET TORQUE FOR ANGLE WILL BE SHOWN Kg.cm kg.cm º (Angle) TARGET TORQUE WITHOUT APPLYING OR ANGLE...
- Page 7 STEP 5: ZERO- RESET ADAPTOR Press to zero-reset the adaptor.(suggested) • Refer to “POWER ON AND AUTO ZERO • RESET” and “ZERO RESET”. Press STEP 6: CHECK P/T MODE OF TORQUE (Torque Only) Refer to “P/T MODE SELECTION” to set P or • T- mode operation of torque.
- Page 8 STEP 8: WHAT TO LOOK FOR There are 12 LEDs to indicate the current torque • or angle reaching 80%, 85%, 90%, 95%, 97.5% (green LED indication) and 100% (red LED 100% 97.5% indication) of target torque/angle. ((...((..))...)) over 80% There is also a buzzer to indicate the reaching • level of target value. Interval sound means it ((((((((..)))))))) over 100% reaches over 80% and long sound means it reaches over 100% of target value.
- Page 9 Angle value EX. For a 30.00Nm adaptor, 5% is 1.5Nm In angle mode, the LCD displays the angle • rotated. The angle is counted after the rotation force torque has been reaching over 5% of the rated maximum torque. Target angle After releasing force, the LCD shows the • maximum angle and the maximum torque. 1.5 Nm (alternatively) Start to count angle Continuously applying force Release force STEP 10: SAVE TORQUE/ANGLE VALUE OR CLEAR MAXIMUM VALUE Peak mode In P-mode, after releasing force, the LCD shows...
- Page 10 VISIT SETUP MENU From the target torque/angle screen, press and hold • to go into setup menu. Continuously press visit the P/T mode menu, torque-unit-in-angle- operation menu, record menu, record clear-all menu, operation count menu and communication menu. Finally press again to skip out the setup menu and go back to the target torque/angle screen. Long Press P/T mode menu Torque-unit-in-angle-operation menu Record menu Record clear-all menu Operation count menu Communication menu...
- Page 11 P/T MODE SELECTION Visit the P/T mode menu, press to select • the Peak-hold or Track mode of torque operation. Continuously pressing will skip setup menu • and go back to the target torque/angle screen. SELECT TORQUE UNIT IN ANGLE OPERATION Visit the torque-unit-in-angle-operation menu, • press or to select the torque unit during angle rotation. Continuously pressing will skip out the setup • menu and go back to the target torque/angle screen. In.lb. ft.lb. kg.cm DATA12, DATA14, DATA38 Rev. 02/15/12...
- Page 12 VIEW DATA RECORD Visit the record menu, press or to select the • Press to select data data number and view it. If no record exists, will be shown. • Continuously pressing will skip out the setup • menu and go back to the target torque/angle screen. Press to select data Abandon CLEAR A SINGLE RECORD Visit the record menu. • Press or to select the data number you • want to delete. Press twice to delete the current data. ( • will be shown) If press once, will be shown. If you • want to abandon this action , just press to skip this menu. Continuously pressing will skip out the setup •...
-
Page 13: Clear All Records
CLEAR ALL RECORDS Visit the record clear-all menu. • Press twice to delete the all record data. ( • will be shown) If press once, will be shown. If you • want to abandon, just press to skip this menu. Continuously pressing will skip the setup • menu and go back to the target torque/angle screen. Abandon VIEW OPERATION COUNTS Visit the operation counts, the operation counts • will be shown. Operation counting record counts every time the • adaptor has been used over 60% of maximum torque. This record is not erasable until re-calibration. The feature will count up to 65,000 measurements. • The following figure means the recorded count is • 10025. Continuously pressing will skip the setup menu • and go back to the target torque/angle screen. DATA12, DATA14, DATA38 Rev. -
Page 14: Maintenance And Storage
MAINTENANCE AND STORAGE ATTENTION: One-year periodic recalibration is necessary to maintain accuracy. Please contact your local dealer for calibration. CAUTION 1. Over-torque (110% of Max. torque range) could cause breakage or lose accuracy. 2. Do not shake violently or drop wrench. 3. Do not use this wrench as a hammer. 4. Do not leave this wrench in any place exposed to excessive heat, humidity, or direct sunlight. -
Page 15: Troubleshooting
TROUBLESHOOTING Error Codes for Angle Feature Torque Wrenches Error Code Cause Corrective Action Comments Applied torque exceeded 110% of Return torque wrench to repair center the maximum rated capacity of the for calibration. torque wrench. 1. Press the button to restart The torque wrench shut down If the torque wrench is the torque wrench - If this does not during angle mode. When in angle mode, it must work, then restarted, the torque wrench was be laying in the not laying horizontally. horizontal position (See note 1.) 2. - Page 16 NOTES Memory Prest Newton meters inch/pounds foot/pounds kilogram/centimeters angle Location # (N-m) (in - lb) (ft - lb) (kg -cm) (degree º) DATA12, DATA14, DATA38 Rev. 02/15/12...
- Page 17 DATA12, DATA14, DATA38 DATA12, DATA14, DATA38 Adaptador digital de torsión de ángulo Encaje 1/4", 3/8", 1/2" ESPECIFICACIONES ADVERTENCIA Rango de torsión 1/4" ......30 N-m / 22.12 libras-pie sieMpre Rango de torsión 3/8"...
-
Page 18: Especificaciones
ESPECIFICACIONES Notas de las página 1: *6: Prueba medioambiental: *1: La precisión de la lectura está garantizada desde 20% a. Calor seco al 100% de rango máximo + /- un (1) incremento. Para b. Frío mantener la precisión, calibre el adaptador a intervalos c. Calor húmedo regulares (1 año recomendado). d. Cambio de temperatura *2: La precisión del ángulo está garantizada a ±2° cuando e. Impacto (choque) se gira el adaptador hasta los 90° a una velocidad de... -
Page 19: Características Y Funciones
CARACTERíSTICAS Y FUNCIONES 1. Lámparas indicadoras DEL 5. Unidades 9. Botón de unidad/ajuste 12. Puerto de comunicación 2. Alarma/timbre 6.Modo de pico/rastreo 10. Botón de pre-ajustado (Uso por centros de servicio autorizados solamente) 3. Lectura de salida DCL 7. Número de memoria 11. Botón hacia arriba/Botón 13. Barra de extensión 4. Torsión/Valor de ángulo 8.Botón de encendido/borrado hacia abajo 14. -
Page 20: Apagado Automático
CERO-REAJUSTE DEL ESFUERZO DE TORSIÓN • Sujete el adaptador en la herramienta. • Presione suavemente para encender. • Auto reajuste a cero será procesado primero. • El adaptador iniciará en el modo de torsión o de ángulo. El modo el cual se iniciará depende del modo en cual el adaptador fue apagado la última vez. • En el modo de torsión, se mostrará una pantalla • Si el adaptador está moviéndose una y otra vez, el de torsión meta. reajuste a cero no parará. • En el modo de ángulo, después de varios segundos de reajuste del ángulo en cero, se mostrará... - Page 21 PRUEBA DE FERRETERíA • Para realizar un reajuste de ferretería, quite la batería y reinstálela. • Si el adaptador no funciona de manera normal, o si se muestra por favor pase por el proceso de reajuste para reiniciar el adaptador. AJUSTANDO LOS VALORES DE TORSIÓN INDICADOR DE BAJO VOLTAJE Si el voltaje de la batería es demasiado bajo, el calibrador desplegará un símbolo de batería y luego se apagará. muestra que el adaptador no funciona Reponga las baterías .
- Page 22 INICIO PASO 1: INSTALE EL ADAPTADOR Y ENCIÉNDALO EX. Seleccione unidades • Presione suavemente para encender. In.lb. In.lb ft.lb. Ft.lb PASO 2: NO APLIQUE FUERZA SOBRE EL ADAPTADOR PASO 3: LA TORSIÓN META PARA EL ÁNGULO SERÁ Kg.cm kg.cm º (Angle) TORSIÓN O ÁNGULO META SIN APLICAR FUERZA PASO 4: AJUSTE LA TORSIÓN O ÁNGULO META EX.
- Page 23 PASO 5: ADAPTADOR DE REAJUSTE A CERO • Presione para reajustar a cero el adaptador. (sugerido) • Consulte “ENCENDIDO Y RE-AJUSTE A CERO AUTOMÁTICO” y “REAJUSTE A CERO”. Presione PASO 6: REVISE MODO DE TORSIÓN P/T (Torsión solamente) • Consulte “MODO DE SELECCIÓN P/T” para ajustar el modo de operación P o T de la torsión.
- Page 24 PASO 8: QUÉ BUSCAR • Hay 12 lámparas DEL para indicar que la torsión o ángulo actual está alcanzando un 80%, 85%, 90%, 95%, 97.5% (indicación con DEL verde) y 100% 100% 97.5% (indicación con DEL roja) de la torsión/ángulo meta. • También hay un timbre para indicar el nivel de ((...((..))...)) sobre el 80% alcance del valor meta. El sonido intervalo indica que se hay logrado más allá del 80% y un sonido largo ((((((((..)))))))) sobre el 100% quiere decir que éste está alcanzando más allá del 100% del valor meta.
- Page 25 Valor del ángulo EX. Para un adaptador 30.00Nm, el 5% es de 1.5Mn • En el modo de ángulo, la pantalla LCD despliega el ángulo girado. Se cuenta el ángulo después que la No fuerza torsión de rotación ha estado logrando más del 5% de la máxima torsión clasificada. Ángulo Meta • Después de liberar la fuerza, la pantalla LCD muestra el máximo ángulo y la máxima torsión. (alternamente) 1.5 Nm Comience a contar el ángulo Aplique fuerza continuamente Lance la...
- Page 26 VISITE EL MENÚ DE INICIO • Desde la pantalla de torsión/ángulo meta, presione y sostenga para entrar al menú de inicio. Presione continuamente para visitar el menú de modo P/T, menú de operación de ángulo de la unidad de torsión, menús de grabado, menú de grabado de borrado de todo, el menú...
- Page 27 SELECCIÓN DE MODO P/T para • Visite el menú de modo P/T, presione seleccionar el modo de sujeción de pico o modo de rastreo de la operación de torsión. • Al presionar continuamente se saltará el menú de inicio y se volverá a la pantalla de torsión/ángulo meta. SELECCIONE LA OPERACIÓN DE DE UNIDAD EN ÁNGULO DE TORSIÓN Visite el menú...
- Page 28 VEA EL ARCHIVO DEL DATO • Visite el menú de grabar, presione o para Presione Para seleccionar datos seleccionar el número del dato y verlo. • Si no existe ningún archivo, se mostrará. • Al presionar continuamente se saltará al menú de inicio y se volverá a la pantalla de torsión/ángulo meta. Presione Para seleccionar datos Abandonar BORRE UN ARCHIVO SENCILLO • Visite el menú...
-
Page 29: Borrado De Todos Los Archivos
BORRADO DE TODOS LOS ARCHIVOS • Visite el menú de borrado de todos los archivos. • Presione dos veces para borrar todos los archivos de los datos. ( aparecerá) • Si se presiona una vez, aparecerá. Si se desea abandonar, sólo presione para saltar este menú. • Al presionar continuamente, se saltará el menú de inicio y volverá a la pantalla de torsión/ángulo meta. Abandon VEA CONTEO DE OPERACIÓN • Visite el conteo de operación, el conteo de operación... - Page 30 MANTENIMIENTO Y ALMANCENAMIENTO ATENCIÓN: Un recalibrado periódico de un año será necesario para mantener la precisión. Comuníquese por favor con su detallista local por el calibrado. PRECAUCIÓN La sobre torsión (110% del máximo rango de torsión) podría ocasionar roturas o perder la precisión.
-
Page 31: Diagnóstico De Averías
DIAGNÓSTICO DE AVERíAS Códigos de error para torquímetros con característica de ángulo Código de error Causa Acción correctiva Comentarios La torsión aplicada excede el Devuelva el torquímetro a un centro de 110% de la máxima capacidad reparaciones para el calibrado. nominal del torquímetro. - Page 32 NOTAS Preajuste de memoria Metros Newton Pulgadas/pie Libras/pie Kilogramo/centímetros ángulo Localización # (N-m) (in - lb) (ft - lb) (kg -cm) (grado º) DATA12, DATA14, DATA38 Rev. 02/15/12...
Need help?
Do you have a question about the Carlyle DATA12 and is the answer not in the manual?
Questions and answers