Table of Contents
Advertisement
Quick Links
P600
Owner's Manual
Use and Care
Troubleshooting
Warranty Information
Introduction ..................................................................... 2
Overview ......................................................................... 2
Components of lift system............................................... 3
Component List ............................................................... 4
Specifications .................................................................. 4
Cautions .......................................................................... 6
Turning the lift ON/OFF ............................................ 7
Raising/Lowering the lift ............................................ 8
Moving the lift along the track ................................... 9
Mounting the lift to the track ...................................... 10
Basics in transferring an individual ................................. 11
Charging the lift ............................................................... 14
Emergency lowering ....................................................... 15
Emergency stopping and shut off ................................... 15
Attaching the airline to the lift .......................................... 16
LCD display functionality ................................................ 17
Cleaning, disinfection, and sterilization......................18
Turning the hooks upwards.......................................18
Troubleshooting .............................................................. 19
General inspection and maintenance ............................. 20
Lift accessories ............................................................... 21
Service record history ..................................................... 22
Warranty ......................................................................... 26
Advertisement
Table of Contents

Subscribe to Our Youtube Channel
Related Manuals for Handicare PRISM MEDICAL P600


Summary of Contents for Handicare PRISM MEDICAL P600
-
Page 1: Table Of Contents
P600 Introduction ..............2 Overview ................. 2 Components of lift system..........3 Component List ............... 4 Specifications ..............4 Cautions ................6 Operation Turning the lift ON/OFF ..........7 Raising/Lowering the lift ..........8 Moving the lift along the track ........9 Mounting the lift to the track ........ -
Page 2: Introduction
CAUTION: DO NOT ATTEMPT TO USE THIS EQUIPMENT WITHOUT FIRST UNDERSTANDING THE CONTENTS OF THIS MANUAL. Introduction P-600 Before using this equipment, and to ensure the safe operation of your ft carefully read this entire Cautions P-600 manual, especially the section on “ ”. -
Page 3: Components Of Lift System
Components of the P-600 Lift system Track BATH Trolley eyelet BATHROOM TRACK #1 LIFT TRACK #2 Lift BEDROOM CUPBOARD Figure 1B - P-600 Lift mounted Figure 1A - Sample floor plan showing basic components of a portable ceiling lift system. onto track HAND CONTROL CARRY BAR... -
Page 4: Component List
Component List The following components are included with your new P-600 lift system: P-600 lift Pneumatic Hand Control • Lift Charger • Owner’s Manual • Warranty Card • SLINGS: If a sling has been supplied with the lift refer to the instructions included with the sling. ACCESSORIES: If additional accessories such as a turntable, or gate system, have been supplied with the lift refer to the instructions included with those items. - Page 5 NOTES: Please use the following type of plug for P-600 lifts installed in the UK: Please use the following type of plug for P-600 lifts installed in Australia. The P-600 lift shall be connected to a center-tapped single phase supply ...
-
Page 6: Cautions
Cautions P-600 ● must be installed prior to use. Contact your local authorized dealer to ensure that it is P-600 properly installed. The must be installed only by persons authorized by Prism Medical. ● Under no circumstance should the track, lift and sling (s) or entire system be put in control of a person who has not been properly trained in the use and care of this equipment. -
Page 7: Operation
Operation Caution: Always, before using the P-600 lift system, the lift, track and sling (s) must be visually checked for any unusual wear and tear. Refer to the user manual with each piece of supplied equipment to determine what should be checked. Should anything look unusual then contact your local dealer prior to use. -
Page 8: Raising/Lowering The Lift
Operation Raising/lowering the lift By pressing the DOWN arrow button, or the UP arrow button, the lift can be lowered or raised to the correct height for attaching the sling or positioning an indi- vidual. Refer to figure 5A and 5B It is recommended that the caregiver (operator) steady the lift with one hand when it is close to the individual DOWN... -
Page 9: Moving The Lift Along The Track
Moving the lift along the track The lift can be easily moved along the track by simply pushing it by hand. For ease of use it is recommended that the lift be first lowered to a comfortable height at which it can easily be pushed along the length of the track by hand. -
Page 10: Mounting The Lift To The Track
Mounting the lift to the track P-600 The first step in being able to use the lift is to mount it onto the trolley of the lift track. There are several ways of making this connection. Refer to figures 8A through to 11B to determine the type of ceiling connection that has been installed with the purchased system. -
Page 11: Basics In Transferring An Individual
Basics in transferring an individual Caution: The following steps are intended to generally describe the procedure involved in the lifting and transferring of an individual from one location to another using the lift, track and sling. Track con- figurations will vary by installation. The manual for the sling that was purchased with the lift should be reviewed in detail prior to attempt- ing these steps. - Page 12 Caution: Prior to lifting an individual make sure that the straps of the sling are securely placed on the carry bar hooks and that the straps will not come off . A)- Sling loop correctly posi- B)- During the preparation Figure 3 - Sling loop incor- tioned at the base of the for the patient transfer, the...
- Page 13 Basics in transferring an individual … continued Step 5) The individual may now be raised with the use of the UP button on the hand control or front panel but- ton. While lifting is in progress the height required in order for the transfer to be completed should be closely ob- served.
-
Page 14: Charging The Lift
Charging the lift The batteries of the lift should be charged on a regular basis. It is recommended that the lift be left on charge when not in operation, and at the end of each day. This will maximize the life cycle of the batteries. -
Page 15: Emergency Lowering
Emergency Lowering The DOWN blue button located on the front right side of the lift can be used to lower an individual should the hand control buttons fail. Refer to figure 14B. Should both DOWN arrow buttons on the hand control, and the DOWN button of the lift fail, the person may be lowered by pressing the RED emergency lowering button... -
Page 16: Attaching The Airline To The Lift
Attaching the airline tube to the lift Should the gray rubber airline that connects the lift to the hand control become disengaged from the front left side of the lift it must be re-connected in order for the lift to work properly. The rubber airline may become disconnected for the following reasons: 1) The lift is pulled along the track by the airline. -
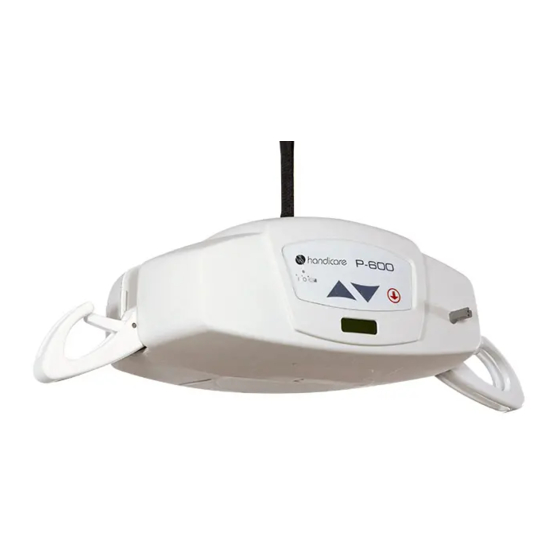
Page 17: Lcd Display Functionality
LCD Display Functionality Default Display Mode: The lift unit displays the battery charge level: 1. Battery Level (the factory setting for the Default Display Mode); or, 2. Indicates direction in which the lift is moving (UP/DOWN) In Battery Level Mode the lift will: 1. -
Page 18: Cleaning, Disinfection And Sterilization
LCD Display Functionality (Continued) If there is no load on the lift the display will show “DOWN LIMIT SWITCH” L i m _ Cleaning, Disinfection and Sterilization The exterior of the lift should only be cleaned, disinfected and sterilized using isopropyl alcohol. Damp a cloth with isopropyl alcohol and wipe down entire exterior of lift including strap and hook. -
Page 19: Troubleshooting
Trouble Shooting P-600 Should problems arise with the use of the lift review the following chart. Find the fault and complete the recommended solution. If the fault is not found and/or the solution does not correct the problem contact your local authorized dealer for service immediately. Fault Recommended Solution Refer to the section of this manual titled “Attaching the airline tube to the lift”. -
Page 20: General Inspection And Maintenance
General Inspection and Maintenance A) Each Use - To be completed by User P-600 Prior to each use the lift and associated track, accessories and sling (s), must be visually inspected. Refer to the accessory and sling user guides for specific details regarding their inspection. Should any of the these items fail the inspection do not use the lift Contact your local authorized dealer for service. -
Page 21: Lift Accessories
Lift Accessories P-600 The following is a list of available accessories for the lift. Items such as the track, turntables and brack- ets are installed at the time of purchase. Add-on pieces are available to after the initial purchase, however your local authorized dealer must be consulted as to suitability, purchase and installation. -
Page 22: Service Record History
Service Record History - Initial Information Complete the following section on Purchase and Service Information as soon as this equipment is installed. Use the service record history to record to any completed service and repairs. Ensure that the service record is signed and dated each time it is used. ... - Page 23 Service Record History Complete this section after each service, repair inspection and/ or maintenance. Photocopy additional pages as required. Date: _______________________ Time: ________________________ Service Type: □ Periodic Inspection □ Monthly Inspection □ 6 Month Inspection □ Repair □ Yearly Inspection □ Other:_________ _____________________________ _________________________ Completed By:...
- Page 24 Service Record History Complete this section after each service, repair inspection and/ or maintenance. Photocopy additional pages as required. Date: _______________________ Time: ________________________ Service Type: □ Periodic Inspection □ Monthly Inspection □ 6 Month Inspection □ Repair □ Yearly Inspection □ Other:_________ _____________________________ _________________________ Completed By:...
- Page 25 Service Record History Complete this section after each service, repair inspection and/ or maintenance. Photocopy additional pages as required. Date: _______________________ Time: ________________________ Service Type: □ Periodic Inspection □ Monthly Inspection □ 6 Month Inspection □ Repair □ Yearly Inspection □ Other:_________ _____________________________ _________________________ Completed By:...
-
Page 26: Warranty
Warranty This Warranty does not affect or in any way limit your Statutory Rights. 1. Prism Medical guarantees all equipment, which includes Ceiling Lifts, Floor Lifts, Slings, Service Parts and Track and accessories, supplied as new, against failure within the period of 1 year from date of installation or 18 months from date of manufacturing, whichever is shorter, by virtue of defects in material or workmanship.
Need help?
Do you have a question about the PRISM MEDICAL P600 and is the answer not in the manual?
Questions and answers