Table of Contents
Advertisement
Available languages
Available languages
Quick Links
10" SLIDING COMPOUND MITRE SAW
10" SLIDING COMPOUND MITRE SAW
Service à la clientèle / Customer service: 1-866-206-0888
Notre personnel du service à la clientèle est disponible pour vous aider.
Pour obtenir de l'aide pour le montage de votre produit, pour signaler des pièces endommagées ou manquantes, ou pour toute autre information à
propos de ce produit, veuillez composer notre numéro sans frais.
Our Customer service staff is available to help you.
For help with product assembly, to report damaged or missing parts, or for any other information about this product, please call our toll-free
number.
CONSERVEZ CE GUIDE
Conservez ce guide avec la facture d'origine dans un endroit sûr et sec pour référence future.
SAVE THIS MANUAL
Keep this manual and the original sales invoice in a safe, dry place for future reference.
COMBINÉE COULISSANTE 10 PO
COMBINÉE COULISSANTE 10 PO
Modèle / Model:
SCIE À ONGLETS
SCIE À ONGLETS
Manuel de l'utilisateur (p.2)
Operator's Manual (p.14)
68125139
CMS174
CMS174
Advertisement
Chapters
Table of Contents

Related Manuals for PRO-PULSE CMS174


Summary of Contents for PRO-PULSE CMS174
- Page 1 68125139 CMS174 Modèle / Model: SCIE À ONGLETS SCIE À ONGLETS COMBINÉE COULISSANTE 10 PO COMBINÉE COULISSANTE 10 PO Manuel de l’utilisateur (p.2) 10" SLIDING COMPOUND MITRE SAW 10" SLIDING COMPOUND MITRE SAW Operator’s Manual (p.14) Service à la clientèle / Customer service: 1-866-206-0888 Notre personnel du service à...
-
Page 2: Table Of Contents
Les cordons d‘alimentation endommagés augmentent les risques de choc électrique. 8. Lorsque vous utilisez un outil électrique à l‘extérieur, utilisez toujours une rallonge marquée « W-A » ou «W». Ces rallonges répondent aux normes pour utilisation à l’extérieur et réduisent les risques de choc électrique. CMS174... -
Page 3: Règles De Sécurité Importantes
RÈGLES DE SÉCURITÉ IMPORTANTES SÉCURITÉ PERSONNELLE 9. Demeurez alerte, regardez ce que vous faites et faites preuve de bon sens lorsque vous travaillez avec un outil électrique. N‘utilisez pas l‘outil lorsque vous êtes fatigué ou sous l‘emprise de drogues, de l‘alcool ou d‘un médicament. -
Page 4: Règles De Sécurité Pour La Scie À Onglets
à l’entretien peut créer un risque de choc électrique ou de blessures. RÈGLES DE SÉCURITÉ POUR LA SCIE À ONGLETS COUPEZ DU BOIS SEULEMENT. Votre scie PRO-PULSE a été conçue pour couper le bois seulement. -
Page 5: Liste Des Composantes
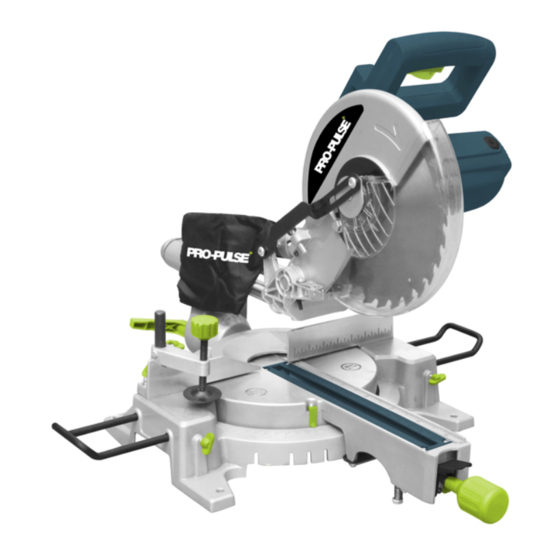
FIG.2 ASSEMBLAGE RETIREZ TOUTES LES PIÈCES DE LA BOÎTE Votre scie à onglets combinée coulissante PRO-PULSE est complètement assemblée dans la boîte, sauf les rallonges de table, le sac à poussières, support de scie arrière, et serre de retenue. Utilisez toujours les rallonges de table pour immobiliser le bois lors du sciage ... -
Page 6: Fonctionnement
Une fois que vous aurez sorti l’outil de sa boîte, lu les instructions, fixé l'outil à l’établi et vérifié que tous les accessoires sont correctement installés, vous pouvez utiliser votre scie. N’oubliez pas de porter les articles de protection appropriés. CMS174... - Page 7 FONCTIONNEMENT AVERTISSEMENT : Avant de brancher la scie, assurez-vous que sa gâchette est normale. Si le bouton de blocage n’est pas relâché, ne tirez pas sur la gâchette avec force : ceci pourrait sérieusement endommager l’interrupteur. N’OUBLIEZ PAS : Avant l’utilisation, relâchez le boulon d’arrêt et retirez la poignée de la position inférieure.
- Page 8 (1) pour régler la profondeur de coupe. Tournez la vis: Dans le sens horaire = coupe moins profonde Dans le sens antihoraire = coupe plus profonde Levier de butée 3. Après avoir terminé la coupe, remettez le levier de butée de profondeur à sa de profondeur position normale. CMS174...
-
Page 9: Entretien
ENTRETIEN REMARQUE : Bien que les angles soient marqués sur la scie, c’est toujours une bonne idée de les vérifier en effectuant une coupe d’essai. Voir la section "Réglage de l'angle d'onglet et de biseau" ci-dessous. Inspectez régulièrement le cordon et faites-le remplacer par le personnel d’un ... - Page 10 NE JAMAIS utiliser de la goupille transversale dans toute opération de coupe. La goupille transversale permet à l'opérateur de bloquer la lame de scie en position, empêchant la lame de scie de se relever et s'abaisser. (Voir. Fig 3 & 4) CMS174...
-
Page 11: Garantie P
POUR SERRER FIG.9 GARANTIE Merci d‘avoir acheté cet outil PRO-PULSE. Ces outils sont conçus pour répondre à des normes de qualité et sont garantis pour usage domestique contre tout défaut de fabrication pendant 12 mois suivant la date de l‘achat.Cette garantie n‘a aucune incidence sur vos droits prévus par la loi. -
Page 12: Liste Des Pièces
ATTENTION! Toutes les réparations doivent être exécutées par le personnel d’un centre de service autorisé. Si vous ouvrez cet outil, vous risquez d’annuler la garantie. REMARQUE: En raison de l'amélioration constante de nos produits, nous nous réservons le droit de modifier sans préavis les caractéristiques techniques de ce produit. CMS174... -
Page 13: Schéma
SCHÉMA / SCHEMATIC DRAWING... - Page 14 Dust collecting bag Spanner screw Knob WARNING: Repairs should be made by an authorized repair centre. Opening this tool could invalidate your warranty. NOTE: Due to continuous product improvement, we reserve the right to change the product specification without prior notice. CMS174...
- Page 15 TABLE OF CONTENTS p.13 SCHEMATIC DRAWING p.14 PARTS LIST p.15 IMPORTANT SAFETY INSTRUCTIONS p.16 SAFETY INSTRUCTIONS FOR COMPOUND MITRE SAW p.17 SPECIFICATIONS p.18 FUNCTIONAL DESCRIPTION p.18 ASSEMBLY p .19 OPERATION p.20 MAINTENANCE p.24 WARRANTY WARNING! Read and understand all instructions. Failure to follow all instructions listed below may result in serious personal injury.
-
Page 16: Important Safety Instructions
SAFETY INSTRUCTIONS FOR COMPOUND MITRE SAW USE THIS SAW TO CUT WOOD ONLY. The PRO-PULSE mitre saw is designed for woodcutting only. DAMAGED OR WARPED SAW BLADES should not be used. They are out of ... -
Page 17: Specifications
SAFETY INSTRUCTIONS FOR COMPOUND MITRE SAW REPLACE THE TABLE INSERT WHEN WORN. Excessive tear-out increases the likelihood of injury from flying debris. When setting the saw at a new angle, check that due to some mis-alignment, the blade does not cut into the table insert, rear fence, or another part of your saw. -
Page 18: Functional Description
FIG.2 ASSEMBLY REMOVE ALL THE PARTS FROM THE BOX Your PRO-PULSE CMS174 Sliding Compound Mitre Saw is fully assembled in the carton with the exception of the table extensions, dust bag, rear stabilizer stand, and hold-down clamp. When cutting long pieces of material, use the table side extensions. Slide the table side extensions into the holes at the left and right of the table. -
Page 19: Operation P
ASSEMBLY 2. Engage the spindle lock (V, fig.1 ) by pressing the pin located between the handle and the fixed guard. CAUTION: Never press the spindle lock pin while the saw is running! 3. Using protective gloves, rotate the blade by hand while pressing the pin until it engages a slot in the arbor. - Page 20 Note: at extreme positions, the hold-down clamp should be moved to the right side of the table to prevent it interfering with the movement of the cutting head. Always check before making the cut if there is any potential interference from the clamp or any other part of the machine. CMS174...
-
Page 21: Maintenance
OPERATION REMEMBER: When making sliding cuts, pull sliding head towards you to the end in the raised position. To start cut, lower sliding head down and into workpiece. Push sliding head towards fence through workpiece to complete cut. Slot Cut: To set the cutting depth of your saw blade, adjust the stop plate located on the sliding handle. - Page 22 When you have established the 45 degree stop correctly, tighten the lock nut down to hold the setting. d. Make sure that the needle points to 45 degrees on the scale. If not, loosen the screws and adjust the needle. CMS174...
- Page 23 “locked up” position only when changing saw blades. NEVER use the cross pin in any cutting operation. The cross pin CMS174 allows the operator to lock the saw blade in position, preventing the saw blade raised or lowered.(See. Fig 3&4) 4.
-
Page 24: Warranty
Then, remove the outer flange. (See. Fig.9) FIG.9 WARRANTY Thank you for investing in a PRO-PULSE power tool. These products have been made to quality standards and are guaranteed for domestic use against manufacturing faults for a period of 12 months from the date of purchase.
Need help?
Do you have a question about the CMS174 and is the answer not in the manual?
Questions and answers