
Related Manuals for Mitsubishi Electric P95DW-DC


Summary of Contents for Mitsubishi Electric P95DW-DC
- Page 1 DIGITAL MONOCHROME PRINTER MODEL P95DW-DC OPERATION MANUAL THIS OPERATION MANUAL IS IMPORTANT TO YOU. PLEASE READ IT BEFORE USING YOUR DIGITAL MONOCHROME PRINTER. DIGITAL MONOCHROME PRINTER...
- Page 3 CAUTION: Changes or modifications not expressly approved by the party responsible for compliance could void the user’s authority to operate the equipment. NOTE: This equipment has been tested and found to comply with the limits for a Class A digital device, pursuant to Part 15 of the FCC Rules. These limits are designed to provide reasonable protection against harmful interference when the equipment is operated in a commercial environment.
- Page 4 Indications according to IEC60601-1 1. Functions and intended usage of this product This product receives signals from diagnostic imaging equipment or a personal computer, and automatically prints and ejects the received image data on the thermal paper. 2. Classification of this product •...
- Page 5 CAUTION: DO NOT OPEN. TO REDUCE THE RISK OF INJURY OR BURNS, DO NOT REMOVE COVER (OR BACK). NO USER-SERVICEABLE PARTS INSIDE. REFER SERVICING TO QUALIFIED SERVICE PERSONNEL. The exclamation point within an equilateral triangle is intended to alert the user to the presence of important operating and maintenance (servicing) instructions in the literature accompanying the appliance.
- Page 6 Information for users and Annex IX, and/or to the directive 2006/66/ EC Article 20 Information for end-users and Annex II. Your MITSUBISHI ELECTRIC product is designed and manufactured with high quality materials and components which can be recycled and/or reused.
- Page 7 P95DW-DC. WARNING: The Model P95DW-DC should not be used adjacent to or stacked with other equipment and that if adjacent or stacked use is necessary, the Model P95DW-DC should be observed to verify normal operation in the configuration in which it will be used.
- Page 8 Guidance and manufacturer’s declaration - electromagnetic emissions The Model P95DW-DC is intended for use in the electromagnetic environment specified below. The customer or user of the Model P95DW-DC should assure that it is used in such an environment. Emissions test...
- Page 9 Guidance and manufacturer’s declaration - electromagnetic immunity The Model P95DW-DC is intended for use in the electromagnetic environment specified below. The customer or user of the Model P95DW-DC should assure that it is used in such an environment. Immunity test...
- Page 10 Recommended separation distances between portable and mobile RF communications equipment and the Model P95DW-DC The Model P95DW-DC is intended for use in an electromagnetic environment in which radiated RF disturbances are controlled. The customer or the user of the Model P95DW-DC can help prevent...
-
Page 11: Table Of Contents
CONTENTS CONTENTS ..............1 PRECAUTIONS ............. 2 - 4 FEATURES AND FUNCTIONS ....... 5 - 6 Front panel ..................5 Rear panel .................... 6 INSTALLATION OF PAPER ........7 - 8 PRINTING ............. 9 - 10 ADJUSTMENT OF PRINT PICTURE ....11 - 13 SETTING FUNCTION MODE ...... -
Page 12: Precautions
PRECAUTIONS In the interest of safety, please observe the following POWER REQUIREMENT precautions: This digital monochrome printer is designed for operation on 24 V DC. Never connect to any outlet or power supply having a different voltage. PROTECTIVE MEASURES IF ABNORMALITIES ARISE, . . . DO NOT REMOVE THE CABINET Use of the unit during emission of smoke or abnormal Touching internal parts is dangerous or may lead to... - Page 13 FOR LONG OPERATING LIFE UNSUITABLE MATERIALS FOR THE UNIT WHEN A DEFECT IS FOUND Many plastic components are used in the unit. If you detect smoke or other smell from the unit, stop the Coat flaking and deformation are likely to occur if the power supply immediately and ask the agent for repair.
- Page 14 INTENDED USE The digital monochrome printer P95DW-DC is intended for use as a hard copy device for an image generated by a diagnostic imaging equipment. This product is intended to be integrated into a system such as CT, MRT, and ultrasound equipment and...
-
Page 15: Features And Functions
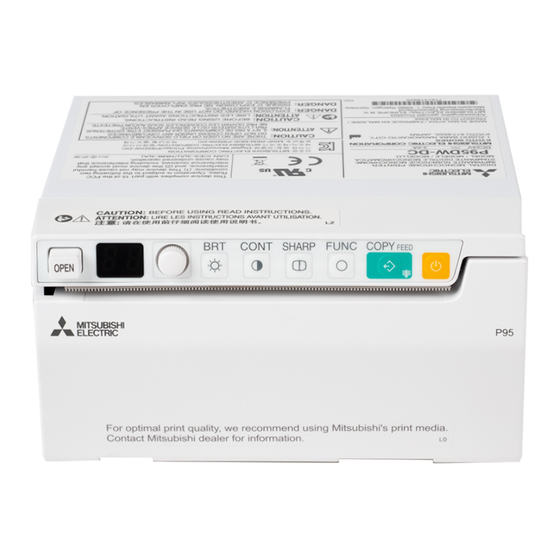
FEATURES AND FUNCTIONS Front panel OPEN button COPY/FEED button Press to open the door. Button to print additional copies of previous print-out. Holding down this Indicator button for two seconds or longer will feed Displays printer status. See pages 9, 12, the paper. -
Page 16: Rear Panel
Rear panel USB terminal Connects to the device equipped with a USB interface. -
Page 17: Installation Of Paper
INSTALLATION OF PAPER Moisture, fingerprints or dust on the Pull out the paper end. paper surface may cause a noise at printing or deterioration in print • Pull out the first 15- quality. Follow the procedure to 20cm (6 in. - 9 in.) prevent fingerprint or dust on the of the paper to paper surface. - Page 18 When setting the paper, observe the following precautions to prevent paper jam. Do not use defective paper. Do not use bent or wrinkled paper. INCORRECT Adjust the paper position correctly. When the paper is fed out skewed from the print exit, adjust the paper position so that it is fed out straight.
-
Page 19: Printing
PRINTING Printing method Turn on the power. Cut the printed paper. • Press the • Cut the printed button paper with the on the front cutter by panel to tearing off the turn on the paper in the power. upper right direction. - Page 20 Cancel of copy printing When the COPY/FEED button is held down for two seconds or longer during copy printing, the copy printing is cancelled upon completion of the current copy. Paper feeding To advance the paper, hold down the COPY/FEED button on the front panel for two seconds or longer while the printer is in other mode than copy printing.
-
Page 21: Adjustment Of Print Picture
ADJUSTMENT OF PRINT PICTURE Adjustment of printer brightness, contrast and sharpness You can make fine adjustment of brightness, contrast and sharpness of the picture to be printed. Control panel • For adjustment, use the BRT “ ”, CONT “ ” or SHARP “ ”... - Page 22 Change the setting. Store the set value. • Turn the dial clockwise Press the (BRT, CONT, or SHARP) to increase the value. button again. The value is memorized and the indicator goes off. The memorized value will not be lost even when the power is turned off.
- Page 23 Automatic restoration to the standby status from the adjustment or setting mode Whenever the front dial and buttons are untouched for more than 20 seconds during adjustment, the printer automatically returns to the standby status (Indicator display : In this case, the new value is not memorized and the setting goes back to the previous value.
-
Page 24: Setting Function Mode
SETTING FUNCTION MODE Function mode In this mode, the initial value setting of each function can be changed. Each time the FUNC button is pressed, the mode is switched as follows. Functions Stand-by status Print size setting Gamma curve setting Adjustment dial lock setting Indicator brightness setting Setting the function mode... - Page 25 Print size setting Indicator Purpose and description • You can select the print size. Images are printed in the size selected by the printer driver. Images are printed in 1275 x 1700 pixels when an image size of 1280 x 960 pixels or less is selected by the printer driver.
- Page 26 Indicator brightness setting Indicator Purpose and description • Brightness of the indicator. The brightness of the indicator decreases. Bright The brightness of the indicator increases.
-
Page 27: Error Display
ERROR DISPLAY In case of an error during operation, you will hear an alarm tone or will see the indicator flashes. Cause/Error display Symptom/Remedy [Symptom] Overheat • When the head gets overheated, the indicator display blinks. When overheat occurs while more than one copy is being processed, printing starts as soon as the error is solved. - Page 28 Cause/Error display Symptom/Remedy Button input [Symptom] error • An alarm tone is heard once in the following cases. • The indicator displays “ ” for one second and the button operation becomes invalid. • During adjusting the printer brightness or the printer contrast, the adjustment dial exceeded the upper limit value (indicator : ) or the lower limit value (indicator : •...
- Page 29 Cause/Error display Symptom/Remedy [Symptom] Gear lock error • When the thermal head does not automatically go down at the start of printing or paper feeding, an alarm tone is heard. • When the thermal head does not automatically go up at the end of printing or paper feeding, an alarm tone is heard.
- Page 30 Cause/Error display Symptom/Remedy Head [Symptom] temperature • When the printer fails to detect the head temperature, an alarm error tone is heard. The indicator displays “ .” • Until the head temperature error is corrected, all the buttons and dial except for the button do not work.
-
Page 31: Status And Modes
STATUS AND MODES Set state/Mode Indicator Contents of indicator Power off Power off Stand-by During data receiving During data receiving Remaining number of copies / number of copies 1 to 99 Print state 100 to 199 Continuous copy printing Printer brightness mode Fine adjustment of the picture brightness Printer contrast mode Fine adjustment of the picture contrast... -
Page 32: Use Of Cleaning Sheet
USE OF CLEANING SHEET When the thermal head is dirty with dust, etc., white spots or stripes may appear on the print. In this case, clean the thermal head by the following procedure BY USING THE SUPPLIED CLEANING SHEET. Turn on the power. Close the door. -
Page 33: Maintenance
MAINTENANCE Turn off the power for maintenance. Maintenance of main unit Wipe off stains of the front panel with a soft cloth. When the panel is heavily stained, wipe with a cloth moistened with neutral cleanser diluted by water and finish with a dry cloth. Maintenance of rubber roller When the rubber roller is dirty with dust, etc., a blank spot may appear on the print. -
Page 34: Specifications
SPECIFICATIONS Product name: Digital Monochrome Printer Model: P95DW-DC Power supply and power consumption: 24 V DC, 3.5 A Connection terminal: USB interface (Series “B” receptacle) Hi-Speed USB (Ver. 2.0) supported Resolution: 1280 x 960 pixels (Standard) (Max. 1280 x 5760 pixels) - Page 35 MITSUBISHI ELECTRIC US, INC. Visual and Imaging Systems 5900-A Katella Ave. Cypress, CA 90630-5019, U.S.A. Phone +1 (714) 220-2500 US Office Main (888) 307-0388 Product Information Within USA (888) 307-0309 Product Support Within USA MITSUBISHI ELECTRIC EUROPE B.V. German Branch Mitsubishi-Electric-Platz 1, 40882 Ratingen, Germany Phone +49 (2102) 486-9250 FAX +49 (2102) 486-7320 UK Branch Travellers Lane, Hatfield, Herts. AL10 8XB, England, U.K. Phone +44 (0) 1707 276100...
Need help?
Do you have a question about the P95DW-DC and is the answer not in the manual?
Questions and answers