Table of Contents
Advertisement
Quick Links
Advertisement
Table of Contents

Summary of Contents for ZeeVee ZyPerPad
- Page 1 ZyPerPad IP ENABLED KEYPAD CONTROLLER User Guide Updated October 6, 2021...
-
Page 2: Table Of Contents
ZyPerPad User Guide Table of Contents System Description Package Contents Panel Layout Factory Reset Accessing the Web User Interface Device Settings - IP Control Device Settings - RS232 Control Command Settings - IP Commands Command Settings - RS232 Commands Key Settings... -
Page 3: System Description
The ZyPerPad is also capable of sending RS232 communications to other control devices for things such as AV equipment, lights, shades etc.. The IP feature of the ZyPerPad can we used with IP devices besides the ZMP. Examples include AVPro Edge Matrix’s and ClearOne DSPs. (Functionality not guaranteed for non ZMP devices) Package Contents ... -
Page 4: Panel Layout
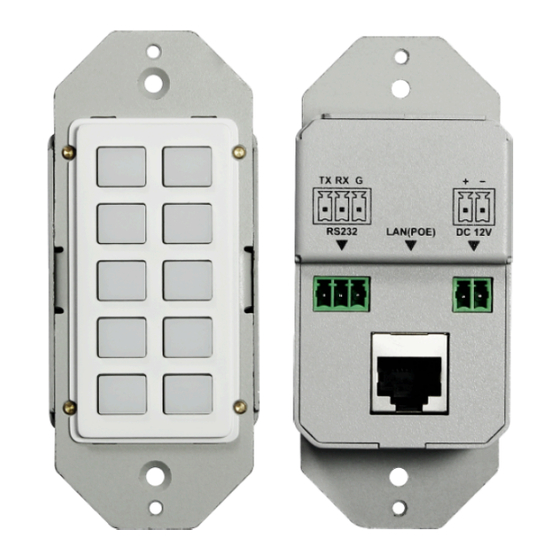
ZyPerPad User Guide Panel Layout Number Name Description Buttons Ten buttons on front panel. Buttons are not defined by default. Configure buttons through the web user interface. RS232 Connect to RS232 enabled device for RS232. (Not used with ZyPer Management Platform) LAN (PoE) Connect to an Ethernet switch. -
Page 5: Factory Reset
ZyPerPad and configure commands for the buttons. The Web UI can be accessed via a browser such as Chrome, Firefox or Safari. 1. Connect the LAN (PoE) port of the ZyPerPad to an Ethernet switch using a Cat5e cable or better. - Page 6 ZyPerPad User Guide 6. Entering the Username and Password will take you to the main page of the User Interface. The main page includes six submenus. Key Settings, Command Settings, Device Settings, Group Settings, Network Settings and System Settings. Rev 20211006...
-
Page 7: Device Settings - Ip Control
Network Settings is used to configure DHCP/Static IP information System Settings is used to configure general system settings and perform system updates. Device Settings - IP Control This section allows you to configure the ZyPerPad to talk to the ZyPer Management Platform (ZMP) Rev 20211006 Page... -
Page 8: Device Settings - Rs232 Control
This example is for the ZyPer Management Platform. Note the IP Address is the address of the ZyPer Management Platform (ZMP) on the network. (Subnet mask is the same as the ZyPerPad unit itself) Be sure to put in port number 23. - Page 9 ZyPerPad User Guide With RS232 there is no concept of IP address, just setup the appropriate serial settings for baud rate, parity, data bits and stop bits. An example is shown below: Rev 20211006 Page...
-
Page 10: Command Settings - Ip Commands
ZyPerPad User Guide Important Note: Be sure to connect the TX and RX lines between the ZyPerPad and target device correctly. TX on ZyPerPad to RX on target device and vice versa. Command Settings - IP Commands This is where you will create the ZyPer Management Platform (ZMP) API commands that will eventually be assigned to the buttons. - Page 11 ZyPerPad User Guide Click on any of the Edit buttons to create a command that will later be assigned to a button. Assign a short description of the command to Command Name. (Note: Limited to 24 characters) Set HEX String Enable to String.
-
Page 12: Command Settings - Rs232 Commands
ZyPerPad User Guide The example above with the name “Channel Up” is for the API command “channel up UHDdec2” Be sure to Save any commands that you create. The Remove button can be used to delete any commands you have already created. - Page 13 ZyPerPad User Guide Click on any of the Edit buttons to create a command that will later be assigned to a button. Note that RS232 communications can be either in Text String or HEX format. When using HEX the bytes must be separated by a space character.
-
Page 14: Key Settings
ZyPerPad User Guide Key Settings After the Command Settings is configured successfully, click on Key Settings to configured commands for each keypad button. Each button can be assigned with up to 6 commands that would execute sequentially. (Not needed with ZMP as the Preset command can be used to create an unlimited series of commands if desired.) - Page 15 ZyPerPad User Guide Now click on the Edit button for the top line in the table. This will bring up the Device List shown below. Click the ZMP or other controller button. (Created earlier) This will bring up the Command Destination box to allow you to select any of the commands you previously created be used when the button is pushed.
-
Page 16: Group Settings
ZyPerPad User Guide Repeat the process for all desired buttons. Note that not all buttons need to be programmed. Also multiple buttons can be programmed with the same commands. Group Settings Group Settings is available to group the buttons according to the relationship and functions of commands configured to the buttons. - Page 17 ZyPerPad User Guide The buttons have 3 different options for how the LEDs will function. A. Independent and Reserve. Each button assigned this function is independent and the LED of the buttons in this group will blink and then extinguish after pressing them.
-
Page 18: Network Settings
Note that you will also need to change the pointer in your browser to the new updated IP Address. DHCP should be reserved for advanced users that will know how to find the ZyPerPad unit after it is assigned a new IP address by the DHCP server. -
Page 19: System Settings
ZyPerPad User Guide System Settings The System Settings tab allows to perform such functions as settings a new admin password, selecting preferred language, settings a web UI timeout, save the current configuration to a binary file, restore a saved configuration, reset the unit to factory defaults, reboot the unit and perform web UI and MCU upgrades. -
Page 20: Using The Programmed Keypad
Note: Restoring configuration will cause the ZyPerPad to reboot. 5. Reset to Default will factory reset the unit. 6. Reboot the Unit will reboot the unit. (Note: All 10 buttons on the ZyPerPad will flash 3 times during a reboot) 7. -
Page 21: Specifications
ZyPerPad User Guide Specifications Feature Specification Ports and Buttons Front Panel: 10 x Button Rear Panel: 1 x LAN (RJ45, PoE) 1 x RS232, 1 x DC 12V Power In Operating Temperature 0°C to 45°C (32°F to 113°F) Storage Temperature -20°C to 70°C (-4°F to 158°F) -
Page 22: Label Specifications
ZyPerPad User Guide Label Specifications The ZyPerPad unit includes 1 sheet of pre- printed labels that can be applied to the individual buttons. Labels shown on right. Label Dimensions: 8.6mm horizontal 6.6mm vertical 0.4mm thick Material: 3M 9448A Double Coated Tissue Tape Certifications and Warranty... -
Page 23: Part Number
ZyPerPad User Guide Part Number Part Number Short Description Long Description 10-button IP enabled keypad controller provide a ZYPERPAD 10x Button Interface simple means of sending commands to the ZyPer Management Platform (ZMP). With built-in PoE, it can receive power from an PoE enabled ethernet switch. -
Page 24: Frequently Asked Questions
ZyPerPad User Guide Frequently Asked Questions Question: Can I just leave the ZyPerPad connected to power (PoE or 12V) indefinitely? Answer: Yes you can Question: Can multiple ZyPerPad units be connected to the same system? Answer: Yes you can have as many ZyPerPad units as you want. -
Page 25: Appendix
ZyPerPad User Guide Appendix The ZyPerPad unit can be used with IP devices other than the ZyPer Management Platform. (Note that functionality with devices other than the ZyPer Management Platform is not guaranteed.) IP devices other than the ZMP may have different login requirements in terms of a Username and Password. -
Page 26: Disclaimers
ZeeVee hardware designs are property of ZeeVee. Components, sub-assemblies, and methods utilized in the designs are free of any encumbrances or appropriate licenses and rights have been obtained by ZeeVee for the use in the described products in the intended manner.
Need help?
Do you have a question about the ZyPerPad and is the answer not in the manual?
Questions and answers