Table of Contents
Advertisement
Quick Links
Advertisement
Table of Contents

Related Manuals for COMPASS HEALTH Richmar DQAPT


Summary of Contents for COMPASS HEALTH Richmar DQAPT
-
Page 3: Table Of Contents
TABLE OF CONTENT Foreword ....................3 Operator Qualifications ............... 3 Operator Training ................4 Product Description ................5 Safety Instructions ................6 Symbols ....................6 Precautionary Definitions ..............8 Warnings and Cautions ............... 9 FCC ....................13 ® Bluetooth ..................14 EMC Guidance.................. - Page 4 System Setting .................. 34 Arm Training ..................35 Leg Training ..................46 Spasm Control................... 47 Emergency Stop ................47 Fine Motor Training ................48 Pause and End of Training ..............50 Training Data Summary ..............50 Favorites Interface ................51 Training Date Export .................
-
Page 5: Foreword
Specifications put fifth in this manual were in effect at the time of publication. However, owing to policy of continual improvement by Compass Health Brands, Corp., any changes to these specifications may be made at any time without obligation on the part of Compass Health Brands, Corp. -
Page 6: Operator Training
Further training requirements vary from country to country. It is the operator’s responsibility to ensure that the training meets the requirements of all applicable local laws and regulations. Other information about training in the operation of this system can be obtained from Compass Health Brands, Corp. -
Page 7: Product Description
Product Description DQAPT is a rehabilitative training device that suitable for the active and passive movement of a person’s lower and upper extremities. It has four training modes (STRENGTH, ENDURANCE, SYMMETRY and ROM training mode) and spasm control function. The device can connect the heart rate sensor via Bluetooth to real-time display heart rate during training. -
Page 8: Safety Instructions
Safety Instructions Symbols 1. Symbols on the medical device Symbols Explanation Manufacturer Date of manufacture Correct Disposal of This Product (Waste Electrical & Electronic Equipment) Statement: Contact the local authorities to determine the proper method of disposal of potentially bio-hazardous parts and accessories. - Page 9 2. Symbols on the package Symbols Explanation This side up The transportation package must be vertical and straight up during transportation. Fragile, handle with care The product inside the packaging could be easily damaged if dropped or handled without care and attention.
-
Page 10: Precautionary Definitions
Precautionary Definitions The precautionary instructions found in this section and throughout this manual are indicated by specific symbols. Understand these symbols and their definitions before operating this equipment. The definition of these symbols is as follows: Text with a “CAUTION” indicator will explain possible safety infractions that could have the potential to cause minor to moderate injury or damage to equipment. -
Page 11: Warnings And Cautions
Warnings and Cautions Please read carefully the user manual before using DQAPT and take care of what follows: Read, understand, and practice the precautionary operating instructions. Know the limitations and hazards associated with using the DQAPT. Observe the precautionary and operational decals placed on the unit. - Page 12 Do not use in the following circumstance: the mixture of the flammable anesthetic gas and air; the mixture of the flammable anesthetic gas and oxygen or nitrous oxide, or other flammable agents. In case of display failure or other obvious defects, switch the device off immediately, and notify a certified service technician.
- Page 13 During the process of operation, constantly watch patients and instrument case, always pay attention to whether the abnormal conditions occur. Please pull the plug before move the device and try to avoid vibration during moving the device. If the device has not been used for a long time (≥2 weeks), please check and make sure the device and accessories are in good conditions before use.
- Page 14 and scarves that could get caught or tangled in pedal crank must not be worn (especially during leg training). Shoes with shoe laces must not be worn, either. Before starting leg training, the arm trainer has to be swiveled back so that the patient can hold on the handlebar.
-
Page 15: Fcc
Please dispose of the equipment and other accessories according to local regulations. Changes or modifications not expressly approved by the party responsible for compliance could void the user’s authority to operate the equipment. This equipment has been tested and found to comply with the limits for a Class B digital device, pursuant to Part 15 of the FCC Rules. -
Page 16: Bluetooth
® The Bluetooth word mark and logos are owned by the Bluetooth SIG, Inc. and any use of such marks by Compass Health Brands, Corp. is under license. Communication between the device and the heart rate sensor is via Bluetooth. -
Page 17: Emc Guidance
EMC Guidance The DQAPT needs special precautions regarding EMC and needs to be installed and put into service according to the EMC information provided. This device has been thoroughly tested and inspected to assure proper performance and operation. Do not use the DQAPT simultaneously with other therapeutic device (such as microwave), to avoid mis-operation. - Page 18 Cable Information: Item Cable Length Manufacturer Power cord 2.5 m Ching Cheng Wire Material Co., Ltd. Guidance and manufacture’s declaration – electromagnetic emission The DQAPT is intended for use in the electromagnetic environment specified below. The customer of the user of the DQAPT should assure that it is used in such an environment.
- Page 19 Guidance and manufacture’s declaration – electromagnetic immunity The DQAPT is intended for use in the electromagnetic environment specified below. The customer or the user of DQAPT should assure that it is used in such an environment. Electromagnetic Immunity IEC 60601 Compliance environment - test...
- Page 20 s and ° ,225° ,270° ° ,225° ,270° hospital environment. If voltage and 315° ) and 315° ) the user of the DQAPT variations requires continued on power 0% U 0% U operation during power supply cycle and cycle and mains interruptions, it is input lines 70% U...
- Page 21 Guidance and manufacture’s declaration – electromagnetic immunity (Continued) The DQAPT is intended for use in the electromagnetic environment specified below. The customer or the user of LGT- DQAPT should assure that it is used in such an environment. Electromagnetic IEC 60601 test Compliance Immunity test environment -...
- Page 22 Table: Test specifications for ENCLOSURE PORT IMMUNITY to RF wireless communications equipment Immunity Maximum Test Distance TEST Band power frequency Service Modulation LEVEL (MHz) (MHz) (V/m) 380 to TETRA 400 Pulse Modulation 18Hz 430 to GMRS 460, ± 5 Hz FRS 460 deviation 1 kHz sine...
- Page 23 5240 5100 to WLAN Pulse 5500 5800 802.11 Modulation 5785 217 Hz NOTE: a) For some services, only the uplink frequencies are included. b) The carrier shall be modulated using a 50 % duty cycle square wave signal. c) As an alternative to FM modulation, 50 % pulse modulation at 18 Hz may be used because while it does not represent actual modulation, it would be worst case.
-
Page 24: Clinical Instructions
Clinical Instructions Indications Before a training with the Active Passive Trainer for Upper and Lower Limbs, a correct examination and diagnosis should be performed. Please stay current with the latest developments and medical publications on Active Passive Training for details on contraindications and side effects not known at the time of manufacturing. -
Page 25: Adverse Effects
10) Limbs need to be braked; 11) Mental disorder; 12) Other patients that doctors think not suitable use this device. Adverse Effects You should stop using the device and consult your doctor if you experience adverse reactions from the device. Possible adverse reactions may include the following: ... -
Page 26: Technical Specifications
Technical Specifications General Product Name APT Performer Product Model DQAPT Dimensions (W×L×H) 710×760×1072 mm (28×30×42 inch) Standard Weight 45.7 kg (102 lbs) Interface 8" touch screen Safe Working Load UE pedals (total) 5 kg (11 lbs) LE pedals (total) 10 kg (22 lbs) Handlebar 20 kg (44 lbs) Adjustable Range... - Page 27 Spasm Relief Rate Timer (duration time) 1-60 min Electrical Power Supply AC100-240V, 50-60Hz Rated Power 160 VA Mode of Operation Continuous System of Protection Class I, Type B Applied Part Ingress Protection IPX0 F2AL250V (Ф5×20mm) Fuse (Main part) Operation and Storage Condition ...
-
Page 28: Working Principle
Working Principle User Interface Speed detection (PWM) Motor drive Arm motor Resistance Leg motor detection Speed detection... -
Page 29: Inspection Of The Goods
Inspection of the Goods Unpacking the Unit The unit is generally delivered with the packaging material supplied by the manufacturer. Proceed as follows: Position the transport packaging so that the arrows are pointing upward. Remove the transport packaging upward. ... - Page 30 Item Name Amounts Unit Anti-tipper wheelchair hook piece Fuses pieces Certificate of quality piece Warranty card piece User manual piece Other parts of DQAPT are available as accessory on demand. Visit website www.compasshealthbrands.com to obtain more information.
-
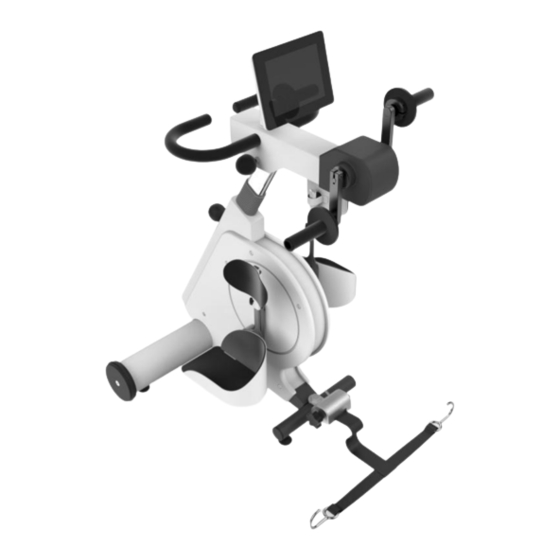
Page 31: Overview Of The Unit
Overview of the Unit Nomenclature Control system LCD Display (Capacitive touch screen) A Host Emergency stop switch USB port: connect with USB flash disk for software update and training data export Upper limb turntable B Arm trainer UE pedal (Upper extremity pedal) C Leg trainer Calf support... -
Page 32: Accessories
LE pedal (Leg extremity pedal) Lower limb turntable Handlebar Locking screw knob: for adjusting Arm trainer direction Locking screw knob: for adjusting trainer height Supporting module D Main structure Pedestal: transport wheels Power switch, power socket and fuse Leveling glides: rotate to adjust the table balance Anti-tipper wheelchair hook Accessories... - Page 33 2. UE pedals with forearm support (optional) Hand Grip Connection part with Arm trainer Snap: fix UE pedal to the Arm trainer Adjustment Knob: adjust the position of grip Please purchase the accessories from Compass Health Brands, Corp.
-
Page 34: Interface Introduce
Interface Introduce Self-inspection Insert the power supply; turn on the switch button in the pedestal of the machine, the system will enter into self-inspection interface. The device performs a self-check when it is turned on. DO NOT approach the movement area of the ARM and LEG trainer of the device. -
Page 35: Main Menu Interface
Main Menu Interface A few seconds, the main menu interface appears on. Item Description Indicate that the unit has connected with Bluetooth icon the Heart Rate Sensor. Indicate that the USB flash disk has been USB icon inserted into the unit and recognized. See Training Date Export as details. -
Page 36: System Setting
Item Description Press into FINE MOTOR TRAINING FINE MOTOR TRAINING interface. See Fine Motor Training as details. Press into FAVORITES interface. See FAVORITES Favorites Interface as details. Press into SYSTEM SETTINGS interface. SYSTEM SETTINGS See System Setting as details. System Setting Press SYSTEM SETTINS in the MAIN MENU to enter this interface, the default training parameters can be reset here. -
Page 37: Arm Training
Table 1: System Settings Parameters Range Step Defaults DEFAULT RPM (r/min) 5-60 1 or 10 DEFAULT DURATION (min) 1-60 1 or 10 DEFAULT RESISTANCE 0-24 1 or 6 DEFAULT GAME DIFFICULTY 1 or 2 DEFAULT SPASM LEVEL 1 or 2 DEFAULT SPASM RELIEF RATE 1 or 2 DEFAULT MILEAGE GOAL (mile) - Page 38 1. Strength Training STRENGTH training is a mode that system can automatically switch between active mode and passive mode according to the patient's training situation. It is designed to motivate the patient to move actively and try to maintain the state of active movement. Press Information icon to view more application information about this training mode.
- Page 39 NOTE: The number/letter in the frame changes blue, indicating that you have selected the item. STEP 3 : Start Training After you have set the training parameters, press START button to start the training. If the speed is set to 30 r/min or above, a prompt will appear on the interface, prompting whether to set the speed to this value, you can press YES to start the training, or press NO to return to the previous interface.
- Page 40 STEP 4 : During Training Status and Operation Bar Item Description Real time display the remaining time of set Remaining Time duration time Real time display the actual rotation speed Rotate Speed when it is greater than the set value Heart Rate Real time display heart rate value Status of Active/Passive...
- Page 41 Item Description Press to change the rotation direction Change Direction Press to pause the training, enter into setup PAUSE interface, which you can adjust the training parameters. STOP Press to stop the training NOTE: The heart rate monitoring value is for reference only. If the heart rate sensor is not connected, the heart rate value is displayed 0.
- Page 42 Passive Mode Active Mode...
- Page 43 Adjust the Training Parameters during Training During the training, if you need to change the training parameters, please press PAUSE button, than the system will go to the ARM STRENGTH TRAINING setup interface as picture follows. Adjust the parameters then press RESUM button to start again. 2.
- Page 44 different. In ENDURANCE training game, resistance will decrease when the hungry fish approach, the patient should cycle the pedals faster than the set speed to swim up and over the hungry fish. Press Information icon to view more application information about this training mode.
- Page 45 STEP 1 : Enter the ARM SYMMETRY training mode STEP 2 : Setting ARM SYMMETRY training parameters You can set the training parameters as the picture shows. STEP 3 : Start Training After you have set the training parameters, press START button to start the training.
- Page 46 STEP 4 : During Training The horizontal bar chart and percentage value shows the relative muscle strength level of the left and right side of the patient during active training.
- Page 47 4. Arm ROM Training The ROM TRAINING, short for range of motion training, is a passive training mode that uses the motor to cycle the pedals, helps to increase the range of movement in a joint and to prevent contractures. Press Information icon to view more application information about this training mode.
-
Page 48: Leg Training
Leg Training Press LEG TRAINING in the MAIN MENU to enter this interface. The mode of the Leg Training is the same as that of the Arm Training. -
Page 49: Spasm Control
Spasm Control When you get a spasm during passive training, the trainer can identify spasms and prompt "spasm" on the screen with sound prompt. When the spasm protection is activated, the speed of the motor slows down to zero and then change the rotation direction, slowly increased to the original speed to relieve spasm. -
Page 50: Fine Motor Training
The device performs a self-check when release emergency stop. DO NOT approach the movement area of the ARM and LEG trainer of the device. Fine Motor Training The FINE MOTOR TRAINING mode is for only upper excises training to help the patient with cognitive and functional movements using hand, eye coordination. - Page 51 Read the game tips and tell the patient how to train, then press OK button to start training.
-
Page 52: Pause And End Of Training
Pause and End of Training During the training, if you need to pause the training, please press PAUSE button, if you need to stop the training, please press STOP button. At the end of training, the buzzer will beep, and the sound will stop automatically after three times. -
Page 53: Favorites Interface
Favorites Interface Press Favorites button on the MAIN MENU to enter the favorites interface. The system can store up to 99 collections. 1. How to Save a Favorite? When the training is finish, the training summary interface appears. Press the SAVE PARAMETERS AS FAVORITE button on the lower right corner of the screen, enter the favorite storage page. - Page 54 2. How to Delete a Favorite? In the Favorites Interface, Choose the favorite you want to remove, the favorite name becomes blue, press DELETE button, a confirmation prompt will appear, press OK button to delete. 3. Start Training from the Favorite Interface In the favorite interface, select the desired favorite and press the SELECT button, the system jumps to the setup interface of the training mode, as following picture shows.
-
Page 55: Training Date Export
Training Date Export The system is equipped a training data export function. How to Export Training Data? In the training summary interface, or before the start of each training program, insert a USB flash disk (FAT32 format) into the USB port, the icon will appear on the upper right corner of the screen, when the icon changes to... -
Page 56: Operation Guidance
Operation Guidance Preparation before Training Make sure the trainer is in a stable place. Connect the power cord: connect the male end of the power supply cord to an appropriate electrical outlet, and connect the female end of the power supply cord into the socket on the unit. Press the Power switch to start the unit. -
Page 57: Secure Patient Position And Adjust Trainer
Please use the specified heart rate sensor (Polar H10, manufactured by Polar Electro Oy). Secure Patient Position and Adjust Trainer 1. Securing patient position The patient should sit in the center of the wheelchair or chair, at a proper distance from the device. - Page 58 through the big screw knob beside the handlebar to fit the patient's training. 4. Adjusting calf support (Leg training) The calf support helps the patient to protect his legs. Use the knob to adjust the height of the calf support so that it can fit the calf. 5.
- Page 59 Only put patient’s feet into the LE pedals while seated. Do not put patient’s feet into the LE pedals while standing. Hands are not allowed into the LE pedals. 6. Fixing hands (Arm training) Use hand straps Fix the patient's upper limbs with hand straps. The specific operation is shown in figure below.
-
Page 60: Interface Operation And Parameter Settings
Interface Operation and Parameter Settings See Chapter Interface Introduce for details. End of Training At the end of training, there is a buzzer beep, and the sound is automatically stopped after three beeps. The trainer will stop training automatically and display the summary of training data. The... - Page 61 data will be cleared when exit this interface. If you want to save the data, please refer to How to Export Training Data? as details. Turn off the power and unplug the power cord. Release the hand / foot straps and remove both hands / feet from the pedals.
-
Page 62: Care And Maintenance
Care and Maintenance Cleaning 1. Please turn off and unplug the power plug of the device before the cleaning and disinfection operation. 2. Main unit cleaning: Clean the surface of the main unit with a clean, soft damp cloth. You can disinfect the Handlebar / Pedals by wiping down with 75% alcohol. -
Page 63: Routine Maintenance
Routine Maintenance Read this maintenance instruction thoroughly before doing any maintenance. Manufacturer will provide circuit diagrams, component part lists, descriptions, calibration instructions to assist to service personnel in parts repair. To preserve product warranty, functionality and product safety we recommend using only original spare parts. The unit and accessories must be checked at regular intervals. -
Page 64: Expected Useful Life Time
1) Fuse specification: F2AL250V (Ф5 × 20mm) 2) When replace the fuse, please follow the steps: a) Turn off the power switch; b) Unplug the power plug; c) Use a screwdriver to unscrew the fuse shell; d) Remove the bad fuse, replace the new fuse (see figure below); e) The fuse shell loaded back to the original position;... - Page 65 For environmental reasons, do not dispose of the device in the household waste at the end of its useful life. Dispose of the unit at a suitable local collection or recycling point. Dispose of the device in accordance with EC Directive – WEEE (Waste Electrical and Electronic Equipment).
-
Page 66: Troubleshooting
Troubleshooting NOTE: If the following measures fail to alleviate the problem, please call the distributors. Troubles Possible causes Solutions 1. No response 1. Lack of power; 1. Check whether the power plug and socket of the after start the 2. Fuse might be instrument are plugged or device. - Page 67 Troubles Possible causes Solutions 5. The heart rate 1. The heart rate 1. Check position of the displays sensor chest strap of heart rate during training. connected with unit; sensor; 2. The heart rate Check whether sensor was not put electrode area of heart rate on properly.
-
Page 68: Assistance
Assistance Every intervention on device must be performed by manufacturer. For any assistance intervention and original spare parts please contact the manufacturer at following address: Compass Health Brands, Corp. Add: Toll Free 1.888.549.4945 6753 Engle Road Middleburg Heights, OH 44130 Tel: 800-947-1728 Website: www.compasshealthbrands.com... -
Page 69: Warranty
Warranty The Manufacturer warrants that the DQAPT is free of defects in material and workmanship for the main unit. This warranty shall remain in effect for two years (24 months) from the date of original consumer purchase. If this Product fails to function during the two year warranty period due to a defect in material or workmanship, at the Manufacturer's Option, Manufacturer or the authorized dealer will repair this Product without charge. - Page 70 Compass Health Brands, Corp. Toll Free 1.888.549.4945 6753 Engle Road FOR-MRRD0001-USDQAPT Middleburg Heights, OH 44130 Version Number: UM0.1...
Need help?
Do you have a question about the Richmar DQAPT and is the answer not in the manual?
Questions and answers