Table of Contents
Advertisement
Advertisement
Table of Contents

Subscribe to Our Youtube Channel
Related Manuals for COMPASS HEALTH TWIN STIM PLUS OTC


Summary of Contents for COMPASS HEALTH TWIN STIM PLUS OTC
- Page 1 INSTRUCTION MANUAL - for the - TWIN STIM PLUS OTC ®...
- Page 2 Twin Stim Plus OTC This instruction manual is published by Compass Health Brands. Compass Health Brands reserves the right to improve and amend it at any time without prior notice. Amendments may however be published in new editions of this manual.
-
Page 3: Table Of Contents
Table of Contents Introduction ........4 1.1 General 1.2 Medical Background 1.3 Indication for use... -
Page 4: Introduction
1. INTRODUCTION 1.1 General The Twin Stim Plus OTC is a portable electrotherapy device featuring two therapeutic modes: Transcutaneous Electrical Nerve Stimulator (TENS) and Neuromuscular Electrical Stimulation (EMS), which are used for pain relief and electrical muscle stimulation. The stimulator sends gentle electrical current to underlying nerves and muscle group via electrodes applied on the skin. - Page 5 How TENS Works There is nothing “magic” about Transcutaneous Electrical Nerve Stimulation (TENS). TENS is intended to help relieve pain. The TENS device sends comfortable impulses through the skin to stimulate the nerve (or nerves) in the treatment area. In many cases, this stimulation will greatly reduce or eliminate the pain sensation the patient feels.
-
Page 6: Indication For Use
1.3 Indication for Use The Twin Stim Plus OTC Stimulator is designed to be used for temporary relief of pain associated with sore and aching muscles in the shoulder, waist, back, neck, upper extremities(arm)and lower extremities(leg) due to strain from exercise or normal household work activities. - Page 7 DANGER This stimulator must NOT be used in combination with the following medical devices: • Internally transplanted electronic medical devices, such as a pacemaker. • Electronic life support equipment, such as respirators. • Electronic medical devices attached to the body, such as electrocardiographs.
- Page 8 WARNING (CONTINUED) DO NOT USE THIS DEVICE DURING THESE ACTIVITIES • When in the bath or shower • While sleeping • While driving, operating machinery, or during any activity in which electrical stimulation can put you at risk for injury. PAIN MANAGEMENT WARNINGS •...
- Page 9 CAUTION WARNINGS AND PRECAUTIONS REGARDING THE ELECTRODES • DO NOT bend or fold because the pad may not function properly. Place the electrodes onto the plastic film and then store into the sealed package when not in use. • DO NOT apply ointment or any solvent to the electrodes or to your skin because it will disrupt the electrodes from functioning properly.
- Page 10 CAUTION (CONTINUED) CAUTION WHILE USING THE STIMULATOR • If the stimulator is not functioning properly or you feel discomfort, immediately stop using the device. If any type of shock or burn should occur, stop using immediately and consider seeking medical attention (if necessary). •...
- Page 11 GENERAL PRECAUTIONS • The long-term effects of electrical stimulation are unknown. • Apply stimulation to only normal, intact, clean, dry, and healthy skin. • TENS is NOT effective in treating the original source or cause of the pain, including headache. •...
- Page 12 POSSIBLE ADVERSE REACTIONS • DO NOT use to treat one region for extended periods of time (more than 30 minutes a session, up to 2 times/day) or muscles in that region may become exhausted and sore. • You may experience skin irritation and burns beneath the stimulation electrodes applied to your skin.
-
Page 13: Package Contents
4 – AA TENS Cell 2 – 2” x 2” electrodes Batteries REPLACEMENT PART NUMBERS Item Number Description DS5002-OTC Twin Stim Plus OTC Device 1 each WW3005-5PK Lead wires 2/pk 5 packs DT7202-ELEC2416 2” x 4” Electrodes 4/pk 2 packs DT7202-ELEC16 2”... -
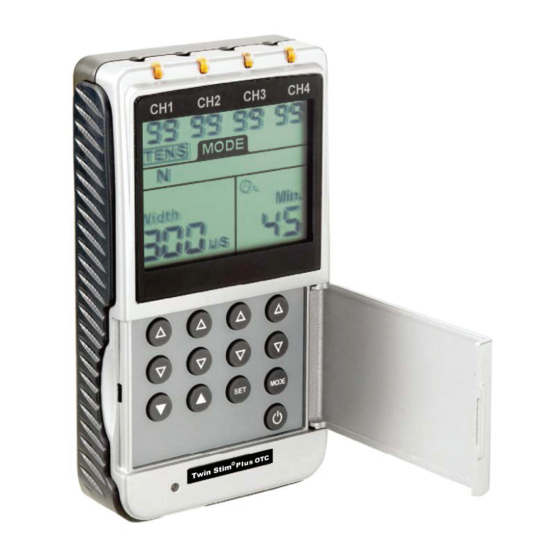
Page 14: Front And Rear Panel
3.1 Front and Rear Panel Output Sockets Panel Cover Liquid Crystal Display Intensity Increase Control (Ch 1 – 4) Intensity Decrease Control (Ch 1 – 4) Mode Control Set Control Setting Controls - Increase Setting Controls - Decrease 10) LED Output Lights 11) Belt Clip 12) Battery Case 13) Power On/Off Control... -
Page 15: Lcd Display
3.2 LCD Display Timer sign(‘L’ for CH1 4 channel output intensity Parameter number display &CH2;’R’ for CH3&CH4) Low battery sign TENS/EMS mode sign Hz/us unit sign Channel Output Intensity (4 channels) Treatment program sign Compliance meter sign Waveform Display Ramp/ON/OFF settings sign Treatment time display Mode Display Width/Rate settings sign... -
Page 16: Specification
4. SPECIFICATIONS 4.1 Technical Information Channel Four, isolated between channels Power Supply Four 1.5V AA Batteries Waveform Asymmetrical Biphasic Square Pulse Pulse Amplitude Adjustable, 0 – 80 mA at 500-ohm load, each channel Voltage 0 to 40V (Load: 500 ohm) Pulse Rate Adjustable, 2 to 150 Hz (0.5 to 150 Hz for Burst Only) Pulse Width... -
Page 17: Technical Specifications (Tens)
4.2 Technical Specifications (TENS) Modes (5) B (Burst), N (Normal), M (Modulation), SD1 (Strength Duration 1), SD2 (Strength Duration 2) Burst Mode Burst Rate: Adjustable, 0.5 – 5Hz Pulse Width: Adjustable, 50 – 300us Frequency: Fixed = 100 Hz Normal The Pulse Rate and Pulse Width are adjustable. -
Page 18: Waveform Information (Tens)
4.4 Waveform Information — TENS BURST NORMAL MODULATION SD1 (STRENGTH DURATION) SD2 (STRENGTH-DURATION) - 18 -... -
Page 19: Waveform Information (Ems)
4.5 Waveform Information — EMS CONSTANT (C) SYNCHRONOUS (S) ALTERNATE (A) - 19 -... -
Page 20: Instruction For Use
5. INSTRUCTIONS FOR USE 5.1 Battery Installation of Batteries Remove the battery cover by sliding down and removing cover. Insert all 4 batteries with the correct polarity as shown below. Replace battery cover. Disposal of Battery Depleted batteries DO NOT belong in the household waste. Dispose of the batteries according to the your federal, state and local regulations. -
Page 21: Using Your Device
5.2 Using Your Device A. Panel Cover A panel on the front of the device covers all the operating buttons. To start using the device, open the panel by putting your finger under the panel ledge on the left side and flip it open to the left. B. -
Page 22: To Set Tens Parameters
C. Turn on Device Once the panel is open, press the power button. The device will beep and the LCD screen will show a display of numbers. D. Select Waveform/Mode To choose which waveform and mode to use, press until the desired selection is displayed on the screen. - Page 23 B. Set Pulse Rate Press and the number for “Rate” on the LCD screen will flash. To change the default number, press until the desired Pulse Rate number is displayed on the screen. If the default Pulse Rate is the desired number and no change is needed, press to move on to the next parameter.
- Page 24 D. Connect & Place Electrodes Once the parameters are set, connect electrodes before starting treatment. Take the electrodes out of the sealed package. Connect both pins of each lead wire to the pigtail of an electrode (one electrode will not work). Make sure none of the metal pin connector is visible. Place electrodes on or around the treatment area, ensure electrodes are completely attached and at least 2”...
-
Page 25: To Set Ems Parameters
5.4 To Set EMS parameters To choose EMS, press until EMS and “C” for Constant are displayed on the screen. If the desired mode is “S” or “A” press until that letter is displayed under EMS. A. Set Ramp Up/Down Time Press once and the number for “Ramp”... - Page 26 C. Set Relaxation “OFF” Time Press button and the number for “OFF” on the LCD Screen will flash. To change the number, press until the desired relaxation/”OFF” time is reached. Note 1: For Alternate (A) Mode only, the OFF time must be at least equal to the “ON”...
- Page 27 E. Set Pulse Rate Press the button and the number for “Rate” on the LCD screen will flash. To change the default number, press until the desired Pulse Rate number is displayed on the screen. If the default Pulse Rate is the desired number and no change is needed, press to move on to the next parameter.
- Page 28 G. Connect & Place Electrodes Once the parameters are set, connect electrodes before starting treatment. Take the electrodes out of the sealed package. Connect both pins of each lead wire to the pigtail of an electrode (one electrode will not work). Make sure none of the metal pin connector is visible. Place electrodes on or around the treatment area, ensure electrodes are completely attached and at least 2”...
-
Page 29: Check Compliance Meter
5.5 Check Compliance Meter The compliance meter can store 60 sets of records with a total treatment time of 999 hours. A. Check & Delete Individual Records Press and the power button at the same time. The screen will show the number of recorded treatments and total operation time. -
Page 30: Cleaning And Storage
6. CLEANING AND STORAGE 6.1 Keeping Electrodes Clean • Ensure the device is completely turned off when removing the electrodes from the treatment area. • Disconnect the electrodes from each lead wire and place on protective liner supplied with the electrodes. •... -
Page 31: Storing Device, Electrodes And Lead Wires
6. If replacement electrodes are necessary, use only electrodes that are the same size (2” x 2”, 2” x 4” & 3” Round) as the electrodes provided with the Twin Stim Plus OTC. 7. Use of larger electrodes may reduce the effect of the stimulation. -
Page 32: Troubleshooting
7. TROUBLESHOOTING Problem Possible Causes Possible Solution Are the batteries Replace the batteries. depleted? The device cannot power on Are the batteries installed Insert the batteries correctly? observing polarity. Electrodes dried out or Replace with new contaminated electrodes Stimulation weak Electrodes are not securely or cannot feel any Reconnect the electrodes... - Page 33 7. TROUBLESHOOTING (Continued) Problem Possible Causes Possible Solution Reposition the electrodes Improper electrode at least 2” apart and no Stimulation is placement more than 6” per channel. ineffective. Unknown Consult clinician. Re-position the Using the electrodes on the electrodes. If at any time same site every time.
-
Page 34: Disposal
8. DISPOSAL Used fully discharged batteries MUST be disposed of in a specially labeled collection container, at toxic waste collection points or through an electrical retailer. You are under legal obligation to dispose of batteries correctly. Please dispose of the device in accordance with the legal obligation. -
Page 35: Electromagnetic Compatibility (Emc) Tables
10. ELECTROMAGNETIC COMPATIBILITY (EMC) TABLES • This device should not be used adjacent to or stacked with other equipment. If adjacent or stacked use is necessary, this device should be observed to verify normal operation in the configuration in which it will be used •... - Page 36 TABLE 1 Declaration - electromagnetic emission The device is intended for use in the electromagnetic environment specified below. The customer or the user of device should assure that it is used in such an environment. Emissions test Compliance Electromagnetic environment - guidance. RF emissions Group 1 The device uses RF energy only for its internal...
- Page 37 TABLE 2 Declaration - electromagnetic immunity The device is intended for use in the electromagnetic environment specified below. The customer or the user of device should assure that it is used in such an environment. Immunity test IEC 60601 test Compliance level Electromagnetic environment - level...
- Page 38 TABLE 3 Declaration - electromagnetic immunity The device is intended for use in the electromagnetic environment specified below. The customer or the user of device should assure that it is used in such an environment. Immunity test IEC 60601 Compliance Electromagnetic environment - guidance test level level...
- Page 39 TABLE 4 Recommended separation distances between portable and mobile RF communications equipment and device The device is intended for use in an electromagnetic environment in which radiated RF disturbances are controlled. The customer or the user of device can help prevent electromagnetic interference by maintaining a minimum distance between portable and mobile RF communications equipment (transmitters) and device, as recommended below, according to the maximum output power of the communications equipment.
-
Page 40: Warranty
11. WARRANTY All Twin Stim PLUS OTC models carry a warranty of one year from ® the date of delivery. The warranty applies to the stimulator only and covers both parts and labour relating thereto. The warranty does not apply to damage resulting from failure to follow the operating instructions, accidents, abuse, alteration or disassembly by unauthorized personnel. - Page 41 - 41 -...
- Page 42 Manufactured for: Compass Health Brands 6753 Engle Rd Middleburg Heights, OH 44130 www.compasshealthbrands.com 800.871.7858 2040.19.05.A...
Need help?
Do you have a question about the TWIN STIM PLUS OTC and is the answer not in the manual?
Questions and answers
How to get started
To get started with the COMPASS HEALTH TWIN STIM PLUS OTC:
1. Install Batteries: Remove the battery cover, insert four batteries with the correct polarity, and replace the cover.
2. Open the Panel: Locate the panel on the front of the device, put your finger under the ledge on the left side, and flip it open to the left.
3. Connect Lead Wires: Plug the necessary lead wires into the output receptacles (CH1 – CH4), leaving unused receptacles unplugged.
4. Turn on the Device: Press the power button; the device will beep, and the LCD screen will display numbers.
5. Select Waveform/Mode: Press the mode button until the desired selection appears on the screen. There are 5 TENS modes (B, N, M, SD1, SD2) and 3 EMS modes (C, S, A).
This answer is automatically generated