Advertisement
Available languages
Available languages
Quick Links
AS-650 Quick start Guide
Main menu
•
Print Image: Select, Import or Delete an
1
image.
•
Printer Setup: Set Printer parameters to
adjust the Printer.
•
Tools: Run Ink Cost Estimator, Ink Status,
Diagnostic tests, Network, and Screen
Calibration.
•
Print Data: Display information about the
job printing.
•
Test Print: Print a test page using current
adjustments and print parameters.
•
Info: Display information about the Printer.
Install inkjet cartridges
To install inkjet cartridges,
open latch lever fully, place
cartridge into pen stall and
push until it bottoms out in
pen stall. Close latch lever.
For additional information on your adressing system please
consult the user guide:
kb.quadient.com/as650_ug_en
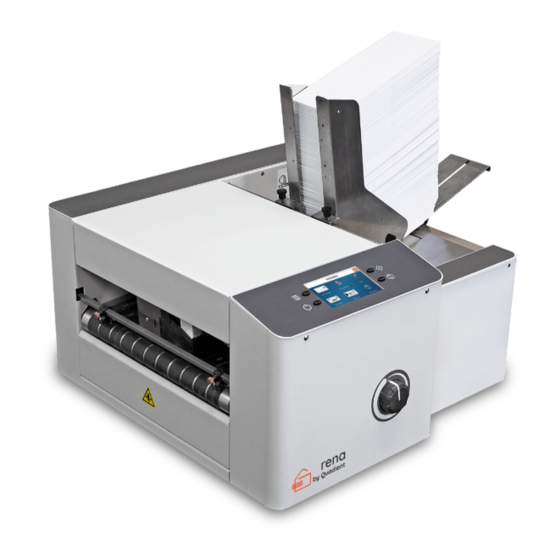
1 - Set Up the Media Transport System
Sheet Separation & Guide Adjustments
c
a
1. Release Separator Locking Lever
(a)
by grasping it at the top of the
Lever and rotating it down. This
will release Sheet Separators
(b).
3. Place one piece of Media in
4. Rotate Separator Locking
center of Feed Table and under
the Separators (b).
5. Loosen Media Side Guide
6. Adjust Media Support
Locking Knobs
(d)
then adjust
Side Guides
(c)
to within 0.8
mm of Media then tighten Media
Side Guide Locking Knobs
(d)
to secure Side Guide positions.
d
2 - Position Print Units
1. Loosen locking screw(s) (a).
2. Position Print Unit(s) as needed
to achieve desired print locations
on Media being fed.
3. Secure locking screw(s)
b
3 - Media Thickness Adjustment
To adjust media thickness:
1. Turn Media Thickness Knob
2. Lift all four Separators
(b)
2. Slide a piece of media
so they are in the "up and
Printheads
locked" position.
3. Adjust the Media Thickness Knob
counter-clockwise until the bottom
of the Print Unit just touches the
media. Then remove the media.
4. Position the Exit Pressure Roller
(a)
Lever
up, to lock the
Assembly so it rides on the media.
Separators in place.
5. Turn Printer ON.
Wedge
(e)
so trailing
edge of Media stack is
raised about 12 mm and
rests on curve of Wedge
then tighten Locking
Knob.
e
(a).
a
(a)
fully
(b)
under
a
(a)
b
A0136345/A - 29/10/2020
1/4
Advertisement

Subscribe to Our Youtube Channel
Related Manuals for quadient AS-650


Summary of Contents for quadient AS-650
- Page 1 AS-650 Quick start Guide 2 - Position Print Units 1 - Set Up the Media Transport System Main menu Sheet Separation & Guide Adjustments 1. Loosen locking screw(s) (a). 2. Position Print Unit(s) as needed to achieve desired print locations on Media being fed.
- Page 2 AS-650 Kurzanleitung 2 – Druckeinheiten positionieren 1 – Einrichten des Medientransportsystems Hauptmenü Anpassungen der Bogentrennung und Führung 1. Verschlussschraube(n) lösen. 2. Druckeinheit(en) wie erforderlich positionieren, um die gewünsch- ten Druckpositionen auf den zu- geführten Medien zu erreichen. 3. Verschlussschraube(n) anzie- hen.
- Page 3 Fermez le levier de verrouillage. Pour plus d'informations sur votre système d'adressage, veuillez consulter le A0136345/A - 29/10/2020 kb.quadient.com/as650_ug_fr guide de l'utilisateur :...
- Page 4 AS-650 Beknopte handleiding 2 - Printeenheden positioneren 1 - Het mediatransportsysteem instellen Hoofdmenu Vellenscheider en aanpassing van geleiders 1. Draai de borgschroef/-schroeven los. 2. Positioneer de printeenheid/ -eenheden naar behoefte om de gewenste afdruklocatie te verkrijgen op de ingevoerde media.
Need help?
Do you have a question about the AS-650 and is the answer not in the manual?
Questions and answers