Table of Contents
Advertisement
Quick Links
Advertisement
Table of Contents

Related Manuals for Daikin MCS341-DS1-111


Summary of Contents for Daikin MCS341-DS1-111
- Page 1 Installer reference guide Security gateway MCS341-DS1-111...
-
Page 2: Table Of Contents
1 About this document 2 Installation General safety precautions............................. 2.1.1 General ................................2.1.2 Installation site ............................... 2.1.3 Electrical ................................. Daikin system equipment ............................... System description................................2.3.1 Local network setup ............................2.3.2 Specifications..............................Before installation................................2.4.1 About necessary equipment .......................... 2.4.2 About the location of the terminals....................... -
Page 3: About This Document
The original documentation is written in English. All other languages are translations. Technical engineering data ▪ A subset of the latest technical data is available on the regional Daikin website (publicly accessible). ▪ The full set of latest technical data is available on the Daikin Business Portal (authentication required). -
Page 4: Installation
Improper installation or attachment of equipment or accessories could result in electrical shock, short-circuit, leaks, fire or other damage to the equipment. Only use accessories, optional equipment and spare parts made or approved by Daikin. WARNING Make sure installation, testing and applied materials comply with applicable legislation (on top of the instructions described in the Daikin documentation). -
Page 5: Installation Site
After finishing the electrical work, confirm that each electrical component and terminal inside the electrical components box is connected securely. ▪ Make sure all covers are closed before starting up the unit. MCS341-DS1-111 Installer reference guide Security gateway 4P529063-1A – 2020.12... -
Page 6: Daikin System Equipment
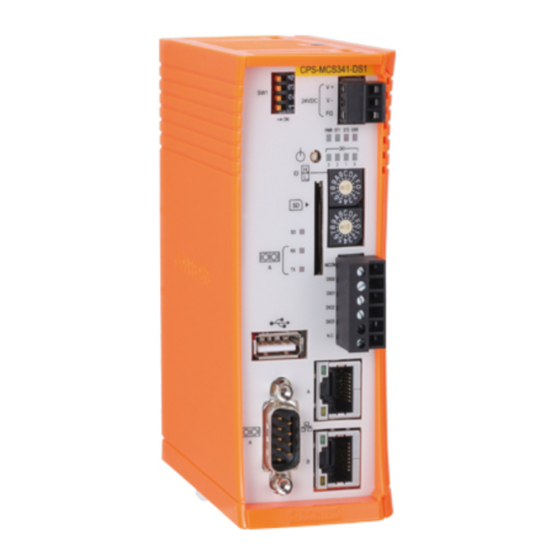
Installation 2.2 Daikin system equipment The installation requires: The gateway MCS341-DS1-111, spare part number EU.SB.5000072. The wiring to connect to the power convertor is included here. An AC/DC power convertor (PWD-90AW24), spare part number 999175A. And one of the following:... -
Page 7: Specifications
Units d LAN gateway e Daikin Cloud Service f Computer with connection to the Daikin Cloud Service The table is only intended as an example and only applicable for the setup indicated in the image above. iTM or LC8... -
Page 8: About The Location Of The Terminals
1 Place the module over the top of the DIN-35 rail so that the upper hook on the rear face is hooked in. 2 Push the module in direction (a) until the lower hook snaps into the rail. MCS341-DS1-111 Installer reference guide Security gateway... -
Page 9: About Electric Wiring
Use a flat-blade screwdriver if necessary. 4 Repeat the previous steps for all other modules. 2.6 About electric wiring This chapter will describe the procedure to connect the Security gateway components with Daikin devices and other equipment. wiring requirements "7.4 Wiring... -
Page 10: To Connect The Security Gateway To The Local Network
1 Connect the power supply in the same way as shown in "To connect the power supply" [ 9]. 2 Add the Security gateway to the local network as shown in the following figure: MCS341-DS1-111 Installer reference guide Security gateway 4P529063-1A – 2020.12... - Page 11 LC8 controller d LAN connection to port A e Security gateway f LAN gateway (RJ-45) g User PC h Daikin Cloud Service Plug in the power supply. To connect to DIII-NET compatible equipment Refer to: ▪ Ainet handbook:...
-
Page 12: Commissioning
"To set up the time zone of the Security gateway" [ 20]. ▪ Add all attached (Daikin) equipment to the Security gateway web interface, see "4 To commission the iTM or LC8 controller" [ 21] to configure the connected devices quickly (local commissioning tool). -
Page 13: To Connect To The Security Gateway For The First Time
5 In the Network Connections window, double-click the Local Area Connection option. Result: The following window appears. 6 Select the Internet Protocol Version 4 (TCP/IPv4) option and click the Properties button. Result: The following window appears. MCS341-DS1-111 Installer reference guide Security gateway 4P529063-1A – 2020.12... - Page 14 13 Check if you can make a connection from your computer to the Security gateway module. To do so, open the command prompt on your computer as follows: 14 Click the Windows Start button. MCS341-DS1-111 Installer reference guide Security gateway 4P529063-1A – 2020.12...
-
Page 15: About Configuring The Security Gateway
1 Type the default IP address of the Security gateway (https://192.168.0.126) in the URL bar of the web browser (Google Chrome or Microsoft Edge). Result: A warning message about the connection appears. 2 Click ADVANCED (ADVANCED) to show the advanced setup window. MCS341-DS1-111 Installer reference guide Security gateway 4P529063-1A – 2020.12... - Page 16 3 Click Proceed to 192.168.0.126 (unsafe) (Proceed to 192.168.0.126 (unsafe)). Result: A login window appears 4 Fill out ID (ID) and Password (Password) (default ID: Daikin / default password: Daikin) of the Security gateway and click the Sign in (Sign in ) button.
-
Page 17: To Set Up The Network Of The Security Gateway
3.4.2 To set up the network of the Security gateway To access the Security GW Menu (Security GW Menu), see "To access the Security gateway" [ 15]. 1 Click the Network (Network) button. Result: The Network Setup (Network Setup) dialog appears. MCS341-DS1-111 Installer reference guide Security gateway 4P529063-1A – 2020.12... - Page 18 (Primary DNS) are according to the conditions of the local network, you do not need to change them. 3 Click the Save (Save) button. Result: The Confirm (Confirm) dialog appears. 4 Click the Yes (Yes) button to reboot the Security gateway. MCS341-DS1-111 Installer reference guide Security gateway 4P529063-1A – 2020.12...
- Page 19 F1, F2 INFORMATION For confirmation that the IP address is changed correctly, access the Security gateway as described in "To access the Security gateway" [ 15] by using the new IP address. MCS341-DS1-111 Installer reference guide Security gateway 4P529063-1A – 2020.12...
-
Page 20: To Set Up The Time Zone Of The Security Gateway
Result: The Time Zone Setup (Time Zone Setup) dialog appears. 2 Click the [▼] button to open Time Zone drop-down list >> select and click the time zone. 3 Click the Save (Save) button. MCS341-DS1-111 Installer reference guide Security gateway 4P529063-1A – 2020.12... -
Page 21: To Commission The Itm Or Lc8 Controller
3 Setup the network of the local controller according to the table below. 4 Set NSC URL http://Lcc.m2m.daikineurope.com/NSC and select the correct Access Point Name (Access Point Name) from the selection list. The details (Details) section can remain empty. MCS341-DS1-111 Installer reference guide Security gateway 4P529063-1A – 2020.12... - Page 22 LT2N###### (with # being an alphanumerical value). LC8 No: The registered id number of the LC8 Controller. This number will be in the following format: LC8N###### (with # being an alphanumerical value). MCS341-DS1-111 Installer reference guide Security gateway 4P529063-1A – 2020.12...
-
Page 23: Operation
To access the Security GW Menu (Security GW Menu), see "To access the Security gateway" [ 15]. 1 Click the Communication Log (Communication Log) button. 2 Check the download status in the download bar at the bottom of the window. MCS341-DS1-111 Installer reference guide Security gateway 4P529063-1A – 2020.12... -
Page 24: To Download Update Logs
4 Check the details of the communication log .csv (Communication_Log.csv) file. 5.1.2 To download update logs To access the Security GW Menu (Security GW Menu), see "To access the Security gateway" [ 15]. 1 Click the Update Log (Update Log) button. MCS341-DS1-111 Installer reference guide Security gateway 4P529063-1A – 2020.12... - Page 25 2 Check the download status in the download bar at the bottom of the window. 3 Find and double-click (to open) the downloaded update log .csv (Update_Log.csv) file. 4 Check the details of the update log .csv (Update_Log.csv) file. MCS341-DS1-111 Installer reference guide Security gateway 4P529063-1A – 2020.12...
-
Page 26: To Download Monitoring Logs
To access the Security GW Menu (Security GW Menu), see "To access the Security gateway" [ 15]. 1 Click the Monitoring Log (Monitoring Log) button. 2 Check the download status in the download bar at the bottom of the window. MCS341-DS1-111 Installer reference guide Security gateway 4P529063-1A – 2020.12... -
Page 27: To Reset The Security Gateway To Its Factory Settings
5.2 To reset the Security gateway to its factory settings To access the Security GW Menu (Security GW Menu), see "To access the Security gateway" [ 15]. 1 Click the Factory Reset (Factory reset) button. MCS341-DS1-111 Installer reference guide Security gateway 4P529063-1A – 2020.12... -
Page 28: To Reboot The Security Gateway
Result: The Security gateway is reset to the original manufacturer settings. 5.3 To reboot the Security gateway To access the Security GW Menu (Security GW Menu), refer to "To access the Security gateway" [ 15]. 1 Click the Reboot (Reboot) button. MCS341-DS1-111 Installer reference guide Security gateway 4P529063-1A – 2020.12... - Page 29 Result: The Confirm (Confirm) dialog appears. 2 Click the Yes (Yes) button. Result: The confirmation dialog disappears and all of the buttons are grayed- out and disabled. Result: The Security gateway is rebooted. MCS341-DS1-111 Installer reference guide Security gateway 4P529063-1A – 2020.12...
-
Page 30: To Check The Version Numbers
1 Click the Version (Version) button. Result: The Version (Version) dialog appears. 2 Check the versions. 3 Click the OK (OK) button to go back to the main screen. Result: The main screen appears. MCS341-DS1-111 Installer reference guide Security gateway 4P529063-1A – 2020.12... -
Page 31: Troubleshooting
Enable cookies in your browser preferences and try again. 3. Security gateway 3.1 Failed to connect to — connection Security gateway. Check if the Security gateway is connected to the same network. MCS341-DS1-111 Installer reference guide Security gateway 4P529063-1A – 2020.12... - Page 32 Security gateway. 8. Time zone setup 8.1 Failed to Same as 4.3 communicate with the Security gateway. 9. Error dialog 9.1 Your session has — expired. Try to sign in again. MCS341-DS1-111 Installer reference guide Security gateway 4P529063-1A – 2020.12...
-
Page 33: Technical Specifications
"To access the web interface Security gateway" [ 15] ▪ default ID Daikin ▪ default password: Daikin 7.4 Wiring requirements Security gateway WARNING All field wiring and components MUST be installed by a licensed electrician and MUST comply with the applicable legislation. -
Page 34: System Requirements
CPU Intel i3 2.2 GHz or higher Operating Microsoft Windows 7 or higher system Memory 512 MB RAM or more Free space 10 GB or more on hard drive Network 10 BASE-T or higher MCS341-DS1-111 Installer reference guide Security gateway 4P529063-1A – 2020.12... -
Page 35: Appendix A - About Detecting The Ip Address Of The Security Gateway
1 Download and extract the zip file containing the GwSettingTool.exe (GwSettingTool.exe) file to a folder on your local drive. 2 Double-click the GwSettingTool.exe file (GwSettingTool.exe) to start the Security gateway setup tool. Result: Connecting starts. MCS341-DS1-111 Installer reference guide Security gateway 4P529063-1A – 2020.12... - Page 36 Result: After about 1 minute, a login window appears. 3 Fill out ID (ID) and password (Password) (default ID: Daikin / default password: Daikin) of the Security gateway and click the Sign in (Sign in) button. Result: The Security GW Menu (Security GW Menu) window appears.
- Page 37 Appendix A – About detecting the IP address of the Security gateway 5 Check the IP address (IP address) of LAN Port1 (LAN Port1 ). MCS341-DS1-111 Installer reference guide Security gateway 4P529063-1A – 2020.12...
-
Page 38: Appendix B - About Commissioning In Case Of Proxy Server
LAN connection to port A e Security gateway f iTM or LC8 controller to port B g LAN gateway (RJ-45) h Daikin Cloud Service 3 Plug in the power supply. 9.2 To access the Security gateway "To access the Security gateway" [... - Page 39 Subnet Mask (Subnet mask): 255.255.255.0 ▪ Use a Proxy Server (Use a Proxy Server): Check ▪ IP Address (IP address): IP Proxy Server ▪ Port Number (Port Number): Port Proxy Server MCS341-DS1-111 Installer reference guide Security gateway 4P529063-1A – 2020.12...
-
Page 40: To Set Up The Time Zone Of The Security Gateway
8 Connect an Ethernet cable between the Security gateway module and the local network. F1, F2 F1, F2 9.4 To set up the time zone of the Security gateway "To set up the time zone of the Security gateway" [ 20]. MCS341-DS1-111 Installer reference guide Security gateway 4P529063-1A – 2020.12... -
Page 41: To Commission The Itm Or Lc8 Controller
1 Setup the network of the local controller according to the table below. 2 Set NSC URL http://Lcc.m2m.daikineurope.com/NSC and select the correct Access Point Name (Access Point Name) from the selection list. The details (Details) section can remain empty. MCS341-DS1-111 Installer reference guide Security gateway 4P529063-1A – 2020.12... - Page 42 LT2N###### (with # being an alphanumerical value). LC8 No: The registered id number of the LC8 Controller. This number will be in the following format: LC8N###### (with # being an alphanumerical value). MCS341-DS1-111 Installer reference guide Security gateway 4P529063-1A – 2020.12...
- Page 44 4P529063-1A 2020.12 Verantwortung für Energie und Umwelt...
Need help?
Do you have a question about the MCS341-DS1-111 and is the answer not in the manual?
Questions and answers