Table of Contents
Advertisement
Quick Links
SAVEO-RV2-RCCD
Getting Started
Switch on and Charge your Scanner
Please switch on your scanner (as illustrated) and place it in the
cradle to charge for 3~4 hours before rst use.
If you want to charge smartphone and scanner simultaneously,
please switch scanner to right "C" (charge mode) before placing
it in the cradle.
Power on Saveo Scan
On the underside of the scanner you will nd a small recessed
button.
Use a paper clip or tooth pick to push the button until you hear a
noti cation sound.
Ensure power switch remains depressed after you release it.
Power Switch
Power switch is located on the
underside of the scanner.
1
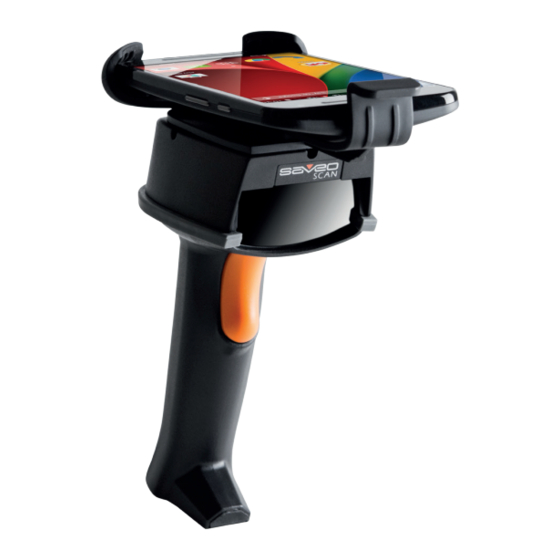
Operating Elements
*Please remove the protective sticker from window
before use
Universal Holder
Exit Window
Trigger/Power
On button
Wrist Strap
'To Device' Cable
Use the appropiate cable type to
connect to smartphone/tablet
Switch for Operation Mode
and Charge Mode/Bluetooth
Mode
LED indicator
Charging Cradle
Optimize Device Charging
Select the Charge & Data model for the device type
by scanning the barcode below:
Micro USB
Type-C
For Optimal Charging, please use the original USB
cable & adaptor supplied with your mobile device.
2
Attach your smartphone
Attaching your smartphone to scanner using the
Extend the retractable arm before placing phone in holder and
then pushing it rmly back against the phone.
Extend retractable
arm
Press button and slide
outwards to extend the
arm
Insert phone
Secure phone in
holder
USB connection typo and port location vary on di erent
models of smartphone, the cable can be con gured for
your speci c model, Micro USB or USB Type-C. For iOS
devices, please use a Saveo Lightning cable.
Micro USB
USB Type-C
universal holder
Connect phone to scanner
3
Advertisement
Table of Contents

Related Manuals for Saveo Scan SAVEO-RV2-RCCD

Summary of Contents for Saveo Scan SAVEO-RV2-RCCD
- Page 1 Switch for Operation Mode and Charge Mode/Bluetooth Mode Power on Saveo Scan LED indicator On the underside of the scanner you will nd a small recessed button. Charging Cradle Use a paper clip or tooth pick to push the button until you hear a noti cation sound.
- Page 2 Search for devices Switch scanner to Operation Mode (Data trans- Switch scanner to Charge Mode/Bluetooth Mode Your phone will automatically search for devices, Saveo Scan will mission via USB OTG) appear as an external keyboard with a unique identi er number (R-xxxxxx).
- Page 3 Operating Modes Reset to Defaults Transmit Memory Data Demo Scan the following barcode to receive data stored in the There are two operating modes on the scanner, Data transmis- Reset Con guration to Defaults (scan from A1to A6) scanner’s internal memory.. sion mode and Data Storage Mode.
- Page 4 Transmission Speed Power Saving Mode Unpairing your device Demo Before connecting the scanner to another device it is Power saving mode is enabled by default and will put the Transmission speed is dependent on your device. In order not to scanner to sleep after 1 minutes inactivity.
- Page 5 Scanning with Simplicity SAVEO-RV2-RCCD Scan Engine Specific User Manual US PH: +1 720 257 7070 info@saveoscan.com UK PH: +44 208 0998071 www.saveoscan.com...
-
Page 6: Table Of Contents
Table of Contents Chapter 1 Getting Started..........................1 Introduction .............................. 1 About This Guide ............................. 2 Connecting EVK and PC ......................... 2 Barcode Scanning ........................... 2 Configuring the CR2307 .......................... 2 Command Programming ........................2 Barcode Programming........................3 Enter/Exit Setup ........................3 Programming Barcode Data...................... - Page 7 Standard Keyboard ......................... 23 Emulate ALT+Keypad ......................23 Function Key Mapping......................24 ASCII Function Key Mapping Table..................25 USB Country Keyboard Types ....................26 Inter-Keystroke Delay......................29 Convert Case........................... 30 Emulate Numeric Keypad ....................... 31 Access the Engine with Your Program ................... 32 Acquire Scanned Data ......................
- Page 8 UCC/EAN-128 ............................48 Restore Factory Defaults........................ 48 Enable/Disable UCC/EAN-128....................... 48 Set Length Range for UCC/EAN-128..................... 49 AIM 128..............................50 Restore Factory Defaults........................ 50 Enable/Disable AIM 128 ......................... 50 Set Length Range for AIM 128....................... 51 EAN-8 ..............................52 Restore Factory Defaults........................ 52 Enable/Disable EAN-8........................
- Page 9 Restore Factory Defaults........................ 65 Enable/Disable UPC-A ........................65 Transmit Check Digit ........................66 Transmit Preamble Character ......................66 Add-On Code..........................67 Add-On Code Required ........................68 Interleaved 2 of 5 ........................... 69 Restore Factory Defaults........................ 69 Enable/Disable Interleaved 2 of 5 ....................69 Check Digit Verification ........................
- Page 10 Set Length Range for Standard 25....................84 Code 39 ..............................85 Restore Factory Defaults........................ 85 Enable/Disable Code 39......................... 85 Check Digit Verification ........................86 Transmit Start/Stop Character......................87 Enable/Disable Code 39 Full ASCII ....................87 Set Length Range for Code 39....................... 88 Codabar ..............................
- Page 11 Transmit Application Identifier “01” ..................105 RSS-Limited............................106 Restore Factory Defaults......................106 Enable/Disable RSS-Limited ......................106 Transmit Application Identifier “01” ..................106 RSS-Expand ............................107 Restore Factory Defaults......................107 Enable/Disable RSS-Expand ....................... 107 Appendix ................................. 108 Factory Defaults Table ........................108 AIM ID Table............................
-
Page 13: Chapter 1 Getting Started
** Enter Setup Chapter 1 Getting Started Introduction The CR2307 scan engines, armed with computerized image recognition system, bring about a new era of 1D barcode scan engines. The CR2307's 1D barcode decoder chip ingeniously blends technology and advanced chip design & manufacturing, which significantly simplifies application design and delivers superior performance and solid reliability with low power consumption. -
Page 14: About This Guide
** Enter Setup About This Guide This guide provides programming instructions for the CR2307. Users can configure the scan engine by scanning the programming barcodes included in this manual or by sending host commmands to the device. The CR2307 has been properly configured for most applications and can be put into use without further configuration. -
Page 15: Barcode Programming
** Enter Setup Barcode Programming The CR2307 can be configured by scanning programming barcodes. All user programmable features/options are described along with their programming barcodes/commands in the following sections. Enter/Exit Setup ** Enter Setup Exit Setup Programming Barcode Data ** Do Not Transmit Programming Barcode Data Transmit Programming Barcode Data Exit Setup... -
Page 16: Factory Defaults
** Enter Setup Factory Defaults Scanning the following barcode can restore the engine to the factory defaults. You may need to reset your engine when: 1. engine is not properly configured so that it fails to decode barcodes; 2. you forget previous configuration and want to avoid its impact; 3. -
Page 17: Chapter 2 Scan Mode
** Enter Setup Chapter 2 Scan Mode Manual Mode Manual Mode (default): A trigger pull activates a decode session. The decode session continues until the barcode is decoded or the trigger is released or the decode session timeout expires. ** Manual Mode Decode Session Timeout: This parameter sets the maximum time decode session continues during a scan attempt. -
Page 18: Continuous Mode
** Enter Setup Continuous Mode Continuous Mode: A trigger press activates the engine to scan and decode at user-specified intervals, i.e. the timeout between decodes. Each decode session lasts until barcode is decoded or the decode session timeout expires. To suspend/resume the operation, simply press the trigger. Continuous Mode Decode Session Timeout: This parameter sets the maximum time decode session continues during a scan attempt. - Page 19 ** Enter Setup Timeout between Decodes:This parameter sets the timeout between decode sessions. When a decode session ends, next session will not happen until the timeout between decodes expires. It is programmable in 0.1s increments from 0.0s to 25.5s. The default timeout is 1.0s. Timeout between Decodes Example: Set the timeout between decodes to 5s Scan the Enter Setup barcode.
- Page 20 ** Enter Setup Timeout between Decodes (Same Barcode) can avoid undesired rereading of same barcode in a given period of time. This parameter sets the timeout between decodes for same barcode. It is programmable in 0.1s increments from 0.1s to 25.5s. The default timeout is 3.0s. If the parameter is set to 0, the timeout between decodes (same barcode) is infinite.
-
Page 21: Sense Mode
** Enter Setup Sense Mode Sense Mode: The engine activates a decode session every time when it detects a change in ambient illumination and meets the requirement of the image stabilization timeout. Decode session continues until barcode is decoded or the decode session timeout expires. Sense Mode Decode Session Timeout: This parameter sets the maximum time decode session continues during a scan attempt. - Page 22 ** Enter Setup Image Stabilization Timeout: The engine waits for the image stabilization timeout to expire before activating a decode session every time it detects a change in ambient illumination. This parameter is programmable in 0.1s increments from 0.0s to 25.5s. Image Stabilization Timeout Example: Set the Image Stabilization Timeout to 5s Scan the Enter Setup barcode.
- Page 23 ** Enter Setup Timeout between Decodes (Same Barcode) can avoid undesired rereading of same barcode in a given period of time. This parameter sets the timeout between decodes for same barcode. It is programmable in 0.1s increments from 0.1s to 25.5s. The default timeout is 3.0s. If the parameter is set to 0, the timeout between decodes (same barcode) is infinite.
- Page 24 ** Enter Setup Sensitivity: This parameter specifies the degree of acuteness of the engine’s response to changes in ambient illumination. The higher the sensitivity, the lower requirement in illumination change to trigger the engine. You can select an appropriate degree of sensitivity that fits the ambient environment. High Sensitivity ** Medium Sensitivity ** Medium Sensitivity...
-
Page 25: Command Trigger Mode
** Enter Setup Command Trigger Mode Command Trigger Mode: Decode session is activated by a host command. The decode session continues until the barcode is decoded or the decode session timeout expires. Command Trigger Mode Decode Session Timeout: This parameter sets the maximum time decode session continues during a scan attempt. -
Page 26: Chapter 3 Notification
** Enter Setup Chapter 3 Notification Good Read Beep ** Good Read Beep On Good Read Beep Off Low Frequency ** Medium Frequency High Frequency Beep Duration: 40ms ** Beep Duration: 80ms Beep Duration: 120ms Exit Setup... -
Page 27: Decode Result Notification
** Enter Setup Decode Result Notification When enabled, if a barcode does not decode, “F” is transmitted; if a barcode is decoded, “S” is appended to the barcode data as the most left character. Enable Decode Result Notification ** Disable Decode Result Notification Exit Setup... -
Page 28: Other Settings
** Enter Setup Other Settings You can change the following parameter settings temporarily and the changes will be lost when you power down or reboot the engine. Silent Mode Silent Mode On ** Silent Mode Off Note: This feature is only applicable to decode beep and will be automatically disabled when the engine is powered down or rebooted. -
Page 29: Chapter 4 Communication Settings
** Enter Setup Chapter 4 Communication Settings The engine provides an TTL-232 interface and a USB interface to communicate with the host device. The host device can receive scanned data and send commands to control the engine or to access/alter the configuration information of the engine via the TTL-232 or USB interface. -
Page 30: Ttl-232 Interface
** Enter Setup TTL-232 Interface Baud Rate When the engine is connected to a host device through its TTL-232 interface, you need to set communication parameters (including baud rate) to match the host device. Baud rate is the number of bits of data transmitted per second. Set the engine’s baud rate to match the Host requirements. -
Page 31: Parity Check
** Enter Setup Parity Check ** None Even Parity Odd Parity Stop Bit ** 1 Stop Bit 2 Stop Bits Exit Setup... -
Page 32: Data Bit
** Enter Setup Data Bit 8 Data Bits ** 8 Data Bits, No Parity, 1 Stop Bit 8 Data Bits, Even Parity, 1 Stop Bit 8 Data Bits, Odd Parity, 1 Stop Bit 8 Data Bits, No Parity, 2 Stop Bits 8 Data Bits, Even Parity , 2 Stop Bits 8 Data Bits, Odd Parity, 2 Stop Bits 7 Data Bits... - Page 33 ** Enter Setup 7 Data Bits, Even Parity, 1 Stop Bit 7 Data Bits, Odd Parity, 1 Stop Bit 7 Data Bits, Even Parity, 2 Stop Bits 7 Data Bits, Odd Parity, 2 Stop Bits Exit Setup...
-
Page 34: Usb Interface
** Enter Setup USB Interface USB HID-KBW When enabled, the engine’s transmission is simulated as USB keyboard input. It works on a Plug and Play basis and no driver is required. ** USB HID-KBW Exit Setup... -
Page 35: Standard Keyboard
** Enter Setup Standard Keyboard ** Standard Keyboard Emulate ALT+Keypad When Emulate ALT+Keypad is enabled, any ASCII character (0x00 - 0xFF) is sent over the numeric keypad no matter which keyboard type is selected. Since sending a character involves multiple keystroke emulations, this method appears less efficient. -
Page 36: Function Key Mapping
** Enter Setup Function Key Mapping When Function Key Mapping is enabled, function character (0x00 - 0x1F) are sent as ASCII sequences over the numeric keypad. CTRL Make Press function key (Refer to the ASCII Function Key Mapping Table on the following page) CTRL Break Function Key Mapping Exit Setup... -
Page 37: Ascii Function Key Mapping Table
** Enter Setup ASCII Function Key Mapping Table ASCII Value ASCII Value Function Key Function Key (HEX) (HEX) Exit Setup... -
Page 38: Usb Country Keyboard Types
** Enter Setup USB Country Keyboard Types Keyboard layouts vary from country to country. All supported keyboard types are listed below. ** 1 - U.S. 2 - Belgium 3 - Brazil 4 - Canada 5 - Czech 6 - Denmark 7 - Finland 8 - France Exit Setup... - Page 39 ** Enter Setup 9 - Austria 10 - Greece 11 - Hungary 12 - Israel 13 - Italy 14 - Latin America 15 - Netherland 16 - Norway 17 - Poland 18 - Portugal Exit Setup...
- Page 40 ** Enter Setup 19 - Romania 20 - Russia 21 - Slovakia 22 - Spain 23 - Sweden 24 - Switzerland 25 - Turkey1 26 - Turkey 2 27 - UK 28 - Japan Exit Setup...
-
Page 41: Inter-Keystroke Delay
** Enter Setup Inter-Keystroke Delay This parameter specifies the delay between emulated keystrokes. ** No Delay Short Delay (5ms) Medium Delay (10ms) Long Delay (15ms) Exit Setup... -
Page 42: Convert Case
** Enter Setup Convert Case This parameter is valid when the Standard Keyboard or Function Key Mapping is enabled. ** No Case Conversion Convert All to Upper Case Convert All to Lower Case Invert Upper and Lower Case Characters Example: When the Invert Upper and Lower Case Characters feature is enabled, barcode data “AbC”... -
Page 43: Emulate Numeric Keypad
** Enter Setup Emulate Numeric Keypad When this feature is disabled, sending barcode data is emulated as keystroke(s) on main keyboard. To enable this feature, scan the Emulate Numeric Keypad barcode. Sending a number (0-9) is emulated as keystroke on numeric keypad, whereas sending other character like “+”, “_”, “*” , “/” and “.”... -
Page 44: Access The Engine With Your Program
** Enter Setup Access the Engine with Your Program 1. Use CreateFile to access the engine as a HID device. 2. Use ReadFile to deliver the scanned data to the application program. 3. Use WriteFile to send data to the engine. For detailed information about USB and HID interfaces, go to www.USB.org. -
Page 45: Chapter 5 Data Formatting
** Enter Setup Chapter 5 Data Formatting Introduction After a successful barcode read, a string containing numbers, letters or symbols will be returned. In real applications, barcode data may be found insufficient for your needs. You may wish to include additional information such as barcode type, data acquisition time or delimiter in data being scanned. -
Page 46: Prefix Sequence
** Enter Setup Prefix Sequence ** Code ID+Custom+AIM ID Custom+Code ID+ AIM ID Exit Setup... -
Page 47: Custom Prefix
** Enter Setup Custom Prefix Enable/Disable Custom Prefix If custom prefix is enabled, you are allowed to append to the data a user-defined prefix that cannot exceed 5 characters. For example, if barcode data is “123” and custom prefix is “AB”, the host will receive “AB123”. Enable Custom Prefix ** Disable Custom Prefix Set Custom Prefix... -
Page 48: Aim Id Prefix
** Enter Setup AIM ID Prefix AIM (Automatic Identification Manufacturers) ID defines symbology identifier (For the details, see the AIM ID Table section in Appendix). If AIM ID prefix is enabled, the engine will add the symbology identifier before the scanned data after decoding. Enable AIM ID Prefix ** Disable AIM ID Prefix Exit Setup... -
Page 49: Code Id Prefix
** Enter Setup CODE ID Prefix Code ID can also be used to identify barcode type. Unlike AIM ID, Code ID is user programmable. For the information of default Code ID, see the Code ID Table section in Appendix. Enable CODE ID Prefix ** Disable CODE ID Prefix Restore All Default Code IDs Restore All Default Code IDs... - Page 50 ** Enter Setup Set Code ID Barcodes Set Code 128 Code ID Set UCC/EAN-128 Code ID Set AIM 128 Code ID Set EAN-8 Code ID Set EAN-13 Code ID Set ISSN Code ID Set ISBN Code ID Set UPC-E Code ID Exit Setup...
- Page 51 ** Enter Setup Set Code ID Barcodes (continued) Set UPC-A Code ID Set Interleaved 2 of 5 Code ID Set ITF-6 Code ID Set ITF-14 Code ID Set Deutsche 14 Code ID Set Deutsche 12 Code ID Set Matrix 2 of 5 Code ID Set Industrial 25 Code ID Exit Setup...
- Page 52 ** Enter Setup Set Code ID Barcodes (continued) Set Standard 25 Code ID Set Code 39 Code ID Set Codabar Code ID Set Code 93 Code ID Set Code 11 Code ID Set Plessey Code ID Set MSI-Plessey Code ID RSS-14 Code ID RSS-Limited...
-
Page 53: Custom Suffix
** Enter Setup Custom Suffix Enable/Disable Custom Suffix If custom suffix is enabled, you are allowed to append to the data a user-defined suffix that cannot exceed 5 characters. For example, if barcode data is “123” and custom suffix is “AB”, the host will receive “123AB”. Enable Custom Suffix ** Disable Custom Suffix Exit Setup... -
Page 54: Set Custom Suffix
** Enter Setup Set Custom Suffix To set a custom suffix, scan the Set Custom Suffix barcode, the numeric barcodes corresponding to the hexadecimal value of a desired suffix and the Save barcode. Note: A custom suffix cannot exceed 5 characters. Set Custom Suffix Example: Set the custom suffix to “CODE”... -
Page 55: Terminating Character Suffix
** Enter Setup Terminating Character Suffix A terminating character, such as carriage return (CR) and line feed (LF), can be used to mark the end of data, which means nothing can be added after it. A terminating character suffix cannot exceeed 5 characters. Enable/Disable Terminating Character Suffix This parameter determines whether to append predefined terminating character suffix to the data. -
Page 56: Set Terminating Character Suffix
** Enter Setup Set Terminating Character Suffix The engine provides a shortcut for setting the terminating character suffix to 0x0D (CR) or 0x0D,0x0A (CRLF) or 0x09 (Horizontal Tab), and enabling it by scanning the appropriate barcode below. Terminating Character 0x0D Terminating Character 0x0D,0x0A Terminating Character 0x09 Set Terminating Character Suffix... -
Page 57: Chapter 7 Symbologies
** Enter Setup Chapter 7 Symbologies Introduction Every symbology (barcode type) has its own unique attributes. This chapter provides programming barcodes for configuring the engine so that it can identify various barcode symbologies. It is recommended to disable those that are rarely used in order to increase the efficiency of the engine. Global Settings Enable/Disable All Symbologies If all symbologies are disabled, the engine can only identify programming barcodes. -
Page 58: Code 128
** Enter Setup Code 128 Restore Factory Defaults Restore the Factory Defaults of Code 128 Enable/Disable Code 128 ** Enable Code 128 Disable Code 128 Exit Setup... -
Page 59: Set Length Range For Code 128
** Enter Setup Set Length Range for Code 128 The engine can be configured to only decode Code 128 barcodes with lengths that fall between (inclusive) the minimum and maximum lengths. The supported maximum length is 255 characters. If minimum length is set to be greater than maximum length, the engine only decodes Code 128 barcodes with either the minimum or maximum length. -
Page 60: Ucc/Ean-128
** Enter Setup UCC/EAN-128 Restore Factory Defaults Restore the Factory Defaults of UCC/EAN-128 Enable/Disable UCC/EAN-128 ** Enable UCC/EAN-128 Disable UCC/EAN-128 Decode as Code 128 Exit Setup... -
Page 61: Set Length Range For Ucc/Ean-128
** Enter Setup Set Length Range for UCC/EAN-128 The engine can be configured to only decode UCC/EAN-128 barcodes with lengths that fall between (inclusive) the minimum and maximum lengths. The supported maximum length is 255 characters. If minimum length is set to be greater than maximum length, the engine only decodes UCC/EAN-128 barcodes with either the minimum or maximum length. -
Page 62: Aim 128
** Enter Setup AIM 128 Restore Factory Defaults Restore the Factory Defaults of AIM 128 Enable/Disable AIM 128 Enable AIM 128 ** Disable AIM 128 Decode as Code 128 Exit Setup... -
Page 63: Set Length Range For Aim 128
** Enter Setup Set Length Range for AIM 128 The engine can be configured to only decode AIM 128 barcodes with lengths that fall between (inclusive) the minimum and maximum lengths. The supported maximum length is 255 characters. If minimum length is set to be greater than maximum length, the engine only decodes AIM 128 barcodes with either the minimum or maximum length. -
Page 64: Restore Factory Defaults
** Enter Setup EAN-8 Restore Factory Defaults Restore the Factory Defaults of EAN-8 Enable/Disable EAN-8 ** Enable EAN-8 Disable EAN-8 Transmit Check Digit EAN-8 is 8 digits in length with the last one as its check digit used to verify the integrity of the data. ** Transmit EAN-8 Check Digit Do Not Transmit EAN-8 Check Digit Exit Setup... -
Page 65: Add-On Code
** Enter Setup Add-On Code An EAN-8 barcode can be augmented with a two-digit or five-digit add-on code to form a new one. In the examples below, the part surrounded by blue dotted line is an EAN-8 barcode while the part circled by red dotted line is add-on code. -
Page 66: Add-On Code Required
** Enter Setup Add-On Code Required This parameter is only valid when Enable 2-Digit Add-On Code and/or Enable 5-Digit Add-On Code is selected. EAN-8 Add-On Code Required ** EAN-8 Add-On Code Not Required EAN-8 Extension Disable EAN-8 Zero Extend: Transmit EAN-8 barcodes as is. Enable EAN-8 Zero Extend: Add five leading zeros to decoded EAN-8 barcodes to extend to13 digits. -
Page 67: Restore Factory Defaults
** Enter Setup EAN-13 Restore Factory Defaults Restore the Factory Defaults of EAN-13 Enable/Disable EAN-13 ** Enable EAN-13 Disable EAN-13 Transmit Check Digit EAN-13 is 13 digits in length with the last one as its check digit used to verify the integrity of the data. ** Transmit EAN-13 Check Digit Do Not Transmit EAN-13 Check Digit Exit Setup... -
Page 68: Add-On Code
** Enter Setup Add-On Code An EAN-13 barcode can be augmented with a two-digit or five-digit add-on code to form a new one. In the examples below, the part surrounded by blue dotted line is an EAN-13 barcode while the part circled by red dotted line is add-on code. -
Page 69: Add-On Code Required
** Enter Setup Add-On Code Required This parameter is only valid when Enable 2-Digit Add-On Code and/or Enable 5-Digit Add-On Code is selected. EAN-13 Add-On Code Required ** EAN-13 Add-On Code Not Required Exit Setup... -
Page 70: Issn
** Enter Setup ISSN Restore Factory Defaults Restore the Factory Defaults of ISSN Enable/Disable ISSN Enable ISSN ** Disable ISSN Decode as EAN-13 Exit Setup... -
Page 71: Isbn
** Enter Setup ISBN Restore Factory Defaults Restore the Factory Defaults of ISBN Enable/Disable ISBN Enable ISBN ** Disable ISBN Decode as EAN-13 Exit Setup... -
Page 72: Set Isbn Format
** Enter Setup Set ISBN Format ** ISBN-13 ISBN-10 Exit Setup... -
Page 73: Upc-E
** Enter Setup UPC-E Restore Factory Defaults Restore the Factory Defaults of UPC-E Enable/Disable UPC-E ** Enable UPC-E Disable UPC-E Transmit Check Digit UPC-E is 8 digits in length with the last one as its check digit used to verify the integrity of the data. ** Transmit UPC-E Check Digit Do Not Transmit UPC-E Check Digit Exit Setup... -
Page 74: Add-On Code
** Enter Setup Add-On Code A UPC-E barcode can be augmented with a two-digit or five-digit add-on code to form a new one. In the examples below, the part surrounded by blue dotted line is a UPC-E barcode while the part circled by red dotted line is add-on code. -
Page 75: Add-On Code Required
** Enter Setup Add-On Code Required This parameter is only valid when Enable 2-Digit Add-On Code and/or Enable 5-Digit Add-On Code is selected. UPC-E Add-On Code Required ** UPC-E Add-On Code Not Required Transmit System Character The first character of UPC-E barcode is the system character. ** Do Not Transmit System Character Transmit System Character Exit Setup... -
Page 76: Upc-E Extension
** Enter Setup UPC-E Extension Disable UPC-E Extend: Transmit UPC-E barcodes as is. Enable UPC-E Extend: Extend UPC-E barcodes to make them compatible in length to UPC-A. Convert UPC-E to UPC-A: Extend UPC-E barcodes to make them compatible in format to UPC-A. Enable UPC-E Extend **Disable UPC-E Extend Convert UPC-E to UPC-A... -
Page 77: Upc-A
** Enter Setup UPC-A Restore Factory Defaults Restore the Factory Defaults of UPC-A Enable/Disable UPC-A ** Enable UPC-A Disable UPC-A Decode as EAN-13 Exit Setup... -
Page 78: Transmit Check Digit
** Enter Setup Transmit Check Digit UPC-A is 13 digits in length with the last one as its check digit used to verify the integrity of the data. ** Transmit UPC-A Check Digit Do Not Transmit UPC-A Check Digit Transmit Preamble Character Preamble characters (Country Code and System Character) can be transmitted as part of a UPC-A barcode. -
Page 79: Add-On Code
** Enter Setup Add-On Code A UPC-A barcode can be augmented with a two-digit or five-digit add-on code to form a new one. In the examples below, the part surrounded by blue dotted line is a UPC-A barcode while the part circled by red dotted line is add-on code. -
Page 80: Add-On Code Required
** Enter Setup Add-On Code Required This parameter is only valid when Enable 2-Digit Add-On Code and/or Enable 5-Digit Add-On Code is selected. UPC-A Add-On Code Required ** UPC-A Add-On Code Not Required Exit Setup... -
Page 81: Interleaved 2 Of 5
** Enter Setup Interleaved 2 of 5 Restore Factory Defaults Restore the Factory Defaults of Interleaved 2 of 5 Enable/Disable Interleaved 2 of 5 ** Enable Interleaved 2 of 5 Disable Interleaved 2 of 5 Exit Setup... -
Page 82: Check Digit Verification
** Enter Setup Check Digit Verification A check digit is optional for Interleaved 2 o 5 and can be added as the last digit. It is a calculated value used to verify the integrity of the data. Disable: The engine transmits Interleaved 2 of 5 barcodes as is. Do Not Transmit Check Digit After Verification: The engine checks the integrity of all Interleaved 2 of 5 barcodes to verify that the data complies with the check digit algorithm. -
Page 83: Set Length Range For Interleaved 2 Of 5
** Enter Setup Set Length Range for Interleaved 2 of 5 The engine can be configured to only decode Interleaved 2 of 5 barcodes with lengths that fall between (inclusive) the minimum and maximum lengths. The supported maximum length is 255 characters. If minimum length is set to be greater than maximum length, the engine only decodes Interleaved 2 of 5 barcodes with either the minimum or maximum length. -
Page 84: Restore Factory Defaults
** Enter Setup ITF-6 ITF-6 is a special kind of Interleaved 2 of 5 with a length of 6 characters and the last character as the check character. Restore Factory Defaults Restore the Factory Defaults of ITF-6 Enable/Disable ITF-6 By default, ITF-6 is decoded as Interleaved 2 of 5. Disable ITF-6 Enable ITF-6 But Do Not Transmit Check Digit Enable ITF-6 and Transmit Check Digit... -
Page 85: Restore Factory Defaults
** Enter Setup ITF-14 ITF-14 is a special kind of Interleaved 2 of 5 with a length of 14 characters and the last character as the check character. Restore Factory Defaults Restore the Factory Defaults of ITF-14 Enable/Disable ITF-14 By default, ITF-14 is decoded as Interleaved 2 of 5. Disable ITF-14 Enable ITF-14 But Do Not Transmit Check Digit Enable ITF-14 and Transmit Check Digit... -
Page 86: Deutsche 14
** Enter Setup Deutsche 14 Restore Factory Defaults Restore the Factory Defaults of Deutsche 14 Enable/Disable Deutsche 14 By default, Deutsche 14 is decoded as Interleaved 2 of 5. Disable Deutsche 14 Enable Deutsche 14 But Do Not Transmit Check Digit Enable Deutsche 14 and Transmit Check Digit Note: It is advised not to enable Deutsche 14 unless necessary, because Deutsche 14, ITF-14 and Interleaved 2 of 5 use the same encoding method and enabling them at the same time can easily cause confusion with... -
Page 87: Deutsche 12
** Enter Setup Deutsche 12 Restore Factory Defaults Restore the Factory Defaults of Deutsche 12 Enable/Disable Deutsche 12 By default, Deutsche 12 is decoded as Interleaved 2 of 5. Disable Deutsche 12 Enable Deutsche 12 But Do Not Transmit Check Digit Enable Deutsche 12 and Transmit Check Digit Note: It is advised not to enable Deutsche 12 unless necessary, because Deutsche 12, ITF-12 and Interleaved 2 of 5 use the same encoding method and enabling them at the same time can easily cause confusion with... -
Page 88: Matrix 2 Of 5 (European Matrix 2 Of 5)
** Enter Setup Matrix 2 of 5 (European Matrix 2 of 5) Restore Factory Defaults Restore the Factory Defaults of Matrix 2 of 5 Enable/Disable Matrix 2 of 5 ** Enable Matrix 2 of 5 Disable Matrix 2 of 5 Exit Setup... -
Page 89: Check Digit Verification
** Enter Setup Check Digit Verification A check digit is optional for Matrix 2 of 5 and can be added as the last digit. It is a calculated value used to verify the integrity of the data. Disable: The engine transmits Matrix 2 of 5 barcodes as is. Do Not Transmit Check Digit After Verification: The engine checks the integrity of all Matrix 2 of 5 barcodes to verify that the data complies with the check digit algorithm. -
Page 90: Set Length Range For Matrix 2 Of 5
** Enter Setup Set Length Range for Matrix 2 of 5 The engine can be configured to only decode Matrix 2 of 5 barcodes with lengths that fall between (inclusive) the minimum and maximum lengths. The supported maximum length is 255 characters. If minimum length is set to be greater than maximum length, the engine only decodes Matrix 2 of 5 barcodes with either the minimum or maximum length. -
Page 91: Industrial 25
** Enter Setup Industrial 25 Restore Factory Defaults Restore the Factory Defaults of Industrial 25 Enable/Disable Industrial 25 ** Enable Industrial 25 Disable Industrial 25 Exit Setup... -
Page 92: Check Digit Verification
** Enter Setup Check Digit Verification A check digit is optional for Industrial 25 and can be added as the last digit. It is a calculated value used to verify the integrity of the data. Disable: The engine transmits Industrial 25 barcodes as is. Do Not Transmit Check Digit After Verification: The engine checks the integrity of all Industrial 25 barcodes to verify that the data complies with the check digit algorithm. -
Page 93: Set Length Range For Industrial 25
** Enter Setup Set Length Range for Industrial 25 The engine can be configured to only decode Industrial 25 barcodes with lengths that fall between (inclusive) the minimum and maximum lengths. The supported maximum length is 255 characters. If minimum length is set to be greater than maximum length, the engine only decodes Industrial 25 barcodes with either the minimum or maximum length. -
Page 94: Standard 25
** Enter Setup Standard 25 Restore Factory Defaults Restore the Factory Defaults of Standard 25 Enable/Disable Standard 25 ** Enable Standard 25 Disable Standard 25 Exit Setup... -
Page 95: Check Digit Verification
** Enter Setup Check Digit Verification A check digit is optional for Standard 25 and can be added as the last digit. It is a calculated value used to verify the integrity of the data. Disable: The engine transmits Standard 25 barcodes as is. Do Not Transmit Check Digit After Verification: The engine checks the integrity of all Standard 25 barcodes to verify that the data complies with the check digit algorithm. -
Page 96: Set Length Range For Standard 25
** Enter Setup Set Length Range for Standard 25 The engine can be configured to only decode Standard 25 barcodes with lengths that fall between (inclusive) the minimum and maximum lengths. The supported maximum length is 255 characters. If minimum length is set to be greater than maximum length, the engine only decodes Standard 25 barcodes with either the minimum or maximum length. -
Page 97: Code 39
** Enter Setup Code 39 Restore Factory Defaults Restore the Factory Defaults of Code 39 Enable/Disable Code 39 ** Enable Code 39 Disable Code 39 Exit Setup... -
Page 98: Check Digit Verification
** Enter Setup Check Digit Verification A check digit is optional for Code 39 and can be added as the last digit. It is a calculated value used to verify the integrity of the data. Disable: The engine transmits Code 39 barcodes as is. Do Not Transmit Check Digit After Verification: The engine checks the integrity of all Code 39 barcodes to verify that the data complies with the check digit algorithm. -
Page 99: Transmit Start/Stop Character
** Enter Setup Transmit Start/Stop Character Code 39 uses an asterisk (*) for both the start and the stop characters. You can choose whether or not to transmit the start/stop characters by scanning the appropriate barcode below. Transmit Start/Stop Character Do Not Transmit Start/Stop Character Enable/Disable Code 39 Full ASCII The engine can be configured to identify all ASCII characters by scanning the appropriate barcode below. -
Page 100: Set Length Range For Code 39
** Enter Setup Set Length Range for Code 39 The engine can be configured to only decode Code 39 barcodes with lengths that fall between (inclusive) the minimum and maximum lengths. The supported maximum length is 255 characters. If minimum length is set to be greater than maximum length, the engine only decodes Code 39 barcodes with either the minimum or maximum length. -
Page 101: Codabar
** Enter Setup Codabar Restore Factory Defaults Restore the Factory Defaults of Codabar Enable/Disable Codabar ** Enable Codabar Disable Codabar Exit Setup... -
Page 102: Check Digit Verification
** Enter Setup Check Digit Verification A check digit is optional for Codabar and can be added as the last digit. It is a calculated value used to verify the integrity of the data. Disable: The engine transmits Codabar barcodes as is. Do Not Transmit Check Digit After Verification: The engine checks the integrity of all Codabar barcodes to verify that the data complies with the check digit algorithm. -
Page 103: Start/Stop Character
** Enter Setup Start/Stop Character Transmit Start/Stop Character Do Not Transmit Start/Stop Character ** ABCD/ABCD as the Start/Stop Character ABCD/TN*E as the Start/Stop Character abcd/abcd as the Start/Stop Character abcd/tn*e as the Start/Stop Character Exit Setup... -
Page 104: Set Length Range For Codabar
** Enter Setup Set Length Range for Codabar The engine can be configured to only decode Codabar barcodes with lengths that fall between (inclusive) the minimum and maximum lengths. The supported maximum length is 255 characters. If minimum length is set to be greater than maximum length, the engine only decodes Codabar barcodes with either the minimum or maximum length. -
Page 105: Code 93
** Enter Setup Code 93 Restore Factory Defaults Restore the Factory Defaults of Code 93 Enable/Disable Code 93 ** Enable Code 93 Disable Code 93 Exit Setup... -
Page 106: Check Digit Verification
** Enter Setup Check Digit Verification Check digits are optional for Code 93 and can be added as the last two digits, which are calculated values used to verify the integrity of the data. Disable: The engine transmits Code 93 barcodes as is. Do Not Transmit Check Digit After Verification: The engine checks the integrity of all Code 93 barcodes to verify that the data complies with the check digit algorithm. -
Page 107: Set Length Range For Code 93
** Enter Setup Set Length Range for Code 93 The engine can be configured to only decode Code 93 barcodes with lengths that fall between (inclusive) the minimum and maximum lengths. The supported maximum length is 255 characters. If minimum length is set to be greater than maximum length, the engine only decodes Code 93 barcodes with either the minimum or maximum length. -
Page 108: Code 11
** Enter Setup Code 11 Restore Factory Defaults Restore the Factory Defaults of Code 11 Enable/Disable Code 11 Enable Code 11 ** Disable Code 11 Exit Setup... -
Page 109: Check Digit Verification
** Enter Setup Check Digit Verification Check digits are optional for Code 11 and can be added as the last one or two digits, which are calculated values used to verify the integrity of the data. If the Disable option is enabled, the engine transmits Code 11 barcodes as is. Disable ** One Check Digit, MOD11 Two Check Digits, MOD11/MOD11... -
Page 110: Set Length Range For Code 11
** Enter Setup Set Length Range for Code 11 The engine can be configured to only decode Code 11 barcodes with lengths that fall between (inclusive) the minimum and maximum lengths. The supported maximum length is 255 characters. If minimum length is set to be greater than maximum length, the engine only decodes Code 11 barcodes with either the minimum or maximum length. -
Page 111: Plessey
** Enter Setup Plessey Restore Factory Defaults Restore the Factory Defaults of Plessey Enable/Disable Plessey Enable Plessey ** Disable Plessey Exit Setup... -
Page 112: Check Digit Verification
** Enter Setup Check Digit Verification Check digits are optional for Plessey and can be added as the last one or two digits, which are calculated values used to verify the integrity of the data. Disable: The engine transmits Plessey barcodes as is. Do Not Transmit Check Digit After Verification: The engine checks the integrity of all Plessey barcodes to verify that the data complies with the check digit algorithm. -
Page 113: Set Length Range For Plessey
** Enter Setup Set Length Range for Plessey The engine can be configured to only decode Plessey barcodes with lengths that fall between (inclusive) the minimum and maximum lengths. The supported maximum length is 255 characters. If minimum length is set to be greater than maximum length, the engine only decodes Plessey barcodes with either the minimum or maximum length. -
Page 114: Msi-Plessey
** Enter Setup MSI-Plessey Restore Factory Defaults Restore the Factory Defaults of MSI-Plessey Enable/Disable MSI-Plessey Enable MSI-Plessey ** Disable MSI-Plessey Exit Setup... -
Page 115: Check Digit Verification
** Enter Setup Check Digit Verification Check digits are optional for MSI-Plessey and can be added as the last one or two digits, which are calculated values used to verify the integrity of the data. If the Disable option is enabled, the engine transmits MSI-Plessey barcodes as is. Disable ** One Check Digit, MOD10 Two Check Digits, MOD10/MOD10... -
Page 116: Set Length Range For Msi-Plessey
** Enter Setup Set Length Range for MSI-Plessey The engine can be configured to only decode MSI-Plessey barcodes with lengths that fall between (inclusive) the minimum and maximum lengths. The supported maximum length is 255 characters. If minimum length is set to be greater than maximum length, the engine only decodes MSI-Plessey barcodes with either the minimum or maximum length. -
Page 117: 105
** Enter Setup RSS-14 Restore Factory Defaults Restore the Factory Defaults of RSS-14 Enable/Disable RSS-14 ** Enable RSS-14 Disable RSS-14 Transmit Application Identifier “01” ** Transmit Application Identifier “01” Do Not Transmit Application Identifier “01” Exit Setup... -
Page 118: Rss-Limited
** Enter Setup RSS-Limited Restore Factory Defaults Restore the Factory Defaults of RSS-Limited Enable/Disable RSS-Limited ** Enable RSS-Limited Disable RSS-Limited Transmit Application Identifier “01” ** Transmit Application Identifier “01” Do Not Transmit Application Identifier “01” Exit Setup... -
Page 119: Rss-Expand
** Enter Setup RSS-Expand Restore Factory Defaults Restore the Factory Defaults of RSS-Expand Enable/Disable RSS-Expand ** Enable RSS-Expand Disable RSS-Expand Exit Setup... -
Page 120: Appendix
Appendix Factory Defaults Table Parameter Factory Default Remark System Settings Barcode Programming Enabled Programming Barcode Data Do not send Scan Mode Manual Mode Manual Mode Decode Session Timeout 1-255s; 0: infinite. Decode Session Timeout 1-255s; 0: infinite. Timeout between Decodes 1.0s 0.0-25.5s Continuous Mode... - Page 121 Parameter Factory Default Remark Communication Interfaces TTL-232 Interface Baud Rate 9600 Parity Check None Number of Data Bits Number of Stop Bits USB Interface USB HID-KBW USB HID-KBW Input Mode Standard Keyboard USB Country Keyboard TypeU.S. Inter-Keystroke Delay No delay Convert Case No Conversion Data Formatting...
- Page 122 Parameter Factory Default Remark Code 128 Enabled Code 128 No less than 1 (including check Minimum Length digit) Maximum Length ( ) UCC/EAN-128 GS1-128 Enabled UCC/EAN-128 No less than 1 (including check Minimum Length digit) Maximum Length AIM 128 Disabled AIM 128 No less than 1 (including check Minimum Length...
- Page 123 Parameter Factory Default Remark UPC-E Enabled UPC-E Transmit Check Digit Disabled 2-Digit Add-On Code Disabled 5-Digit Add-On Code Not required Add-On Code Disabled Extend to UPC-A Do not transmit System Character UPC-A Enabled UPC-A Transmit Check Digit Disabled 2-Digit Add-On Code Disabled 5-Digit Add-On Code Not required...
- Page 124 Parameter Factory Default Remark Matrix 2 of 5 Matrix 2 of 5 Enabled Check Digit Verification Disabled Check Digit Do not transmit No less than 2 (including check Minimum Length digit) Maximum Length Industrial 25 Industrial 25 Enabled Check Digit Verification Disabled Check Digit Do not transmit...
- Page 125 Parameter Factory Default Remark Codabar Codabar Enabled Check Digit Verification Disabled Check Digit Do not transmit Start/Stop Character Transmit Start/Stop Character Format ABCD/ABCD No less than 1 (including check Minimum Length digit) Maximum Length Code 93 Code 93 Enabled Check Digit Verification Enabled Check Digit Do not transmit...
- Page 126 Parameter Factory Default Remark MSI-Plessey MSI-Plessey Disabled Check Digit Verification One check digit, MOD10 Check Digit Do not transmit No less than 2 (including check Minimum Length digit) Maximum Length RSS-14 RSS-14 Enabled AI (Application Identifier) Transmit RSS-Limited RSS-Limited Enabled AI (Application Identifier) Transmit RSS-Expand...
-
Page 127: Aim Id Table
AIM ID Table Symbology AIM ID Remark Code 128 Standard Code 128 UCC/EAN 128 FNC1 is the character right after the start character (GS1-128) AIM 128 FNC1 is the 2nd character after the start character Standard EAN-8 EAN-8 ]E4….]E1… EAN-8 + 2-Digit Add-On Code ]E4….]E2…... - Page 128 Symbology AIM ID Remark One check digit, MOD 7; transmit check digit Transmit barcodes as is; Full ASCII disabled; no check digit verification One check digit, MOD 43; transmit check digit Code 39 One check digit, MOD 43; do not transmit check digit Full ASCII enabled;...
-
Page 129: Code Id Table
Code ID Table Symbology Code ID Code 128 UCC/EAN-128 AIM 128 SETTING 128 EAN-8 EAN-13 ISSN ISBN UPC-E UPC-A Interleaved 2 of 5 ITF-6 ITF-14 Deutsche 14 Deutsche 12 Matrix 2 of 5(European Matrix 2 of 5) Industrial 25 Standard 25 Code 39 Codabar Code 93... -
Page 130: Ascii Table
ASCII Table Char (Null char.) (Start of Header) (Start of Text) (End of Text) (End of Transmission) (Enquiry) (Acknowledgment) (Bell) (Backspace) (Horizontal Tab) (Line Feed) (Vertical Tab) (Form Feed) (Carriage Return) (Shift Out) (Shift In) (Data Link Escape) (XON) (Device Control 1) (Device Control 2) (XOFF) (Device Control 3) (Device Control 4) - Page 131 Char (Request to Send) (Unit Separator) (Space) (Exclamation Mark) " (Double Quote) (Number Sign) (Dollar Sign) (Percent) & (Ampersand) (Single Quote) (Right / Closing Parenthesis) (Right / Closing Parenthesis) (Asterisk) (Plus) (Comma) (Minus / Dash) (Dot) (Forward Slash) (Colon) (Semi-colon) <...
- Page 132 Char > (Greater Than) (Question Mark) (AT Symbol) (Left / Opening Bracket) (Back Slash) (Right / Closing Bracket)
- Page 133 Char (Caret / Circum ex) (Underscore) (Grave Accent) (Left/ Opening Brace) (Vertical Bar) (Right/Closing Brace) (Tilde) (Delete)
-
Page 134: Digit Barcodes
Digit Barcodes 0 ~ 5... - Page 135 6~ 9...
- Page 136 A ~ F...
-
Page 137: Save/Cancel Barcodes
Save/Cancel Barcodes After reading numeric barcode(s), you need to scan the Save barcode to save the data. If you scan the wrong digit(s), you can either scan the Cancel the Last Digit barcode and then the correct digit, or scan the Cancel All Digits barcode and then the digits you want. -
Page 138: F1~F12
F1~F12 When the USB HID-KBW feature is enabled, scanning one of the following barcodes will send the corresponding function key. F1~F6... - Page 139 F7~F12...
Need help?
Do you have a question about the SAVEO-RV2-RCCD and is the answer not in the manual?
Questions and answers