Advertisement
Quick Links
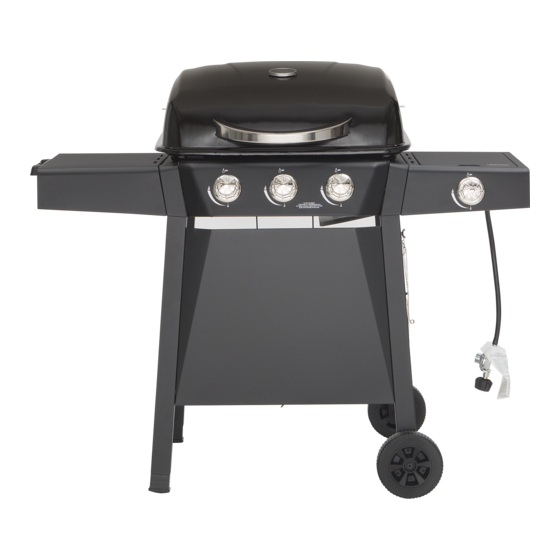
Outdoor LP Gas Barbecue Grill
Model No. GBC1729W series
WARNING
FOR YOUR SAFETY:
1. Do NOT store or use gasoline or
other flammable liquids or vapors in
the vicinity of this or any other
appliance.
2. An LP cylinder not connected for
use shall not be stored in the vicinity
of this or any other appliance.
WARNING
FOR YOUR SAFETY:
For Outdoor Use Only!
DANGER
If you smell gas -
1. Shut off gas to appliance.
2. Extinguish any open flame.
3. Open lid.
4. If odor continues, keep away from
the appliance, immediately call your
gas supplier or your fire department.
Failure to follow these instructions
could result in fire or explosion
which could cause property damage,
personal injury or death.
OWNER'S MANUAL
(outside any enclosure)
Table of Contents
. . . . . . . . . . . . . . . . . . . .
Limited Warranty . . . . . . . . . . . . . . . . . . . . . . . . . . . 5
Assembly Instructions. . . . . . . . . . . . . . . . . . . . . . . . 8
Installing LP Gas Tank. . . . . . . . . . . . . . . . . . . . . . . 13
Operating Instructions. . . . . . . . . . . . . . . . . . . . . . . 14
Cleaning and Care . . . . . . . . . . . . . . . . . . . . . . . . . 16
Troubleshooting . . . . . . . . . . . . . . . . . . . . . . . . . . . 18
The use and installation must conform with local codes or,
in the absence of local codes, with either the National Fuel
Gas Code, ANSI Z223.1/NFPA 54, Natural Gas and Propane
Installation Code, CSA B149.1, or Propane Storage and
Handling Code, B149.2, or the Standard for Recreational
Vehicles, ANSI A 119.2/NFPA 1192, and CSA Z240 RV
Series, Recreational Vehicle Code, as applicable.
This instruction booklet contains important safety
information. Please read and keep for future reference.
If you are assembling this unit for someone else, give
this manual to him or her to read and save for future
reference.
California Proposition 65: Handling the brass material
on this product exposes you to lead, a chemical known
to the State of California to cause cancer, and birth
defects or other reproductive harm. Wash your hands
after handling this product.
WARNING
CALIFONIA PROPOSITION 65
This product can expose you to
chemicals including benzene, which
is known to the State of California to
cause cancer. For more information,
go to www.P65Warnings.ca.gov.
Do not leave this appliance
unattended,especially cooking the
fatty meat and close the lid too long
time.
Manufactured in China for: RevoAce Inc. Limited
Hong Kong, China
1.800.694.0013 • service@revoace.com
9:00 am to 5:00 pm Eastern time, Monday to Friday.
Page 2
GBC1729W-OM-E-F100
Advertisement

Related Manuals for RevoAce GBC1729W Series


Summary of Contents for RevoAce GBC1729W Series
-
Page 1: Table Of Contents
Failure to follow these instructions Manufactured in China for: RevoAce Inc. Limited could result in fire or explosion Hong Kong, China 1.800.694.0013 • service@revoace.com which could cause property damage, 9:00 am to 5:00 pm Eastern time, Monday to Friday. -
Page 2: Important Safeguards
FOR YOUR SAFETY W WARNINGS: 1. Improper installation, adjustment, alteration, service or maintenance can cause injury or property damage. 2. Read the installation, operation, and maintenance instructions thoroughly before installing or servicing this equipment. 3. Failure to follow these instructions could result in fire or explosion, which could cause property damage, personal injury, or death. - Page 3 IMPORTANT SAFEGUARDS W Dented or rusted LP gas cylinders may be hazardous and should be checked by your LP gas supplier prior to use. W LP gas cylinders must be stored outdoors out of the reach of children and must not be stored in a building, garage or any other enclosed area.
- Page 4 IMPORTANT SAFEGUARDS W Do NOT alter grill in any manner. Any alteration will void your warranty. W Do NOT use the grill unless it is COMPLETELY assembled and all parts are securely fastened and tightened. W Do NOT build this model of grill in any built-in or slide-in construction. Ignoring this warning could cause a fire or an explosion that can damage property and cause serious bodily injury or death.
-
Page 5: Limited Warranty
Limited Warranty RevoAce Inc. Limited (“RA”) warrants to the original retail purchaser of this product, and to no other person, that if this product is assembled, maintained, and operated in accordance with the printed instructions accompanying it, then for a period of one (1) year for all remaining parts from the date of purchase, all parts in such product shall be free from defects in material and workmanship. -
Page 6: Expanded View & Hardware
Expanded View... - Page 7 Parts List Warming Rack G1025-010 Regulator / Hose Assembly* B0308-A18 Cooking Grid G1329-010 Right Side Shelf G1329-050 Heat Plate (3) G1203-010 Side Burner Grid B0404-C03 Lid Handle G1205-020 Side Burner G1329-060 Temperature Gauge B0104-JRE Left Cart Frame G1729-040 Lid* G1429-010 Foot (2) G1329-070 Top Hinge (2)*...
-
Page 8: Assembly Instructions
Assembly Instructions Assemble Feet DO NOT RETURN TO PLACE OF PURCHASE. Please have your owner’s manual and model number available for reference. Note: The model number is printed on a label which can be found on the inside door, back or side of the cart assembly. Assembly Tips: 1. - Page 9 Attach Rear Panel Support Attach Cart Frame Support Wire (2) Attach Axle, Wheels and LP Gas Tank Retainer Attach Lid Handle Heat Plate, Handle and Wire Temperature Gauge...
- Page 10 Attach Grill Body Assembly Attach Tool Hook Attach Left Side Shelf Attach Right Side Shelf Note: Leave 5 mm of bolt threads exposed. Note: Leave 5 mm of bolt threads exposed.
- Page 11 Attach Control Knob Bezel and Side Burner Insert Side Burner, Igniter Wire and Side Burner Valve Grid Note: Leave 5 mm of bolt threads exposed. Attach Warming Rack and Control Knobs Insert Heat Plates and Cooking Grid...
- Page 12 Insert Grease Cup Support and Grease Cup...
-
Page 13: Installing Lp Gas Tank
Operating Instructions To operate, you will need one precision-filled standard grill LP gas tank with external valve threads. CAUTION 20 lb W LP gas tank must be properly disconnected and removed prior to moving this grill. 9 Kg 12.2 in. / 31 cm Inserting LP Gas Tank Securing LP Gas Tank Place precision-filled LP gas tank upright into the notches in the right... -
Page 14: Operating Instructions
Operating Instructions Checking for Leaks Figure 1:Main Burners Burner Connections Burner/ Venturi Tube Make sure the regulator hose and valve connections are securely fastened to the burner and the tank. Visually check the connection between the burner/venturi tube and orifice. Make sure the burner/venturi tube fits over the orifice. - Page 15 Operating Instructions (Continued) W CAUTION: If burner flame goes out during operation, immediately turn the control knobs to the “ OFF” position, LP gas tank valve “CLOSED” and open lid to let the gas clear for 5 minutes before re-lighting. Figure 6 Turning Off Flame...
-
Page 16: Cleaning And Care
Operating Instructions (Continued) After lighting, observe the burner flame. Make sure all burner ports are lit and flame height matches illustration (Figure 6). W CAUTION: If burner flame goes out during operation, immediately turn the control knob to the “ OFF” position and LP gas tank valve “CLOSED”... - Page 17 Cleaning and Care (Continued) Figure 8 Clean venturi of each burner with small bottle brush or compressed air. Remove all food residue and dirt from burner surface. Burner Flame Conditions 10. Clean any clogged ports with a stiff wire (such as an opened paper clip). Use this chart to see if your burners need to be 11.
-
Page 18: Troubleshooting
Troubleshooting Problem Possible Cause Prevention/Cure • Make sure regulator is securely attached to the LP gas tank • LP gas tank valve is closed per “Installing LP Gas Tank,” then turn LP gas tank valve to “OPEN” • LP gas tank is low or empty •... - Page 19 Troubleshooting (Continued) Problem Possible Cause Prevention/Cure • Remove and clean all grill parts per “Cleaning and Care” • Grease buildup section Flare-up • Excess fat in meat • Trim fat from meat before grilling • Excessive cooking temperature • Adjust to lower cooking temperature •...
Need help?
Do you have a question about the GBC1729W Series and is the answer not in the manual?
Questions and answers