Table of Contents
Advertisement
Owner's Manual
Instructions for Assembly, Testing, Operation,
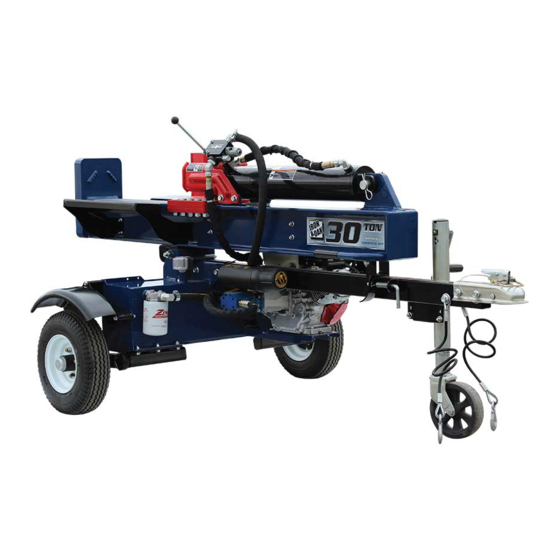
24 & 30 Ton Log Splitters: Outdoor hydraulic powered machine that
READ and UNDERSTAND this manual completely before using log splitter.
All operators of this equipment must read and completely understand all safety information, operating instructions, maintenance
and storage instructions. Failure to properly operate and maintain the log splitter could result in serious injury to the operator and
bystanders from moving parts that can crush or cut, flying objects, burns, fire or explosion, escaping high pressure hydraulic fluid,
or carbon monoxide poisoning in particular, be aware of the following hazards.
Crush and Cut Hazards
Moving parts can crush and cut hands and fingers. Keep hands clear of endplate, wedge, logs, and log dislodger/strippers
while splitting.
High Pressure Hydraulic Fluid Hazards
High fluid pressures and temperatures are developed in hydraulic log splitters. Hydraulic fluid escaping through even a pin-
size hole opening can puncture skin and cause severe blood poisoning. Inspect hydraulic system regularly for possible leaks.
Never check for leaks with your hand while the system is pressurized. Seek medical attention immediately if injured by
escaping fluid.
Fire Hazards
If your log splitter is intended for use near an ignitable forest, brush, or grassy covered land, the engine exhaust should be
equipped with a spark arrestor. See the "Specifications" section of this manual to determine if your splitter already has a spark
arrestor. If not equipped, call Iron & Oak Product Support for ordering information.
Keep a class ABC fire extinguisher with you.
ADD OIL TO ENGINE BEFORE USING: Engine is shipped without oil. DO NOT start log splitter without first adding oil.
ADD HYDRAULIC OIL: Your log splitter was shipped without hydraulic oil. Refer to Periodic Maintenance section of this manual
PRIME THE PUMP: The pump on your log splitter needs to be primed before use. Refer to Initial Setup section for instructions.
INSPECT COMPONENTS: Closely inspect to make sure no components are missing or damaged.
See Initial Unpacking and Set-up for instructions and for whom to contact to report missing or damaged parts.
Any Questions, Comments, Problems or Parts Orders
MBHVH2418A.3
MODELS:
BHVH2418GX
BHVH3018GX
BHVH3018GXT
BHVH3018GXS
Servicing and Storage
for instructions on filling the hydraulic reservoir
Call Iron & Oak Product Support 1-800-817-1005
ITEM NUMBER: __________________
SERIAL NUMBER: ________________
splits wood logs.
WARNING
STOP!
1
Advertisement
Table of Contents

Related Manuals for Iron & Oak BHVH2418GX


Summary of Contents for Iron & Oak BHVH2418GX
- Page 1 MBHVH2418A.3 MODELS: ITEM NUMBER: __________________ BHVH2418GX BHVH3018GX BHVH3018GXT SERIAL NUMBER: ________________ BHVH3018GXS Owner’s Manual Instructions for Assembly, Testing, Operation, Servicing and Storage 24 & 30 Ton Log Splitters: Outdoor hydraulic powered machine that splits wood logs. WARNING READ and UNDERSTAND this manual completely before using log splitter.
-
Page 2: Hazard Signal Word Definitions
Hazard Signal Word Definitions... -
Page 3: Table Of Contents
Table of Contents Hazard Signal Word Definitions ................................2 Table of Contents ....................................... 3 About Your Log Splitter .................................... 4 Safety Label Locations ....................................5 Machine Component Identification ................................7 Initial Setup ........................................ 8 Moving and Towing to the Job Site ................................. 10 Before Each Use –... -
Page 4: About Your Log Splitter
About Your Log Splitter Thank you for purchasing your Iron & Oak log splitter! About Your Log Splitter: This log splitter is a machine designed to split wood logs using a hydraulically powered moving wedge. The log splitter's gasoline engine is used to pressurize the hydraulic system. This log splitter is designed to split logs lengthwise with the grain only. -
Page 5: Safety Label Locations
Splitter Control 778610 Log Splitter Warning 778714 Vertical Lock 797865 787944 Pinch Point Warning 788935 Fuel Fire Explosion 788937 Poisonous Gas BHVH2418GX, 791105 Moving/Towing Instructions BHVH3018GX 789236 Moving/Towing Instructions BHVH3018GXT BHVH2418GX, 791123 Max Towing Speed BHVH3018GX 797158 Made in USA... - Page 6 Safety Label Locations SPLIT CONTROL LEVER OPERATION...
-
Page 7: Machine Component Identification
Machine Component Identification Ref # Description Ref # Description Return Line Filter Engine On/Off Split Control Lever Horizontal Lock End Plate Vertical Lock Beam Jack 2” Ball Coupler Wedge Log Dislodger Safety Cables Cylinder Hydraulic Reservoir Cap Engine Suction Strainer Fuel On/Off... -
Page 8: Initial Setup
Initial Setup IMPORTANT! Engine is shipped without oil. DO NOT start the engine before adding oil. See Assembly Instructions section of this manual on page 37 to assemble the log splitter before setup. Closely inspect all log splitter components. Step One: (See Machine Components section of this manual for diagram of components.) Inspect Log Splitter ... - Page 9 Initial Setup 5. Disconnect the spark plug wire from the spark plug. This prevents the engine from Step Three: starting until the hydraulic pump and cylinder are completely filled with oil. Make Add Hydraulic Oil sure the spark plug wire is held away from the spark plug with string or other to Reservoir nonconductive material.
-
Page 10: Moving And Towing To The Job Site
Moving and Towing to the Job Site WARNING The log splitter is heavy. It can crush and cause serious injury if it rolls out of control or tips over. Follow the instructions below for safely moving and towing the log splitter. Moving the log splitter: Place in Make sure the log splitter is locked in the horizontal position with horizontal... - Page 11 Moving and Towing to the Job Site Towing: 1. Read Review towing safety instructions in your vehicle manual. Instructions 2. Check Make sure tires are fully inflated and in good repair. Tires WARNING: Do not over-inflate tires. Serious injury can occur if tire explodes. ...
- Page 12 Moving and Towing to the Job Site 5. Attach to Hitch Attach log splitter to vehicle hitch. (2" ball) Attach log splitter's coupler to a class 2 or higher hitch with 2" ball (only). Adjust coupler to ball by raising locking lever and turning lock nut with wrench. Proper adjustment is obtained when coupler is as tight as possible on ball and locking lever can still be opened and closed.
- Page 13 Added length. Be aware of the added length of the splitter. Speed limit. Never tow the BHVH2418GX or BHVH3018GX log splitter over 45 mph. Road conditions permitting, the BHVH3018GXT may be towed at up to 55 mph. Faster speeds may result in loss of control.
-
Page 14: Before Each Use - Inspection/Maintenance
Before Each Use – Inspection/Maintenance Step One: Inspect and maintain log splitter before each use If the log splitter has been used previously, it must be inspected and maintained BEFORE EACH SUBSEQUENT USE. WARNING ALWAYS shut off the engine, disconnect the spark plug, and relieve system pressure before inspecting, cleaning, adjusting, or repairing the splitter. - Page 15 Before Each Use – Inspection/Maintenance 5. Hydraulic System Check the hydraulic system carefully: Visually inspect all hoses, tubing, clamps/fittings, pump, and cylinder for cracks, fraying, kinks, or other damage. Check all components for oily residue, which may indicate a leak. Do NOT operate the log splitter if there is any indication of damage or oily residue.
- Page 16 Before Each Use – Inspection/Maintenance 8. Spark Arrestor If the engine is equipped with a spark arrestor muffler, clean and inspect it regularly Muffler (follow spark arrestor manufacturer's service instructions). Replace if damaged. 9. Tires Make sure tires are fully inflated and in good repair if you will be towing the splitter. See tire sidewall for recommended tire pressure.
-
Page 17: Before Each Use - Fueling
Before Each Use – Fueling Step Two: Fueling WARNING Gasoline is highly flammable and explosive. You can be burned or seriously injured when handling fuel. Use extreme care when handling gasoline. 1. Engine Off and The engine must be off and allowed to cool at least two minutes before adding fuel. Cool WARNING: A running engine is hot enough to ignite fuel. -
Page 18: Before Each Use - Work Site Selection And Set-Up
Before Each Use – Work Site Selection and Set-Up Step Three: Work site selection and log splitter setup WARNING It is important to select an appropriate work site and properly set up the log splitter in order to minimize the risk of slips and falls, equipment rolling or tipping over, carbon monoxide poisoning, and accidental fires. -
Page 19: Splitting Operation
Splitting Operation WARNING Before starting this log splitter, review the following instructions and safety information for safe operation of the log splitter. Failure to follow these rules may result in serious injury to the operator or bystanders from moving parts that crush, cut, or entangle from flying objects, burns, fire, falling or tripping, or from carbon monoxide poisoning. - Page 20 Splitting Operation 1. Put on Wear the following protective clothing and safety gear: Protective 1. Eye protection. Always wear safety glasses or goggles when operating the machine. Pieces Clothing / of log may fly out and serious eye injury can occur. Gear 2.
- Page 21 Splitting Operation b) Set to 1. Pull out horizontal lock pin, grasp lifting handle and lift beam until it rotates into vertical Vertical position. Position Crush hazard. The beam is heavy – do not let it just drop. It could crush WARNING: fingers or cause damage to the splitter.
- Page 22 Splitting Operation Load log onto beam with a cut end against the endplate – positioned for a lengthwise cut. 5. Load Log Notes: a) The log splitter is designed only for cutting lengthwise with the grain, NOT for cutting across the grain. b) This log splitter is designed for cutting logs only up to a maximum of 16"...
- Page 23 Splitting Operation 6. Extend Wedge Move Split Control Lever toward endplate to extend wedge and split log. SPLIT CONTROL LEVER OPERATION Operator Position- Horizontal Operator Position- Vertical Important safety instructions: Operator position. ALWAYS operate the log splitter from the manufacturer's indicated OPERATOR POSITION.
- Page 24 Splitting Operation 8. Important If a log does not split completely and becomes stuck on the wedge, follow the instructions below to STUCK LOG remove the log. Procedure A log can become stuck to the wedge if the wedge becomes embedded in the log and the log doesn't split and separate.
-
Page 25: Storage
Storage WARNING Gasoline vapors can ignite and cause a fire. Select a well-ventilated storage away from sources of heat, flame, or sparks. Follow the instructions below for storing your log splitter between uses 1. Retract Wedge Retract the wedge completely to keep the rod protected from corrosion. 2. -
Page 26: Periodic Maintenance
Periodic Maintenance In addition to the maintenance performed with each use, periodic maintenance should also be performed according to the following schedule. WARNING ALWAYS shut off the engine, disconnect the spark plug, and relieve system pressure before cleaning, adjusting, or repairing the splitter. Relieve system pressure by moving Split Control Lever back and forth several times. - Page 27 Periodic Maintenance 7. Reinstall drain plug 2. Hydraulic 8. Remove suction strainer and wipe off debris with a dry cloth. Oil Change 9. Apply thread sealant and reinstall suction strainer (continued) 10. Dispose of used oil at an oil-recycling center. Used hydraulic oil is hazardous waste. 11.
-
Page 28: Troubleshooting
Troubleshooting WARNING Before troubleshooting or attempting to service, read the following safety instructions to avoid serious injury to the operator or bystanders from moving parts that can crush or cut, burns, fire or explosion, or escaping high pressure hydraulic fluid. Important Safety Instructions: 1. -
Page 29: Specifications
Specifications BHVH3018GX BHVH2418GX BHVH3018GXT BHVH3018GXS Splitting Force 24 Ton 30 Ton 30 Ton Maximum Pressure 3500 PSI 3500 PSI 3500 PSI Maximum Flow 11 GPM 16 GPM 16 GPM Hydraulic Tank Capacity 9 Gal 9 Gal 9 Gal Hydraulic Oil System... -
Page 30: Parts Breakdown - Exploded View - Rev A.2
Parts Breakdown – Exploded View – Rev A.2... - Page 31 Parts Breakdown – Exploded View – Rev A.2 Unit Key: A = BHVH2418GX, B = BHVH3018GX, C = BHVH3018GXT, D = BHVH3018GXS Part Description Unit Part Description Unit 30313 .177 x 3 Bridge Cotter Pin 794826R 4-1/2” x 24” Cylinder w/ Decals...
-
Page 32: Summary Of Important Safety Information For Operation
Summary of Important Safety information for Operation WARNING Carefully read and make sure you understand the following safety information before using the log splitter. Improper use or maintenance of the log splitter can result in serious injury to the operator or bystanders from moving parts that can crush or cut, flying objects, burns, fire or explosion, escaping high pressure hydraulic fluid, or carbon monoxide poisoning. - Page 33 Added length. Be aware of the added length of the splitter. Speed Limit. Never tow the BHVH2418GX or BHVH3018GX log splitter over 45 mph. Road conditions permitting, the BHVH3018GXT may be towed at up to 55 mph. Faster speeds may result in loss of control.
- Page 34 Summary of Important Safety information for Operation Do not check for leaks with your hand. Leaks can be located by holding a piece of cardboard or wood (at least two feet long) with your hand at one end and passing the other end near the suspected area (wear eye protection).
- Page 35 Summary of Important Safety information for Operation Safety – During Use General Safety During Use WARNING Before starting this log splitter, review the following rules for safe operation. Failure to follow these rules may result in serious injury to the operator or bystanders. ...
- Page 36 Summary of Important Safety information for Operation Loading/Unloading Unsplit log pile. Do not pile logs to be split in a place that will make you reach across the log splitter in order to load them Hold bark side. Hold the bark side of logs when loading or positioning, never the ends. Never place your hands or any part of your body between a log and any part of the log splitter.
-
Page 37: Assembly Instructions
Assembly Instructions Dismantle shipping crate and remove parts from any boxes. Cut all banding and remove packaging materials from all components. Using this manual, identify and sort components as necessary. CAUTION The bands holding the log splitter and other items in place are under tension and can fly outward when cut. Wear the appropriate personal protective equipment to reduce the risk of injury. - Page 38 Assembly Instructions Parts Bag Contents Part # 82675 1/2-13 x 1-1/4 HHFB Qty: 4 Part # 82672 5/16-18 x 3-1/2 HHFB (BHVH3018GXT only) Qty: 4 Part # 82630 5/16-18 Nylon Lock Flange Nut (BHVH3018GXT only) Qty: 4 Part # 82632 1/2-13 Nylon Lock Flange Nut Qty: 6 Part # 82677...
- Page 39 Assembly Instructions Step 1 – Wheels to Hubs Tools Needed Remove lug nuts from studs 13/16” Socket Slide tire onto hub with valve stem facing out. Ratchet Thread nuts onto studs until hand tight. Tighten the lug nuts in stages. ...
- Page 40 Assembly Instructions Step 2 – Tow Bar Assembly to Axle Assembly Tools Needed Slide tow bar assembly into the beam mount on top of the axle Ratchet Torque Wrench assembly. (If you purchased a light kit for this unit, follow the ...
- Page 41 Assembly Instructions Step 3 – Stand beam upright Tools Needed CAUTION: Beam assembly is top heavy. None Carefully stand beam assembly in vertical position on solid, level ground. Assistance from a second person is required. WARNING Make sure beam assembly is standing on flat, level area. Have another person steady the beam to prevent it from tipping over.
- Page 42 Assembly Instructions Step 4 –Beam Assembly to Axle Assembly Tools Needed Carefully align the axle assembly with the beam assembly. Have a None person hold the beam in place while maneuvering any assembly. Align holes in pivot bracket with holes in bottom of beam. ...
- Page 43 Assembly Instructions Step 5 – Beam rest Tools Needed None Align beam rest with beam rest mounting bracket with the latching face on the valve side of the splitter. Attach to the beam using (2) bolts and (2) nuts. Hand tighten nuts. Do not torque at this time. Fasteners Needed from Parts Bag: Part # 82675 Part # 82632...
- Page 44 Assembly Instructions Step 6 – Block and Rotate Tools Needed Torque Wrench Block the wheels and carefully rotate the beam assembly to the Ratchet horizontal position. 3/4” Socket Adjust beam rest to ensure horizontal latch indeed latches the beam in ...
- Page 45 Assembly Instructions Step 7 – High Pressure Supply Hose Tools Needed Remove plastic plug from pump outlet with pliers (plastic plug is the (2) Adjustable outer most fitting). Wrenches Apply thread sealant to hose threads on only one end of the hose. ...
- Page 46 Assembly Instructions Step 8 –Low Pressure Return Hose Tools Needed Place two hose clamps on the low pressure return hose. 10mm Deep Well Route the low pressure return hose from return filter fitting to valve Socket Ratchet outlet fitting around tow bar and between tow bar and beam assembly.
- Page 47 Assembly Instructions Step 9 – Log Tables Tools Needed Ratchet Insert (2) bolts in lower holes in the beam assembly and install (2) Torque Wrench nuts on bolts leaving them loose enough to install the cradles. 9/16” Socket ...
- Page 48 Assembly Instructions Step 10 – Fenders (shown for BHVH3018GXT) Tools Needed Align holes in fender, fender extender (BHVH3018GXT only), and Torque Wrench fender mounts on axle assembly. Insert (2) bolts and secure with (2) washers (all except the ...
-
Page 49: Available Accessories
Available Accessories Light Kit (Item# 797859) Fits all BHVHxx18 models Engine Guard (Item# 797872) Fits all BHVHxx18 models (standard equipment on BHVH3018GXT) Any Questions, Comments, Problems or Parts Orders Call Iron & Oak Product Support 1-800-817-1005... -
Page 50: Limited Warranty
This limited warranty is in lieu of any other warranty expressed or implied, written or oral and Iron & Oak assumes no other responsibility or liability outside that expressed within this limited warranty. Limited Warranty for Log Splitter Models: BHPCLS1513GC BHH4016GX30 BHVH3018GXT BHH2016GX BHVH2418GX BHVH3414GX BHH3016GX BHVH3018GXS TMH16HYD BHH3016GXF BHVH3018GX... -
Page 51: Product Registration
□ Homeowner □ Commercial □ Rental Application Type: Model (i.e. BHVH2418GX) Serial # (i.e. BHVH2418GXA012345678) Signature: IMPORTANT WARRANTY INFORMATION To activate your Iron & Oak log splitter warranty, please fill out the information in the form below and mail to: Iron &... - Page 52 20195 S. Diamond Lake Rd, Ste 100 Rogers, MN 55374 1-800-350-8739...
Need help?
Do you have a question about the BHVH2418GX and is the answer not in the manual?
Questions and answers