
Subscribe to Our Youtube Channel
Related Manuals for Gigaset E560h


Summary of Contents for Gigaset E560h
- Page 1 E560 Detailed information on the telephone system: User guide of your Gigaset telephone www.gigaset.com/manuals Documentation relating to your base...
-
Page 3: Overview
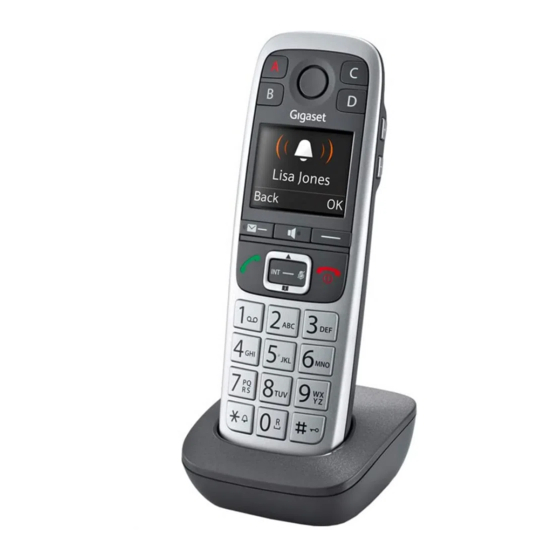
Overview Overview Access to the call and message lists; Flashes: new voice message Display keys ( p. 10) Various functions, depending on the operating situation Talk key Accepting call; selecting displayed number; opening redial list (press and hold); making an external call (press briefly) Flashes: Accepting a call Control key (... -
Page 4: Table Of Contents
Not all functions described in the user guide are available in all countries or from all network providers. Additional information Regarding the telephone system, if the handset is connected to a Gigaset base: User guide for your Gigaset telephone Regarding the telephone system, if the handset is connected to another base:... - Page 5 Illustration in the user guide Warnings, which, if not heeded, can result in injury to persons or damage to devices. Important information regarding function and appropriate handling or functions that could generate costs. Prerequisite for being able to carry out the following action. Additional helpful information.
-
Page 6: Safety Precautions
If you use a medical device (e.g., a pacemaker), please contact the device manufacturer. They will be able to advise you regarding the susceptibility of the device to external sources of high frequency energy (for the specifications of your Gigaset product see "Technical data"). Availability and operation of the functions en fr es may differ on your telephone. -
Page 7: Getting Started
Getting started Getting started Contents of the package • One Gigaset handset Gigaset E560H • Two batteries • One battery cover • One charging cradle • One user guide The charging cradle is designed for use in enclosed, dry rooms within a temperature range of +41 °F to +113 °F. - Page 8 Getting started ¥ ¥ Insert the batteries (for Fit the cover from the top To open the battery cover: ¥ ¥ correct +/- direction, see Push the cover down Then press the cover until it diagram). clicks into place Charging the batteries ¤...
- Page 9 Press the display key Regist. OK . . . an available base is sought . . . if required: enter system PIN (default setting on Gigaset bases: 0000) Registering to another base ¤ . . . Open the menu using the control key...
-
Page 10: Using The Phone
Getting to know your telephone Using the phone Getting to know your telephone Activating/deactivating the handset ¤ Press and hold the end call key (confirmation tone). Activating/deactivating the keypad lock The keypad lock prevents any inadvertent use of the phone. ¤... - Page 11 Getting to know your telephone Volume keys During a call, set the volume for the receiver/headset or speaker or in the case of an incoming call, set the volume of the ringtone (5 levels). ¤ Press the volume keys on the right side of the handset: (louder) / (quieter) Volume:...
- Page 12 Getting to know your telephone The current labelling is displayed after the key number, e.g., ¤ A: <no entry> i.e., the key is not currently labelled. You can now change the labelling. Select a new function using Menu Not all functions may be available, depending on the current assignment.
- Page 13 Getting to know your telephone Menu guidance Your telephone's functions are accessed via a menu consisting of several levels. Main menu (first menu level) ¤ When the handset is in idle status, press the display key Menu to open the main menu. The functions in the main menu are shown by means of an icon and the function's name.
- Page 14 Getting to know your telephone Writing and editing names The following rules apply when writing names: • Each key between is assigned several letters and characters. • Control the cursor with • Characters are inserted at the cursor position. • Press the display key Delete to delete the character to the left of the cursor.
-
Page 15: Making Calls
Making calls Making calls When the display backlight is switched off, pressing any key will activate the backlight. Making an external call External calls are calls to the public telephone network. ¤ Enter the number Press the Talk key briefly ¤... - Page 16 Making calls Calling Line Identification When you receive a call, the caller's number and/or name is displayed on the screen, if the following prerequisites are met. • Your network provider supports CLIP, CLI and CNIP. • CLI (Calling Line Identification): The caller's number is transmitted. •...
- Page 17 Making calls ¤ Press and hold the handsfree key while placing the handset in the charger and for a further 2 seconds. Otherwise, the call is cancelled. For instructions on adjusting the handsfree volume p. 29. Muting You can deactivate your handset’s microphone during a call. Mute Press the display key to mute the handset.
-
Page 18: Lists
Lists Transferring an external call: You have two options to transfer the call: ¤ Wait until the participant called answers, then hang up: Press the End call key ¤ Hang up before the participant answers: Press the End call key If the participant called does not answer or does not transfer the call, end the consultation call with Back. - Page 19 Lists Missed calls list Prerequisite: CLIP ( p. 14) Your telephone saves the last 60 missed calls. Opening the list of missed calls ¤ Missed Calls The list is displayed as follows: Missed Calls: Number of new messages + number of old, read messages. 01+02 Press the display key to open the list.
- Page 20 Lists Displaying CNIP information If you have requested CNIP, you can view the name and town that are registered for this phone number with your network provider. Select a list entry. ¤ Menu Show Name If the name and town are not shown, it means that the caller has not requested Calling Line Iden- tification or that Calling Line Identification has been withheld.
-
Page 21: Directory
Directory Missed calls ¤ Press the Message key Missed Calls . . . missed calls are listed (further informa- tion p. 17) New calls on the network mailbox are only displayed correctly if your network provider transmits this information (see user guide for your provider’s network mailbox). Directory You can create a directory for your own individual handset. - Page 22 Directory Managing directory entries Select an entry. Editing entries ¤ Menu Edit Entry (Change number if required) (Change name if required) Using other functions The following functions can be selected with Menu ¤ Show Number Show number. ¤ Delete Entry Delete selected entry.
-
Page 23: Using The Network Mailbox
Using the network mailbox Using the network mailbox The network mailbox is the answer machine in your provider's telephone network. More infor- mation is available from your provider. You cannot use the network mailbox unless you have requested it from your provider. -
Page 24: Emergency Function
Emergency function Emergency function Your handset is equipped with four additional keys (direct dial keys ). The direct dial can be assigned a special emergency function ("emergency key"). You can use this to request emergency assistance from friends or neighbours. The emergency function must be set up first ( p. - Page 25 Emergency function The police, ambulance service or fire service must not be used for an emergency call. Initially setting up the emergency function If you have already assigned the key for the direct dial, you must first delete this number ( p.
- Page 26 Emergency function Activating/deactivating the emergency function ¤ Menu Settings Emergency Function Activation OK ( = on) . . . the key is illuminated Please note that if the emergency function is activated, the standby time of the handset will reduce. If you have activated the Eco Mode+ ( p.
-
Page 27: Further Functions
Using the handset as an alarm clock Further functions Using the handset as an alarm clock Activating/deactivating the alarm clock The time is set p. 41). ¤ Menu Alarm Clock Activation OK ( = on) After you activate the alarm clock, the menu for setting the wakeup time opens automatically. Setting the wakeup time ¤... -
Page 28: One Touch Call
One touch call If you accept an incoming call, the baby monitor mode is suspended for the duration of the call, but the function remains activated. The baby monitor mode is not deactivated by switching the handset off and on again. The handset should be positioned 3 to 6 ft away from the baby. -
Page 29: Torch/Flashlight
Torch/Flashlight ¤ Call Target: Enter or change the number that you wish to dial. The activated One Touch Call appears on the idle display. The saved number is dialled by pressing any key. Press the End call key to cancel dialling. Ending one touch call mode ¤... -
Page 30: Handset Settings
Handset settings Handset settings Setting the date and time ¤ Menu Settings Date / Time ¤ to enter the month, day and year in 8-digit format, e. g. for April 1st 2019. ¤ to enter hours and minutes in 4-digit format, e.g. for 07:15 Changing the display language You can view the display texts in different languages. - Page 31 Handset settings Changing the call volume You can set the handsfree volume and the earpiece volume to five different levels (1–5; e.g., volume 3 = ¤ Menu Settings Audio / Visual Signals Call Volume Earpiece Volume / Handsfree Volume Set the volume Setting the volume during a call: p.
- Page 32 Handset settings The ringer cannot be re-activated while a call is in progress. ¤ Deactivating the ringer permanently: Press and hold the star key ..the icon appears in the display ¤ Reactivating the ringer: Press and hold the star key ¤...
- Page 33 Handset settings Changing the name of the handset The base automatically specifies a name for the handset. You can change this name. ¤ . . . the list of registered handsets is displayed Select handset Name Enter name Restoring the handset default settings You can reset any individual settings and changes that you have made.
-
Page 34: Appendix
Questions and answers Appendix Questions and answers Possible solutions are available online at www.gigaset.com/service In addition, the following overview provides troubleshooting assistance. The display is blank. • The handset is not switched on: Press and hold the End call key •... -
Page 35: Innovation, Science And Economic Development Canada - Certification
Innovation, Science and Economic Development Canada - Certification You hear a tone during the call • The batteries are empty Charge the batteries ( p. 13) Forgotten system PIN • Reset the system PIN to 0000 ( p. 7) Error tone sounds after system PIN prompt •... -
Page 36: Fcc / Acta Information
FCC / ACTA Information FCC / ACTA Information Warning: Changes or modifications to this unit not expressly approved by Gigaset Communications USA LLC could void the FCC authority to operate the equipment. This includes the addition of any external antenna device. -
Page 37: Safety Precautions
Safety precautions Consult the dealer or an experienced radio TV technician for help. Notice for Direct Inward Dialing ("DID") ALLOWING THIS EQUIPMENT TO BE OPERATED IN SUCH A MANNER AS TO NOT PROVIDE FOR PROPER ANSWER SUPERVISION IS A VIOLATION OF PART 68 OF THE FCC‘S RULES. Notice to Hearing Aid Wearers: This phone system is compatible with inductively coupled hearing aids. - Page 38 Safety precautions 12 Unplug the product from the wall outlet and refer servicing to qualified service personnel under the following conditions: a.) When the power cord is damaged or frayed. b.) If liquid has been spilled into the product. c.) If the product has been exposed to rain or water. d.) If the product does not operate normally by following the operating instructions.
-
Page 39: Service (Customer Care)
God, riots, acts of terrorism, spills of food or liquids, viruses or other software flaws introduced into the Product or other acts which are not the fault of Gigaset NAM and which the Product is not specified to tolerate, including damage caused by mishandling or blown fuses. - Page 40 GIGASET NAM MAY VOID WARRANTY. 4. WARRANTY CLAIM PROCEDURE All warranty claims must be made by notifying Gigaset NAM prior to the expiration of the warranty period. Gigaset NAM's obligation to provide warranty support shall not extend past the end of the warranty period, except that any product repaired or replaced during the warranty period shall continue to be warranted for the balance of such warranty period or thirty (30) days, whichever is greater.
- Page 41 Ontario and the federal laws of Canada applicable therein, and exclude the United Nations Convention on Contracts for the International Sale of Goods. If you want to learn more about Gigaset Service or for Support on your Gigaset phone, visit our web site at www.gigaset.com or please call...
-
Page 42: Manufacturer's Advice
Data protection We at Gigaset take the protection of our customers’ data very seriously. It is precisely for this reason that we are ensuring all our products feature "Privacy by Design" as standard. All information we collect is used to make our products as good as possible. - Page 43 Manufacturer's advice Contact with liquid Your handset is splash proof. If it comes into contact with water, knock the water out of the microphone opening and remove any water on the handset with an absorbent cloth. Your handset is ready for use. If your handset comes into contact with a larger amount of liquid take the following steps: Unplug all cables from the device.
-
Page 44: Specifications
Specifications Specifications Batteries Technology: Nickel-metal-hydride (NiMH) Size: AAA (Micro, HR03) Voltage: 1.2V Capacity: 750 mAh The device is supplied with two approved batteries. Handset operating times/charging times The operating time of the telephone depends on the capacity of the battery, its age and the way it is used. - Page 45 Specifications Characters Standard characters 1x 2x 3x 4x 5x 6x 7x 8x 9x 10x 11x 12x 13x 14x 15x 1 £ $ ¥ ¤ a b c 2 ä á à â ã ç d e f 3 ë é è ê g h i ï...
-
Page 46: Index
Index Index ......37 Customer Care Activating ......30 advisory tones . - Page 47 Index ......18 message key ....... . 1 on/off key .
- Page 48 Index .......4 ... 22 Power adapter Setting up the emergency function .
- Page 49 Issued by Gigaset Communications GmbH Frankenstr. 2a, D-46395 Bocholt © Gigaset Communications GmbH 2019 Subject to availability. All rights reserved. Rights of modification reserved. www.gigaset.com...
Need help?
Do you have a question about the E560h and is the answer not in the manual?
Questions and answers