IKEA Kulinarisk Manual
Hide thumbs
Also See for Kulinarisk:
- Manual (84 pages) ,
- Installation instructions manual (64 pages) ,
- Recipe book (57 pages)
Table of Contents
Advertisement
Quick Links
Advertisement
Table of Contents

Related Manuals for IKEA Kulinarisk


Summary of Contents for IKEA Kulinarisk
- Page 1 KULINARISK...
- Page 2 ENGLISH Please refer to the last page of this manual for the full list of IKEA appointed After Sales Service Provider and relative national phone numbers.
- Page 3 ENGLISH...
-
Page 4: Table Of Contents
Technical data Before first use Energy efficiency Daily use Environmental concerns Clock functions IKEA guarantee Automatic programmes Using the accessories Subject to change without notice. Safety information Before the installation and use of the appliance, carefully read the supplied instructions. The manufacturer is not responsible if an incorrect installation and use causes injuries and damage. - Page 5 ENGLISH Keep children and pets away from the appliance when it • operates or when it cools down. Accessible parts may become hot during use. If the appliance has a child safety device, it should be • activated. Children shall not carry out cleaning and user maintenance •...
-
Page 6: Safety Instructions
ENGLISH Safety instructions Installation Ventilation opening 560x20 mm Warning! Only a qualified person minimum size. Open‐ must install this appliance. ing placed on the bot‐ tom rear side • Remove all the packaging. • Do not install or use a damaged Mains supply cable 1500 mm appliance. - Page 7 ENGLISH • Do not pull the mains cable to disconnect – do not put aluminium foil directly on the appliance. Always pull the mains plug. the bottom of cavity of the appliance. • Use only correct isolation devices: line – do not put water directly into the hot protecting cut-outs, fuses (screw type appliance.
-
Page 8: Installation
ENGLISH • Replace immediately the door glass • Use only lamps with the same panels when they are damaged. Contact specifications. the Authorised Service Centre. Service • Be careful when you remove the door from the appliance. The door is heavy! •... -
Page 9: Product Description
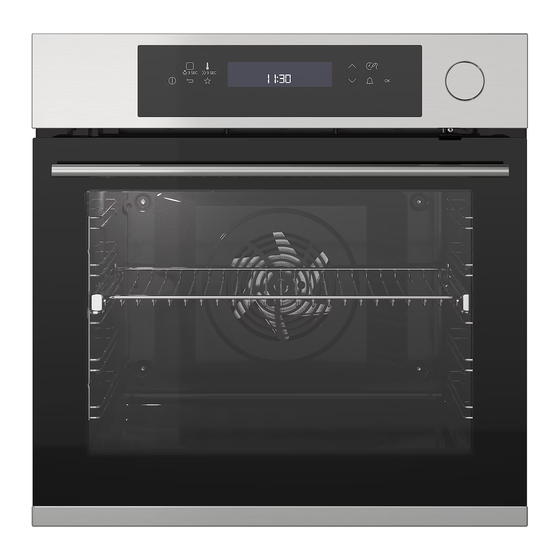
ENGLISH Product description General overview Control panel Electronic programmer Water drawer Socket for the core temperature sensor Grill Lamp Rating plate Steam generator with cover Shelf support, removable Shelf positions Accessories For absorbing the remaining water from the steam generator. •... - Page 10 ENGLISH Symbol Function Comment Heating Functions Press once to enter to the Heating Functions Menu. or Assisted Cook‐ Press again to switch to Assisted Cooking. To turn on or off the light, press for 3 seconds. Back key To go back one level in the menu. To show the main menu, press the symbol for 3 seconds.
-
Page 11: Before First Use
ENGLISH Symbol Function Time of day The display shows the current time. Duration The display shows the necessary time for cooking. End Time The display shows when the cooking time is complete. Temperature The display shows the temperature. Time Indication The display shows how long the heat‐... -
Page 12: Daily Use
ENGLISH Using the Mechanical child lock 2. Open the door. Close the oven door without pulling the child The oven has the child lock installed. It is on lock. the right side of the oven, below the control To remove the child lock, open the oven door panel. - Page 13 ENGLISH Symbol / Menu Description Symbol / Menu Description item item When ON, the display Resets all settings to shows the current time factory settings. Time Indication Factory Settings when you deactivate the appliance. Heating Functions To set a function and Heating function Application activate it later with a...
- Page 14 ENGLISH Heating function Application Heating function Application To bake and roast food This function is de‐ on one shelf position. signed to save energy during cooking. For the Conventional Moist Fan Baking cooking instructions re‐ Cooking fer to "Hints and tips" To bake pizza.
- Page 15 ENGLISH Heating function Application Heating function Application To roast larger meat To defrost food (vege‐ joints or poultry with tables and fruit). The bones on one shelf po‐ defrosting time de‐ Turbo Grilling Defrost sition. To make gratins pends on the amount and to brown.
-
Page 16: Clock Functions
ENGLISH The steam appears after approximately 2 that the temperature increases. When minutes. When the oven reaches the set temperature is reached the buzzer sounds 3 temperature, the signal sounds. times and the bar flashes and then disappears. When the steam generator is empty, the signal sounds. -
Page 17: Automatic Programmes
You can find the recipes for the automatic programmes specified for this oven on the website www.ikea.com. To find the proper Recipe Book check the article number on the rating plate on the front frame of the oven cavity. -
Page 18: Using The Accessories
ENGLISH Assisted Cooking 3. Select the category and dish. Press confirm. This oven has a set of recipes you can use. 4. Select a recipe. Press to confirm. The recipes are fixed and you cannot change them. 1. Turn on the oven. 2. -
Page 19: Additional Functions
ENGLISH Core temperature sensor 3. Turn on the oven. The display shows the core temperature There are two temperatures to be set: the sensor symbol. oven temperature and the core temperature. 4. Press in less than 5 seconds to set The core temperature sensor measures the the core temperature. - Page 20 ENGLISH You can overwrite a memory position. When Set + Go the display shows the first free memory The function lets you set a heating function position, press and press (or a programme) and use it later with one overwrite an existing programme. press of any symbol.
-
Page 21: Hints And Tips
ENGLISH • Night brightness - when the oven is of the oven cool. If you turn off the oven, the turned off, the brightness of the display is cooling fan can continue to operate until the lower between 10 PM and 6 AM. oven cools down. - Page 22 ENGLISH Food Temperature (°C) Time (min) Shelf position Plaited bread / bread 170 - 190 40 - 50 crown Cake with crumble top‐ 160 - 170 20 - 40 ping (dry) Biscuits made with 160 - 170 20 - 40 yeast dough Moist Fan Baking - recommended accessories...
-
Page 23: Care And Cleaning
For additional cooking tables please refer to cavity. the Recipe Book which you can find on the website www.ikea.com. To find the proper Care and cleaning is damaged. Contact an Authorised Service Warning! Refer to Safety Centre. - Page 24 ENGLISH 3. Touch any symbol to turn off the signal. 2. Fully press the clamping levers (A) on the 4. Wipe out the appliance with a soft cloth. two door hinges. Remove the water from the steam generator. Let the appliance dry fully with the door open for approximately 1 hour.
-
Page 25: Troubleshooting
ENGLISH One of the hinge-arms (normally Warning! Danger of the right one) is free to move. electrocution! Disconnect the fuse Make sure, that both hinge-arms before you replace the lamp. are in the same position The lamp and the lamp glass (approximately 70°... -
Page 26: Technical Data
ENGLISH Problem Possible cause Remedy The display shows F111. The plug of the core temper‐ Put the plug of the core tem‐ ature sensor is not correctly perature sensor as far as installed into the socket. possible into the socket. The display shows an error There is an electrical fault. -
Page 27: Energy Efficiency
50 Hz Number of functions Energy efficiency Product Information and Product Information Sheet* Supplier's name IKEA Model identification KULINARISK 304.168.23 Energy Efficiency Index 94.5 Energy efficiency class Energy consumption with a standard load, convention‐ 0.93 kWh/cycle al mode Energy consumption with a standard load, fan-forced 0.69 kWh/cycle... -
Page 28: Environmental Concerns
If service work is carried out under guarantee, this will not This guarantee is valid for 5 years from the extend the guarantee period for the original date of purchase of your appliance appliance. at IKEA. The original sales receipt is required... - Page 29 IKEA. • The use of the appliance in a non- What will IKEA do to correct the problem? domestic environment i.e. professional use. IKEA appointed service provider will examine •...
- Page 30 The IKEA guarantee gives you specific legal Please refer to the last page of this manual rights, which covers or exceed local for the full list of IKEA appointed contacts demands. However these conditions do not and relative national phone numbers.
- Page 31 Hétköznap 8.00 és 17.00 óra között 0900 - 235 45 32 ma-vr: 8.00 - 21.00 Nederland Geen extra kosten. (0900-BEL IKEA) zat: 9.00 - 21.00 Luxembourg 0031 - 50 316 8772 Alleen lokaal tarief. zon / pub. vakantie: 10.00 - 18.00...
- Page 32 21552 © Inter IKEA Systems B.V. 2021 AA-2048871-3...
Need help?
Do you have a question about the Kulinarisk and is the answer not in the manual?
Questions and answers