
Related Manuals for Reliable BRIO 400CC


Summary of Contents for Reliable BRIO 400CC
- Page 1 BRIO 400CC MULTIPURPOSE STEAM CLEANER INSTRUCTION MANUAL GUIDE D’UTILISATION SYSTEME D’ASPIRATEUR MANUAL DE INSTRUCCIONES LIMPIADOR A VAPOR...
- Page 2 ENGLISH FRANÇAIS ESPAÑOL For immediate help with your purchase, please give us a call so that we can resolve your issue. We can be reached toll-free at 1-800-268-1649 or email support@reliablecorporation.com...
- Page 3 THE BRIO 400CC MULTIPURPOSE STEAM CLEANER INSTRUCTION MANUAL ENGLISH...
- Page 4 RELIABLE. RIGHT THERE WITH YOU. At Reliable, we do what we love, and take pride in doing it right. You want what’s best for the people, places and things that matter in your life – from where you live to what you wear. So do we. From the start, we approach every product with a craftsman’s attention...
- Page 5 FOR FUTURE REFERENCE READ ALL INSTRUCTIONS BEFORE USE When using your Brio 400CC steam cleaner, basic safety precautions should always be followed. Please read the following instructions carefully as they provide important information concerning how to install, use and care for this product.
- Page 6 / damaged. • All repairs, including the replacement of the power cord, must only be carried out by Reliable corporation or technicians authorized by Reliable. • This appliance has been designed for domestic use only and may not be used for commercial or industrial purposes.
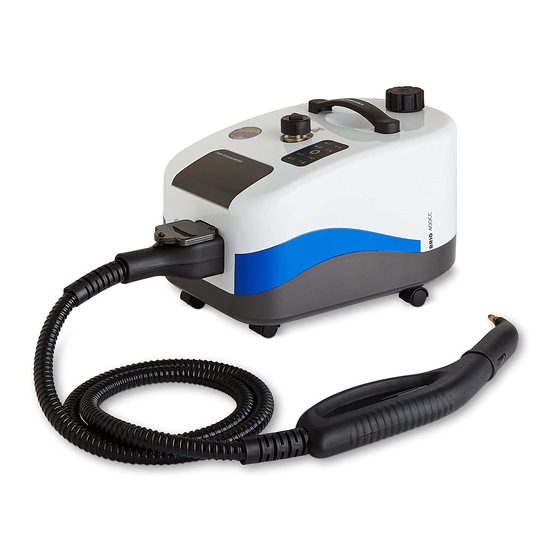
- Page 7 BRIO 400CC KEY FEATURES Main Unit: 1. Main body 2. Water tank cap 3. Carrying Handle 4. Pressure release valve 5. Barometry Accessories: 10. Control handle 11. Extension Rods x2 12. Window wiper 13. Floor brush...
-
Page 9: Safety Regulations
SAFETY REGULATIONS • Please ensure that the voltage shown on the rating plate matches that of your socket prior to connect the steam cleaner to your mains power supply. • Only connect the appliance to a proper grounded socket. • The appliance’s plug must fit into the socket. - Page 10 SET UP (Click) (Click) (Click) (Click) (Click) (Click) (Click)
- Page 11 1. Open the shutter, gently push the steam hose until the shutter can be locked. Refer to A. 2. Please note that extension tubes can be connected to any accessories for your needs. Please refer I to assembly. Cleaning tiled, sealed and hardwood floors 1.
- Page 12 OPERATION & DISPLAY INSTRUCTIONS Please make sure the steamer is filled with water before switch on. (Switch) Switch on the device When this symbol is illuminated, the power has been turned on. (Operation button) When this symbol is illuminated, the Push the button device is starting to heat up.
- Page 13 ( ) Pressure Guage When this symbol is illuminated, the pressure is up to 5Bar and steamer is ready. Before beginning, remove condensed water and moisture from the hose by pressing the steam trigger for approximately 15 seconds. To do this, press the switch on the control handle;...
- Page 14 When this symbol is illuminated, the steamer has engaged into the overheating protection warning. If the temperature inside of the unit is too high, please stop using the steamer and allow it to cool down before continuing. When this symbol is illuminated, it means water tank is running out of water.
- Page 15 Attention: When the pressure inside of steamer is more than 6 Bar, please do not open the valve cap. (Pressure release valve) Please push the steam release trigger after use to release the steam before switching off the unit. (operation button) (Push the button to release the rest of steam)...
-
Page 16: Pressure Release Valve
WARNING Always ensure before cleaning or maintaining the steam cleaner that it is switched off and unplugged from the main power supply. Only clean the appliance by wiping over the housing with a lightly moistened cloth. Do not use any cleaning agents, abrasives or alcohol since they may damage the housing. -
Page 17: Parts Diagram
PARTS DIAGRAM... -
Page 18: Spare Parts
SPARE PARTS All accessories such as the floor nozzle, acessory adaptor, nylon brush nozzle metal brush nozzle may be ordereed subsequently as spare parts. Number Part Name Handle Panel Handle Handle locking screw Kettle lid Seal ring of kettle Shell Indicator board Pressure relief valve Lock nut... - Page 19 Number Part Name Main power switch Outlet socket Low pressure airway Copper tube of pressure guage Copper water inlet pipe PCB protection case Upper support cover of water pump Water pump PCB control board Water pump lower support cover Solenoid valve Solenoid valve package Lower shell of machine Universal wheel...
- Page 20 Number Part Name PCB lifting screw Power cord Cooling fan Cooling fan screw Main relay board Kettle bracket Water level detection line Kettle Return pipe Water inlet hose Thermostat Lower protective shell of boiler Blowdown nut Thermal insulation cotton Upper shell of boiler Thermocouple Thermal fuse Boiler...
- Page 21 Reliable on an exchange basis, and will be either new or refurbished to be functionally equivalent to new. If Reliable is unable to repair or replace a Reliable Boiler Tank, it will refund the current value of that Reliable Boiler Tank at the time the warranty claim is made.
- Page 22 Reliable on an exchange basis, and will be either new or refurbished to be functionally equivalent to new. If Reliable is unable to repair or replace a Reliable Product, it will refund the current value of that Reliable Product at the time the warranty claim is made.
- Page 23 C O N T A C T U S We can be reached toll free at 1-800-268-1649 or email us at support@reliablecorporation.com 1 800 268 1649 www.reliablecorporation.com...
Need help?
Do you have a question about the BRIO 400CC and is the answer not in the manual?
Questions and answers
New will not build steam pressure
The Reliable BRIO 400CC may not be building steam pressure due to several possible reasons:
1. Water Tank is Empty – If the water tank is out of water, the steamer will not generate steam. Check if the water tank needs refilling.
2. Overheating Protection Activated – If the unit is too hot, it may have engaged the overheating protection. Allow the unit to cool down before resuming use.
3. Condensed Water in Hose – If moisture is trapped in the hose, it may prevent proper steam flow. Press the steam trigger for about 15 seconds to remove moisture.
4. Faulty or Damaged Appliance – If the appliance is faulty or damaged, it may not function correctly. Repairs should only be carried out by Reliable or authorized technicians.
5. Pressure Release Valve Issue – If the pressure release valve is not functioning properly, it may prevent pressure from building up.
Check these factors to identify and resolve the issue.
This answer is automatically generated